background image


1-877-98SCOUT 

Worldscout Corporation 

Page 7 of 11 

1-877-987-2688 

www.omniscout.com


omniscout Quick Start Guide.doc 


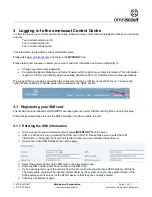
3  Logging in to the omniscout Control Centre 

In order to access your omniscout account online, where you may adjust and set individual functions you will need 
to know: 
 

Your omniscout Account ID 


Your omniscout User ID 


Your omniscout Password  

 
This information is provided by either mail and/or email. 
 
Please visit 

www.omniscout.com

 and click on the 

MYSCOUT

 icon.   

 
Please take a few minutes to review your account and user information and more importantly to: 


Change your temporary password 


Complete the Secret Question and Secret Answer which is part of your User information. This information 
is used to confirm your identity when requesting assistance from our Customer Service Representatives. 

 
We suggest that you begin by consulting the online User Guide by clicking on the HELP menu. You have the 
option of downloading a printable guide, also available in the HELP section. 


3.1  Registering your SIM card 

Clients who have purchased a GSM/GPRS coverage option as part of their Monitoring Plan can skip this step. 
 
Follow these simple steps to enter the SIM information and then update the unit: 
 

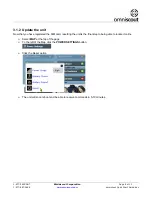
3.1.1  Entering the SIM information 


¾

  Once signed into your omniscout account select 

INVENTORY

 from the menu 

¾

  Click to edit the unit you are placing the SIM card in. NOTE: Please make sure to enter the SIM 

information in the proper omniscout unit (serial number) you are interested in setting up. 

¾

  Scroll down to the SIM Details section of the page. 

¾


¾

  Select the cellular Carrier of the SIM card in the drop down menu. 

¾

  Enter the SIM number and Phone number of the SIM Card. 

¾

  If you have selected one of the carriers from the list, make sure that the three APN fields are left blank. 

The appropriate values will be inserted automatically by the system once you have clicked Save. If the 
SIM requires specific values for the APN make sure that they are correctly entered. 

¾

  Click Save at bottom of page. 


Summary of Contents for LT200

Page 1: ...TARTED 3 2 1 Your own SIM card 4 2 1 1 SIM card requirements 4 2 1 2 Installing the GSM GPRS SIM Card 4 2 2 Charging the battery 5 2 3 Powering Up the omniscout unit 6 3 LOGGING IN TO THE OMNISCOUT CONTROL CENTRE 7 3 1 Registering your SIM card 7 3 1 1 Entering the SIM information 7 3 1 2 Update the unit 8 3 2 omniscout Control Centre Functions 9 3 3 The Settings Page 10 3 3 1 How to use the Setti...

Page 2: ...100 Leek Crescent Unit 10 Richmond Hill Ontario Canada L4B 3E6 This device complies with Part 15 of the FCC Rules Operation is subject to the following two conditions 1 This device may not cause harmful interference and 2 This device must accept any interference received including interference that may cause undesired operation FCC Radiation Exposure Statement This equipment complies with FCC RF r...

Page 3: ...eir own SIM card and therefore will also need to insert the GSM GPRS SIM Card Accessing omniscout functions is done via the omniscout Control Centre an easy to use internet based interface You will need a PC with internet access no additional software is required Microsoft Internet Explorer version 5 5 or greater or FireFox web browser is sufficient to run the omniscout Control Centre This Quick S...

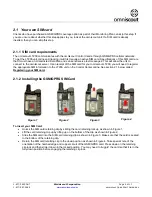
Page 4: ...he SIM card for your omniscout LT200 you will need to register the appropriate SIM information to the LT200 unit on the Control Center online See section 2 1 below called Registering your SIM card 2 1 2 Installing the GSM GPRS SIM Card To insert your SIM Card Unlock the SIM card retaining clip by sliding the card retaining lock up as shown in Figure 1 Lift the card retaining clip up by lifting up ...

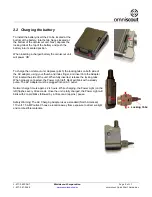
Page 5: ...on both side of the AC adapter using your thumb and index finger and insert into the Adapter Port located the side of the unit When fully inserted release the locking tabs When properly connected the Power Light left Red will blink with a steady pulse The AC Adapter must be plugged into an AC outlet Normal charge time is approx 2 4 hours While charging the Power Light on the left flashes every 30 ...

Page 6: ...ght will also blink but not as frequently The GSM GPRS and GPS lights will blink in a specific pulse pattern rapid blinks followed by a pause to confirm that the unit is properly communicating The GSM GPRS flashes twice followed by a pause when the SIM connects to the network and 3 times followed by a pause when it is connected to our server GPS flashes every 2 seconds when it has a GPS fix To tur...

Page 7: ... menu You have the option of downloading a printable guide also available in the HELP section 3 1 Registering your SIM card Clients who have purchased a GSM GPRS coverage option as part of their Monitoring Plan can skip this step Follow these simple steps to enter the SIM information and then update the unit 3 1 1 Entering the SIM information Once signed into your omniscout account select INVENTOR...

Page 8: ...1 2 Update the unit Now that you have registered the SIM card resetting the unit is the final step to being able to locate it online Select MAP at the top of the page To the left of the Map click the POWER SETTINGS button Click the Reset option The unit will soon reboot and be able to receive commands in 5 10 minutes ...

Page 9: ...rned OFF In addition to turning functions ON or OFF the MAP page is where you can review a History of all communication activities Tracking Location Alarm Events etc History Reports allow you to choose what time period days months that you would like to review If you own more than 1 omniscout you can include as many vehicles as you wish to be included in the same report We urge you to review the o...

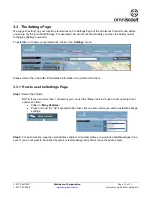
Page 10: ...s click on the Settings menu Please refer to the online HELP for detailed information on omniscout functions 3 3 1 How to use the Settings Page Step 1 Select the Vehicle NOTE If you own more than 1 omniscout you can use the Many Vehicles button to set up more than 1 vehicle at a time Click on Many Vehicles Press and hold the ctrl keyboard button then click on each vehicle you wish to establish cha...

Page 11: ...click on the button to turn notifications ON or OFF Step 4 Turn the function ON Note Low Battery and Personal Alert are always ON You are simply telling the omniscout that you or anyone you choose would like to be notified and where the Alert Notifications should be sent Step 5 Please remember to Click Here To Save Changes Settings Dashboard Overview ...

Reviews: