


Omnia-3 Quick-Start Setup Guide
We know that you're probably in a hurry to get on the air with your new Omnia-3. If you have technical
expertise and previous knowledge of audio processor fundamentals, using the following Eight-Point Quick-Start
procedure will get you up and running as quickly as possible. Please refer to the remainder of the Operating
Guide for additional information.
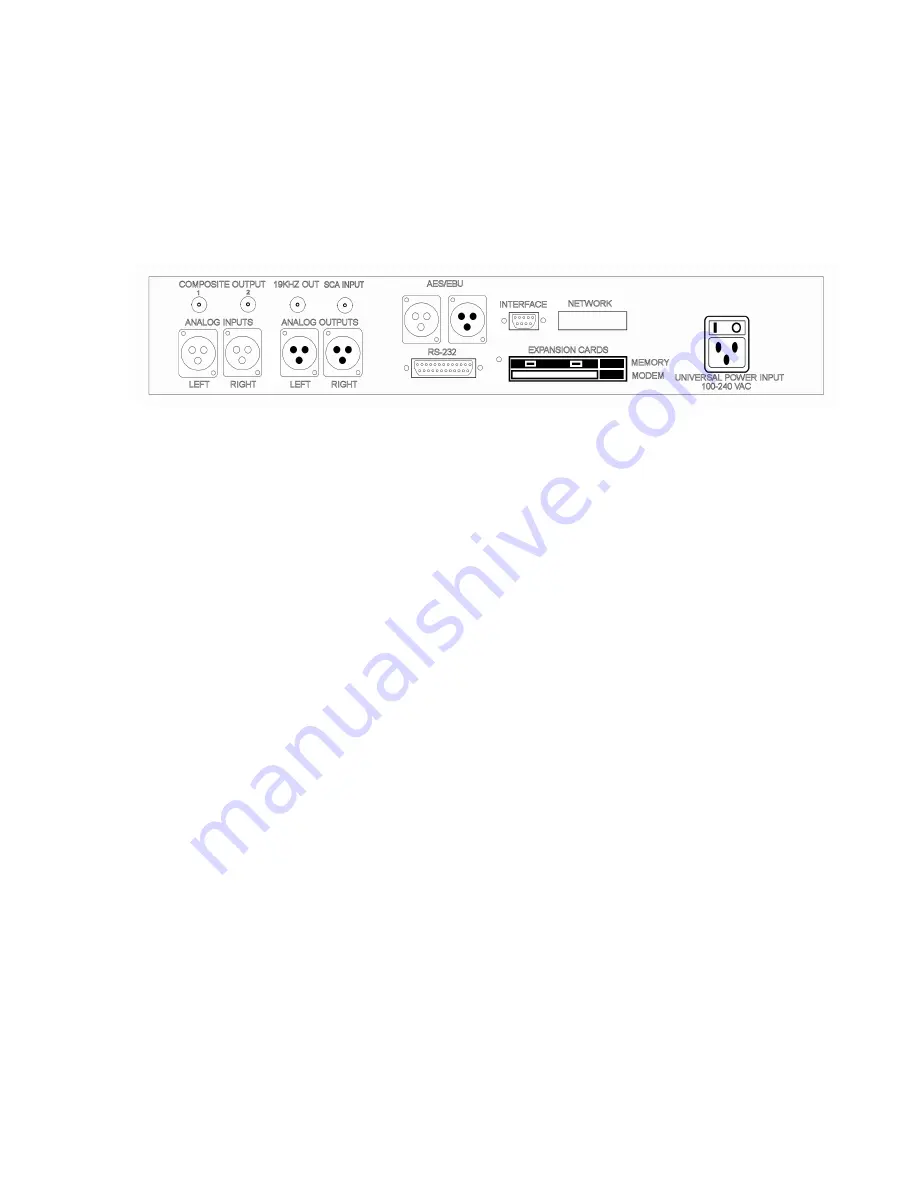
Refer to the following drawing for the location of the various connectors associated with the installation:
Omnia-3 Rear Panel View
1.
Make sure the Omnia-3 PC Memory Card and optional Modem Card (if ordered) are installed into the
correct card slots on the back panel and are fully seated. Installation or removal of cards must be done with the
power
off
unless directed otherwise. The Memory Card
must
be in the top slot, and the Modem in the bottom.
2.
Install the Omnia-3 in the equipment rack using at least two rack screws. If only two screws are used, they
MUST be in the bottom holes of the rack ears!
3.
Connect AC power to the unit, and turn on power using the rear-panel power switch.
4.
Connect the audio inputs that are appropriate for your installation and provide normal program audio to the
Omnia-3.
5.
Navigate to the
Input & Output
menu by rotating the jog-wheel until
Input & Output
is highlighted and
then “click” (push in on the jog-wheel) to enter that menu. Navigate to
Input Source
, click, and select either
the Analog or AES/EBU input. Press the front panel push-button once to switch to the metering screen. If your
audio source is providing an audio feed you should see meter activity on the I/O and Process meters. Rotating
the jog-wheel switches between the I/O and Process bargraph screens. Turn it left for the I/O meters and right
for the Processing gain-reduction bargraphs.
6.
Turn the Jog-Wheel to the left to display the I/O metering screen. Observe the input meters (
L In
and
R In
)
and adjust the controls in the
Input Levels
menu until the input meters are peaking up to about -15dB (or a little
higher) with normal program audio. Each press of the front panel push-button will switch between the selected
metering screen and the menu screen where the input level controls are.
7.
Connect the audio outputs that are appropriate for your installation.
8. If you are using the Analog or Digital XLR audio outputs, navigate to the
Input & Output
Menu and adjust
the controls in the
Output Levels
menu to the correct peak level for the equipment that follows the Omnia-3. If
you are using the Composite MPX Outputs (fm Turbo style only), navigate to the
Stereo Generator
Menu and
adjust the
Composite 1
or
Composite 2
output levels as appropriate for the STL transmitter or Exciter following
the Omnia-3.
You’re now ready to go on the air!
Note that the Omnia-3 is shipped with the Rock preset as the default. While leaning toward the competitive
side, it provides a rich and balanced sound - a good starting point for nearly every format. Remember that our
preset names do not necessarily mean that the preset is useful for
only
the formats to which the name refers.
Feel free to experiment!
11


