background image

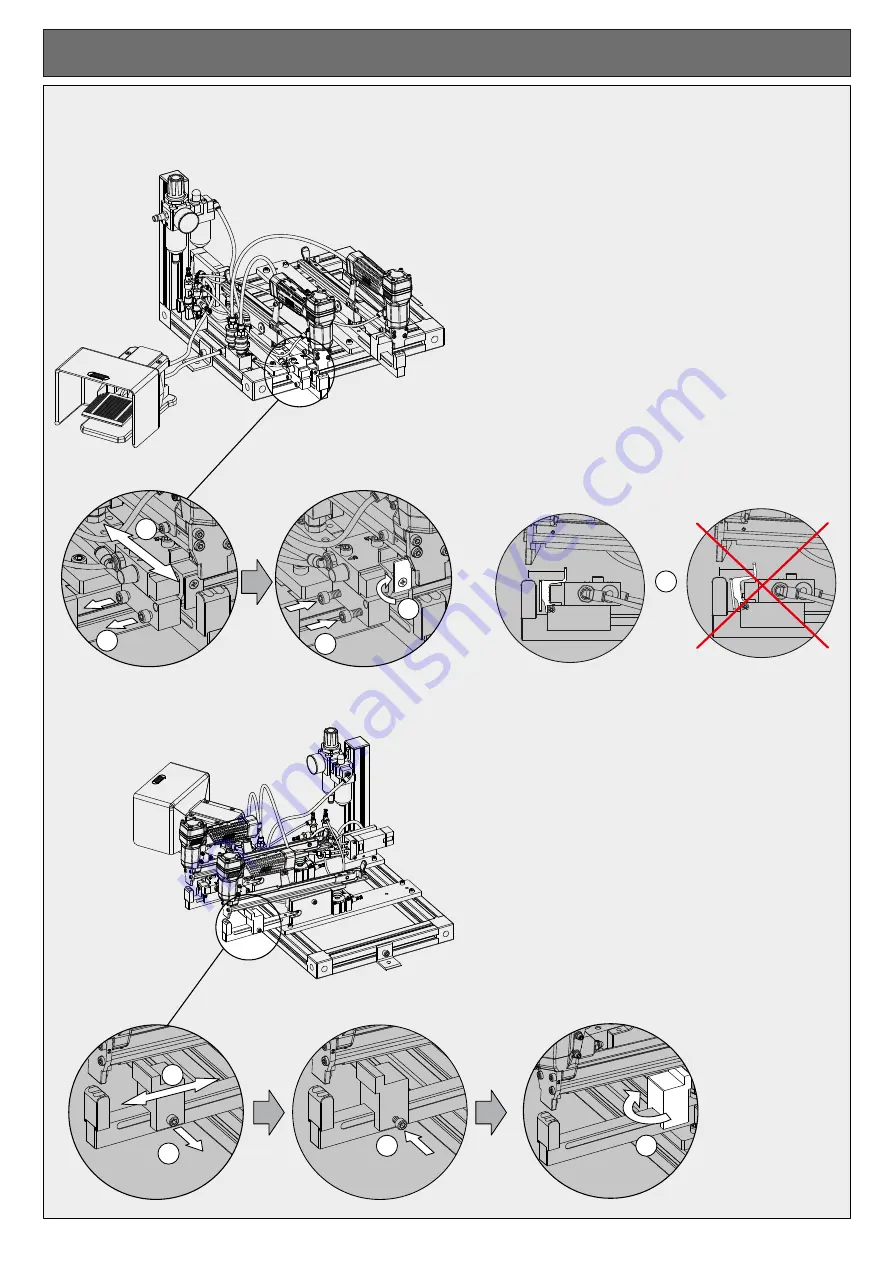
The distance from the edge is determined by the adjustment of the spacerssituated on the two staplers.


 1 - Losen the screws.     


- 14 -

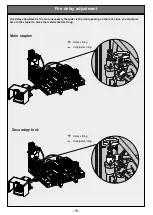
Main stapler:

 2 - Slide the spacer along the guide until required 
      position.     


 3 - Tighteen the screws.     


 4 - When necessary rotate the plate for usage at 
      short distance from the edge.     


 5 - The spacer function is performed by the control 
      lever, therefore the spacer must be adjusted 
      while keeping the control lever pressed.      


 1 - Losen the screw.     


Secondary tool:

 2 - Slide the spacer along the guide until required 
      position.     


 3 - Tighteen the screw.    


 4 - When necessary you may invert the spacer, to 
      achieve the largest distance from edge.     


How  to  set  stapling  position

Adjustment of distance from the edge :

3

4

d

5

d

2

1

3

4

1

2

Summary of Contents for 80.16 ROC2

Page 1: ... Frame with aluminium profile easy to fix upon working surface Possibility to fix 1 or 2 staples at time Safe operations final release through pedal valve INTRODUCTION Magazine capacity 2 strip Easy jam clearing Pneumatic system complete with FRL unit and manometer for a correct power Working pressure 5 5 6 5 bar 80 95 PSI Applicable size 6 to 16 mm Front side opening Adjustments Interax between t...

Page 2: ...lve for feeding secondary stapler Anvil Timer Pneumatic valve Magazine 2 strips capacity Slide valve for feeding main stapler Silenced rear exhaust Adjusting of clinching depth Closing clinching speed regulator on main stapler Fire delaying regulator on secondary stapler Opening clinching speed regulator on main stapler Fire delaying regulator on main stapler Clinching speed regulator on secondary...

Page 3: ...lay adjustment 18 Introduction 1 Index 4 Installation 10 Operating modes Single mode 11 Settings to do in sequence Stapling position 13 14 Dual mode 12 Clinching depth 15 INDEX Accessories O Rings 26 Spare parts list 27 Spare parts Tool frame 24 25 Maintenance Spare parts 22 Spare parts pneumatic tool 80 16 ROC C 23 Tool return after firing 19 Loading 20 Jam clearing 21 4 ...

Page 4: ...lt in safety to enable them to withstand even unusual stresses in excess of those set in this manual The best quality materials have been used and they have been accurately tested on arrival during storage and while being processed in the workshop for damage wear or malfunctioning A 2 Safety measures the machine is not in use the stapler needs to undergo servicing or repairs Never forget that the ...

Page 5: ...kage that all parts work properly and especially that the safety system is perfectly efficient Also make sure that the machine is clean and lubricated B 3 Servicing Information on the use of the stapler The tacker must always be supplied at a pressure within the range indicated on the Data Sheet table A higher pressure than the one suggested by the manufacturer increases the stress to which it is ...

Page 6: ...some internal parts do not submerse it in water or other liquids D 3 Inspections and repairs Before connecting the gun to the compressed air system always check that the trigger and safety catch are perfectly efficient Never use the machine unless these safety arrangements work to perfection In order to assure the safety and reliability of OMER guns maintenance and repairs must be carried out by s...

Page 7: ... kg Sound pressure at the workstation Emitted sound power Usable lenghts mm Weight lbs Working pressure psi Air consumption ft shot 3 6 16 270 5 5 6 5 0 68 79 dB A 84 dB A 1 4 5 8 80 95 0 0240 15 40 33 95 Suitable staple series 80 6 16 1 4 5 8 11 4 0 65x0 95 Crown 500 1 2 Thickness 025 Width 037 Gauge 21 staple Stapling results 98 06 standard supplied ...

Page 8: ...data Main tool all measures are expressed in mm Max 18 Min 2 150 5 6 105 5 27 5 15 5 43 Min 0 5 Max 10 Max 18 Min 2 150 5 6 142 5 27 5 15 5 43 Min 0 5 Max 10 303 min 60 Max 254 73 491 340 146 400 440 Secondary tool ...

Page 9: ...l suitable for pneumatic devices in the lubricator 1 Fix the frame to the working surface through the 2 brakets 3 Connect the compressed air to the unit 4 Adjust pressure at 6 bar by acting on the regulating knob 10 3 4 1 1 ...

Page 10: ...the istructions 1 Close the ball valve 1 Press the pedal and keep it pressed while working This operation activates all devices 2 Insert the material to be fastened by pressing against the control lever wich will activate the tool a b 2 Close the slide valve by closing you will notice a brief air flow 11 This mode can be activated only on the main tool Operating Mode Operating Modes Singole Mode b...

Page 11: ...you have made all necessary asjustments for a safe and correct usage 1 Press the pedal and keep it pressed while working This operation activates all devices 2 Insert the material to be fastened by first pressing it against the spacer in the secondary stapler and only later by pressing it against the control lever of the main stapler wich automaticallycontrol lever wich automatically make both too...

Page 12: ...e frame 13 1 Loose the screws to release the plate 2 Force the plate along the frame until required position 3 Tighteen the screws How to set stapling position Setting of interaxis between staples Adjustment of distance from edge Setting of interaxis between staples a a a a 2 ...

Page 13: ...usage at short distance from the edge 5 The spacer function is performed by the control lever therefore the spacer must be adjusted while keeping the control lever pressed 1 Losen the screw Secondary tool 2 Slide the spacer along the guide until required position 3 Tighteen the screw 4 When necessary you may invert the spacer to achieve the largest distance from edge How to set stapling position A...

Page 14: ...crew the bumper to increase dicrease the opening For safety reason it is important that the opening be only slightly larger than the thickness of the material to be fastened A front side opening adjustment must be carried out to allow an easy insertion of the material to be fastened Disconnect the air before proceeding with any adjustment 4 Tighteen the nut 2 4 3 1 ...

Page 15: ...ing damaging the material to be fastened it is possible to set the clinching depth by adjusting the end run screw 2 Screw or unscrew the end run screw to adjust the clinching depth 3 Tighteen the locking nut 1 2 3 16 Disconnect the air before proceeding with any adjustment max 10 mm min 0 5 mm ...

Page 16: ...ning speed To decrease opening speed 1 2 This adjustment allows you to set the most comfortable working speed An excess of speed identifiable in too sudden movements of the stapler may lead to early wearing out To increase clinching speed To decrease clinching speed To increase opening speed To decrease opening speed 1 2 1 2 2 1 ...

Page 17: ...firing Anticipates firing Fire delay adjustment 18 Fire delay adjustment is the more necessary the wider is the front opening on the tool since you must give time to the stapler to block the material before firing Main stapler Secondary tool ...

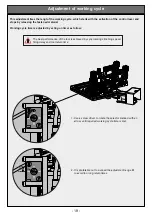
Page 18: ...aterial Working cycle time is adjusted by acting on timer as follow 0 1 Use a screw driver to rotate the selector marked with an arrow until required working cycle time is met 0 R 2 It is preferable not to exceed the adjustment range R to avoid too long return times The best performance of the tool is achieved by syncronizing clinching speed firing delay and tool return time ...

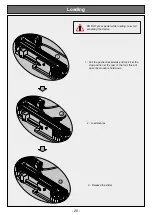
Page 19: ...staples 3 Release the slider DO NOT press pedal while loading to avoid activating the device 1 Pull the pusher backwards and lock it at the stop position at the rear of the tool this will open the movable hold down 1 2 3 ...

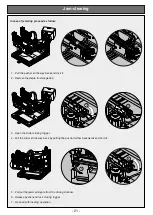
Page 20: ...sher all the way back and lock it 4 Pull the slider all the way back by pulling the pusher further backwards and hold it 3 Open the slider closing trigger 6 Release pusher and lock closing trigger 5 Pull out the jammed staple from the driving channel 7 Proceed with loading operation 21 1 2 3 4 6 5 ...

Page 21: ...Spare parts 22 ...

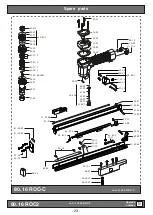
Page 22: ...cod 21560ROC C 80 16 ROC C 04 35 25 04 39 00 22 07 28 00 20 00 24 00 00 14 00 14 17 31 4 03 00 66 03 66 03 03 30 50 06 1 17 30 5 55 06 1 00 13 00 04 54 04 91 08 52 02 50 03 00 06 05 12 2 98 02 08 00 1Z 08 16 6Z 91 05 80 81 00 80 04 20 04 16 04 12 04 10 72 13 91 05 73 00 52 05 66 09 02 63 05 80 04 10 93 07 64 05 71 05 80 80 09 04 25 03 04 5 77 11 74 08 04 12 64 05 4 90 83 4 98 06 ...

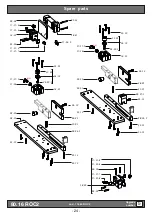
Page 23: ...31 8 17 37 7 17 34 8 17 31 8 18 50 98 01 05 20 92 03 98 04 98 05 2 06 20 98 03 05 25 17 38 18 02 05 30 06 19 06 00 3 17 37 2 32 05 05 20 98 01 05 20 92 03 98 04 98 05 2 06 20 98 03 05 25 17 38 18 02 05 30 06 19 06 00 3 17 37 2 32 05 05 20 98 07 1 05 12 80 16 ROC2 5 cod 11560ROC2 B V B V Upgrade number ...

Page 24: ...6 17 34 2 17 31 4 17 31 6 18 24 08 16Z 06 20 05 30 05 16Z 06 20 06 20 06 20 98 20 18 24 18 34 1 A 18 25 1 17 31 8 25 Spare parts UPGRADE NUMBER INDICE DI MODIFICA NIVEAU DE MODIFICATION INDICADOR DE MODIFICA SERIAL NUMBER MATRICOLA MATRICULE MATRICULA 17 31 4 80 16 ROC2 5 Connetion tubes ø4 Ø6 cod 11560ROC2 A C B V A C B V Upgrade number ...

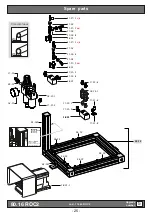
Page 25: ... 35 O Ring O Ring 01 21 1 Guarnizione Gasket 01 21 3 Guarnizione Gasket 01 29 O Ring O Ring 45 04 Anello valvola Ring 50 06 1 Comando a distanza Remote control ass y 40 04 2 Valvola completa Valve ass y 77 11 Leva Lever 20 00 Corpo Body 54 04 Pulsante Trigger Valve 22 07 Testa Head 55 06 1 Raccordo Bush 18 34 1 Pedale Pneumatico Pneumatic Foot Lever 30 07 3 Pistone Piston 52 02 Boccola Bush 73 00 ...

Page 26: ...ticdiagram 18 25 18 25 18 25 1 18 25 1 18 24 18 34 1 18 54 18 22 1 18 24 17 37 7 18 51 17 37 7 17 37 7 18 50 50 06 1 50 06 1 18 02 18 02 Ø6 Ø4 Ø4 Ø4 Ø4 Ø4 Ø4 Ø4 Ø6 Ø6 Ø6 Ø6 Ø6 17 37 1 17 37 2 17 37 1 17 37 2 17 37 2 17 37 2 28 B V B V A C A C B V B V ...

Reviews: