background image

13

Operation

15. IMPORTANT! Before starting the machine, check the following: 

a) make sure that the line voltage of the mains supply corresponds to the identification plate and in 

the relevant wiring diagram. If not, do not connect the electric supply and contact your dealer or the 

manufacturer. 

b) verify that the direction of rotation of the spiral is anti-clockwise (viewed from above).

SWITCHING THE MACHINE ON/OFF

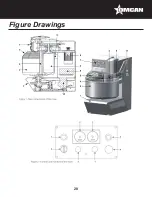
After connecting the machine to the power outlet place the switch in Figure 3 to position I - ON. To turn off the 

machine, place the switch in Figure 3 to position O - OFF.

KNEADING CYCLE

1.  Fill the ingredients in the bowl and close the cover. IMPORTANT! Do not put excessive amounts of 

ingredients over maximum capacity stated by the manufacturer into the bowl; This might cause serious 

damage to the machine and, in particular, to the motor drives. The manufacturer is in no way responsible 

for damage caused by failure to comply with these instructions.

2.  Turn the switch in Figure 3 to position ON - I.

3.  Set the timer on the operating time in speed 1 and 2. To do this, turn the front dial to the red indicator to the 

desired time.

4. 

Press the start button of speed 1 (Pos. 1), if you want to perform an action of pre-mixing at low speed to 

allow the ingredients to bind together; when the time set on timer (Pos. 2) is over, the kneading tool (spiral) 

will automatically switch to speed 2 and will remain there for the time set on the timer in Pos. 4. After this 

time the machine will stop. You can switch from speed 1 over to speed 2 immediately or at any later time by 

pressing the button in (Pos. 3).

PLEASE NOTE!

If the machine is equipped with grid cover do not start in speed 2 immediately, but operate the machine in 

speed 1 at least for the time necessary for the fl our in the bowl to bind with the water and, not less than 120 

seconds; This reduces the development of airborne fl our dust and the risk to people’s health.

5.  If the cycle is in progress and you lift the cover, the remaining cycle time at the time of stopping will be 

saved. To resume the cycle from where it left off, lower the cover and press the START button on the speed 

that was in place at the time of stopping. If in the middle of a cycle you press the emergency button (Pos. 

8), the machine will stop and the timer will return to its initial values.

6.  During the mix cycle is possible to reverse the direction of rotation of the bowl with the selector Pos. 6; 

this can be useful, for example, to “mix in” any “unblended” flour in the dough remaining on the bottom of 

the bowl. IMPORTANT! The direction of rotation of spiral and bowl during normal kneading cycle must be 

anti-clockwise (viewed from above). If needed, you can reverse the direction of rotation of the bowl for the 

time strictly necessary. However, as soon as possible return to the normal direction of rotation to prevent 

possible, even serious damages due to abnormal stress (mechanical overload on the transmission and 

overheating of the motor windings).

7.  Once the cycle is over, lift the cover and pull the dough out. To facilitate the operation it is possible to rotate 

the bowl by pressing the button in (Pos. 7) so as to bring the dough in the best position for the operator; 

please note that if you release the button, the bowl stops.

Summary of Contents for MX-IT-0080-M

Page 1: ...Revised 09 22 2022 Toll Free 1 800 465 0234 Fax 905 607 0234 Email service omcan com www omcan com Dough Mixer Model MX IT 0080 M Item 49122 Instruction Manual ...

Page 2: ... 37 38 39 Table of Contents Section General Information Safety and Warranty Technical Specifications Installation Operation Maintenance Troubleshooting Figure Drawings Parts Breakdown Electrical Schematics Notes Warranty Registration Model MX IT 0080 M ...

Page 3: ...utmost importance to save these instructions for future reference Also save the original box and packaging for shipping the equipment if servicing or returning of the machine is required Omcan Fabrication et distribution Companie Limité et Food Machinery d Amerique dba Omcan et Omcan Inc ne sont pas responsables de tout dommage ou blessure causé du fait que toute personne ait utilisé cet équipemen...

Page 4: ...cuentre daños ocultos en la máquina Si el paquete ha sufrido un manejo de poco cuidado golpes o daños visible o oculto por favor anote en la factura antes de aceptar la entrega y contacte Omcan dentro de las 24 horas de modo que podamos iniciar una reclamación con la compañia Un informe detallado sobre los daños causados a la máquina debe ser llenado en el plazo de tres días desde la fecha de entr...

Page 5: ...OMIC CONCEPTS The operators may incur into physical lesions pain due to wrong gestures and postures This may occur when lifting and handling heavy loads pouring a full flour bag into the bowl pouring water etc or even taking heavy dough pieces out of the bowl All the foregoing risks have been eliminated or minimized by the design and implementation of the protections and safeties describe in this ...

Page 6: ...while the mixer turns very slowly the cover up and stop as soon you hear the micro triggering Do not ever put any part of your body between cover and bowl Make sure that The micro actually activates and stops all moving parts of the mixer as soon as the cover reaches less than 75 mm away for the upper ridge of the bowl 75 mm is not acceptable Spiral and bowl must stop within 4 seconds from the swi...

Page 7: ...efore it comes to a complete stop especially if the bowl is empty with dough in the bowl the machines gets to stop quickly Risks of bone and muscle lesions this is often the result of lack of ergonomic postures while working The employers are responsible for the administration to the operators of comprehensive information on the residual risks resulting from the use of the mixer as well as for the...

Page 8: ...e be disposed of without difficulty In any case for suitable recycling we suggest disposing of the products separately differentiated waste according to the current norms DO NOT DISCARD ANY PACKAGING MATERIALS IN THE ENVIRONMENT Model MX IT 0080 M Spiral Current 8 3A 15 3A Bowl Current 19 4A Spiral Wattage 2400W 4400W Bowl Wattage 5600W Spiral Power 1 4 kW Bowl Power 0 37 kW Electrical 208V 60Hz 3...

Page 9: ...ey protrude by at least 200 mm on the opposite side PLEASE NOTE Do not use handling systems tools and equipment other than those that are described herein When handling and or transporting the mixer or parts thereof take all the necessary precautions to avoid or minimize the occurrence of risks to people animals and other assets Remove the machine from its packaging separating the materials by typ...

Page 10: ... works be strictly performed by skilled licensed technicians technically qualified and informed on the relevant safety issues regulations and standards Please note electric works must be followed by the release of an official statement of compliance On delivery of the machine and before connecting to the mixer to your power network ensure that the voltage frequency and number of phases of your pow...

Page 11: ...bag at once into the bowl start by making it lighter extracting as much flour as possible with a scoop then put the bag on the bottom of the bowl open the bag bottom and let flour slowly and progressively out Make sure to disperse as little flour dust as possible in the air keep the next bag a little inclined with the opening close the existing flour bunch and pour by avoiding as much as possible ...

Page 12: ...ioned in the above paragraph 10 If you need to add liquid ingredients during the kneading cycle you can do so through the appropriate slot on the solid cover see Figure 10 PLEASE NOTE Never try to force your hand through the slit there is no reason to do so and you could risk getting stuck dragged in and badly bruised by the spiral in motion and crushing and cutting between the spiral and column I...

Page 13: ...d 2 immediately or at any later time by pressing the button in Pos 3 PLEASE NOTE If the machine is equipped with grid cover do not start in speed 2 immediately but operate the machine in speed 1 at least for the time necessary for the fl our in the bowl to bind with the water and not less than 120 seconds This reduces the development of airborne fl our dust and the risk to people s health 5 If the...

Page 14: ... with the fixings provided and reactivate the safety devices when the reasons for their removal have been resolved Any non compliance with this manual and or improper use or inconsistency with the expected use of the machine causing direct or indirect damage to people animals things will be a full responsibility of the reference person PERIOD MAINTENANCE AND CHECK UP Before any operations make sur...

Page 15: ...motor and the pulley Pos 6 slides and changes the tension of the belts in Pos 1 Adjust the tension of the belts in accordance with the instructions of the reference manufacturer When you are done lock the nut in Pos 4 REPLACING THE SPIRAL DRIVE BELTS Look at Figure 13 to replace the drive belts to the spiral Release the belts in Pos 1 Pull the belts out Fit new belts in to replace the old ones mak...

Page 16: ...n accordance with the instructions of the reference manufacturer When you are done lock the nut in Pos 9 IMPORTANT To ensure the best performance of the machine and longer service life of the belts it is crucial to replace all drive belts not just some Always check the correct tension of both the belts in Pos 1 and the those in Pos 6 DRIVE BELTS TO THE BOWL To carry out the operations described in...

Page 17: ... bearing pos 3 and sides of the support pos 2 then press down with a hard plastic hammer tighten the screws pos 5 at the ends of the pin pos 6 with washers pos 7 Reassemble the group in the machine screwing but not tightening the screws pos 4 and its washers in the threaded holes of the column after passing them through the slots pos 10 of the mount pos 2 The bowl not being perfectly cylindrical t...

Page 18: ...e head pos 4 then pull it out the weight of the column is not particularly heavy indications below for the different models of the machine however it is important to hold it well in order to keep it balanced on the arms keep arms close to the body as much as possible while the bust leans forward rather bend your knees and keep your upper body upright as much as possible this is in order to minimiz...

Page 19: ...th with drinking water and clean all food contact areas including bowl interiors and rim dough stopper bowl cover pillar spiral and the area underneath the hear over the bowl If needed dismount the pillar and wash in potable water or eventually with neutral dish soap In this case make sure to rinse it off well in potable water Before fitting it back on dry the flange and the holes of the fixing bo...

Page 20: ...20 Figure Drawings ...

Page 21: ...21 Figure Drawings ...

Page 22: ...22 Figure Drawings ...

Page 23: ...23 Figure Drawings ...

Page 24: ...24 Figure Drawings ...

Page 25: ...25 Figure Drawings ...

Page 26: ...26 Figure Drawings ...

Page 27: ...27 Figure Drawings ...

Page 28: ...28 Figure Drawings ...

Page 29: ...29 Figure Drawings ...

Page 30: ...30 Figure Drawings ...

Page 31: ...31 Figure Drawings ...

Page 32: ...32 Parts Breakdown Model MX IT 0080 M 49122 ...

Page 33: ... 49122 38 AK490 Stop Push Button for 49122 66 AK453 Support for Return Shaft for 49122 12 AK472 Bearing 3310 for 49122 39 AK491 Emergency Stop Push Button for 49122 67 AK454 Return Pulley for 49122 13 AK473 Bearing 6308 for 49122 40 AK492 Bowl Cover Locker for 49122 71 AK455 Bowl Pulley for 49122 14 AK474 Bearing 6307 for 49122 41 AK493 Nut for 49122 72 AK456 Spiral Hook Pulley for 49122 15 AK475 ...

Page 34: ...34 Electrical Schematics Model MX IT 0080 M 49122 ...

Page 35: ...35 Electrical Schematics Model MX IT 0080 M 49122 ...

Page 36: ...36 Electrical Schematics Model MX IT 0080 M 49122 ...

Page 37: ...se Holder FU2 Screw Contact Block NO SA1 Screw Contact Block NO SB3 Contactor 16A 7 5KW NC KM1 NO NC Screw Contact Block SA1 Button with Round Black Plastic Guard SB3 Contactor 12A 5 5KW NC KM2 Round Plastic Knob Selector AT 3 SA1 Screw Contact Block NO SB4 Contactor 12A 5 5KW NC KM3 White LED 24V SB1 Button with Round Black Plastic Guard SB4 Minicontactor 4KW 9A NC KM4 Screw Contact Block NO SB1 ...

Page 38: ...________________ ________________________________________________________________________________________ ________________________________________________________________________________________ ________________________________________________________________________________________ ________________________________________________________________________________________ ___________________________...

Page 39: ...gister online by visiting OMCAN PRODUCT WARRANTY REGISTRATION 3115 Pepper Mill Court Mississauga Ontario Canada L5L 4X5 https omcan com warranty registration or email to service omcan com Purchaser s Information Name Company Name Address Telephone City Province or State Postal or Zip Email Address Country Type of Company Restaurant Bakery Deli Dealer from which Purchased Butcher Supermarket Catere...

Page 40: ...s relations avec nos clients et les fabricants de valeur Aujourd hui avec des partenaires en Amérique du Nord Europe Asie et Amérique du Sud nous travaillons continuellement à améliorer et développer l entreprise Nous nous efforçons d offrir à nos clients une valeur exceptionnelle grâce à nos ventes locales qualifiées et des représentants de service qui offrent un accès facile à plus de 6500 produ...

Reviews: