12
Operation
and assets directly or indirectly resulting from the release of dust particle in the air and surrounding
environment (for example, before adding the flour, you should check that nobody is near the machine and
that bystanders at least wear a respiratory protection mask with adequate filtering capacity in relation to
the particle size of the flour (indicated in the data sheet, if available, or measured by the employer for the
purposes of the aforementioned risk assessment). The employer is responsible for identifying additional
PPE that may be required (for example maintaining food hygiene).
5.
If the machine is equipped with a grid cover, let the spiral rotate at speed 1 until all the flour is mixed with
water and only then switch to speed 2; this is a great way for limiting the dispersion of flour dust caused by
the kneading tool operation.
6.
Do not try to recover the flour deposited on parts of the machine; It may be contaminated and will affect the
purity and hygiene of the mix with a risk to consumers. The operators also may be exposed to a serious
risk to their safety if they put hands, fingers, etc. in areas where there are moving parts (e.g. between bowl
and cover, or bowl wall and column).
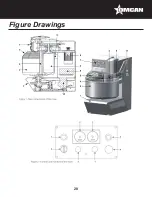
7. To control the normal stop, press the STOP button, Pos. 5 Figure 2.
8. If you press the emergency button the machine stops and the electricity to the motors is switched off: Use
it only if absolutely necessary, otherwise use the STOP button Pos. 5 Figure 2. Once pressed, it must be
reset to restart the machine.
9.
The same result is obtained by lifting the bowl cover; in this case to restart the machine must first close
the cover. In normal cases, do not stop the machine by lifting the cover to avoid exposing yourself to
unnecessary risks and shortening the life of the mixer safety system; use, rather, the STOP button pos. 5
Figure 2, as mentioned in the above paragraph.
10.
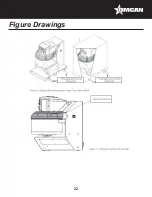
If you need to add liquid ingredients during the kneading cycle you can do so through the appropriate slot
on the solid cover (see Figure 10).
PLEASE NOTE!
Never try to force your hand through the slit, there is no reason to do so and you could risk getting stuck,
dragged in and badly bruised by the spiral in motion and crushing and cutting between the spiral and column.
If your mixer has a grid cover (only with machines not intended for the European Community) you can pour the
liquid through the grid itself making sure to avoid protruding your hands through the openings of the grid.
11.
If it is necessary to add flour during the kneading cycle, even in modest amounts, you can pour it through
the appropriate slot on the full cover; However, if the cover is a steel grid, do not pour flour from above
through the gird: but stop the machine, lift the cover and add the required amount of flour without jerking
your hands or the scoop. Move your hand or the scoop and drop flour on several points of the dough; so as
to limit the dispersion of flour dust in the air.
12. When cleaning, wear shoes with reinforced toes, waterproof gloves and appropriate dust mask.
13. To remove the dough from the bowl, break it into small parts that can be re-manipulated easily and safely.
Dough is not firm (it is much more unstable, the more it is soft), it tends to stretch downwards and is difficult
to collect with the hand, if not in small portions; the centre of the mass varies continuously and causes, a
continuous change in the equilibrium and effort that the operator has to maintain. If you consider that the
operator must bend the torso to remove the portions, which can increase the risk of muscle and bone pain
with increasing masses drawn and moved by hand.
14. Do not put hands between the rotation bowl and the column wall for any reason; the distance between the
two parts meet the requirements of security, but there still remains a residual risk of catching and dragging
in if someone placed their hands or even the arms in this area.
Summary of Contents for MX-IT-0080-M
Page 20: ...20 Figure Drawings ...
Page 21: ...21 Figure Drawings ...
Page 22: ...22 Figure Drawings ...
Page 23: ...23 Figure Drawings ...
Page 24: ...24 Figure Drawings ...
Page 25: ...25 Figure Drawings ...
Page 26: ...26 Figure Drawings ...
Page 27: ...27 Figure Drawings ...
Page 28: ...28 Figure Drawings ...
Page 29: ...29 Figure Drawings ...
Page 30: ...30 Figure Drawings ...
Page 31: ...31 Figure Drawings ...
Page 32: ...32 Parts Breakdown Model MX IT 0080 M 49122 ...
Page 34: ...34 Electrical Schematics Model MX IT 0080 M 49122 ...
Page 35: ...35 Electrical Schematics Model MX IT 0080 M 49122 ...
Page 36: ...36 Electrical Schematics Model MX IT 0080 M 49122 ...


