background image

Pedal

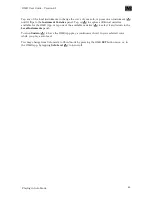
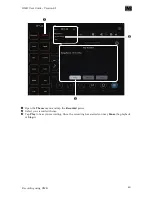
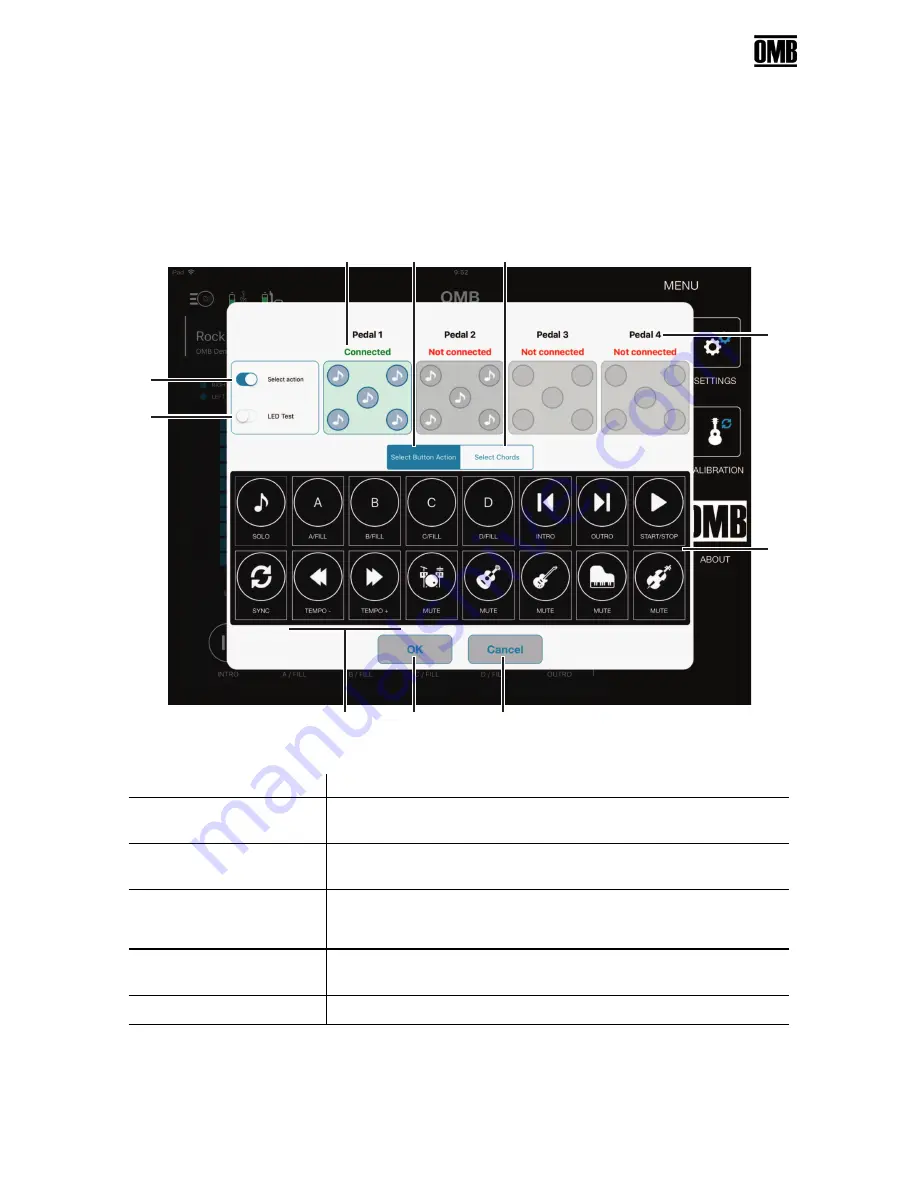
Now that you’ve paired your OMB Foot Pedal to the OMB App, it’s time to sync the buttons to
enhance your music.

First tap the

Settings

menu and select

Pedal

.

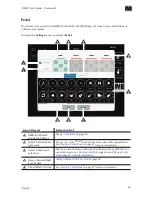
A

F

I

B

C

D

E

G

J

H

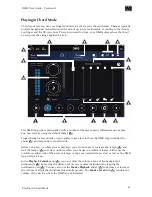
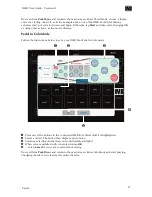
Screen Element

Explanation/Link

A

OMB Foot Pedal
Connection Status

Playing in Chord Mode

(page 41)

B

Select Button Status
(selected)

Choose one of the

Chord

mode actions to associate with a pedal button.

See

Playing in Chord Mode

on page 41 for more information.

C

Select Chords (not
selected)

Tap to associate chords you defined in

Pad

Mode with a pedal button for

use in

Solo

mode. See

Playing in Pad Mode

(page 46) and

Playing in Solo

Mode

(page 44) for more information.

D

Daisy-chained OMB
Foot Pedals

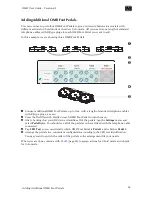
Adding Additional OMB Foot Pedals

(page 58)

E

Chord Mode Actions

See

Playing in Chord Mode

on page 41 for more information.

Pedal

55

OMB User Guide - Version 0.I

Summary of Contents for OMB Upgrade Kit

Page 1: ...OMB User Guide OMB Guitars Ltd info ombguitars com Version 0 I...

Page 2: ...858 909 9 053 690 Japanese patent numbers 6338313 JP6089284B2 European Patent Office numbers EP2959472 EP2732444 and Chinese patent number ZL2015800143031 Additional patents are pending Android Apple...

Page 3: ...itars 13 Attaching the Add On Device to String Through Body Electric Guitars 14 Attaching the Add On Device to Hard Tail Bridge Electric Guitars 18 Attaching the Add On Device to Tune o matic Bridge E...

Page 4: ...ying in Pad Mode 46 Recording using OMB 48 Shutting Down 50 The OMB Foot Pedal 51 Unpacking the OMB Foot Pedal 52 Attaching the OMB Foot Pedal Legs 53 Bluetooth Pairing for OMB Foot Pedal 54 Pedal 55...

Page 5: ...t away but first take a moment to look over the following points The OMB system uses Bluetooth technology for your guitar and app to communicate See EMC and Certificate of Conformity on page 4 for all...

Page 6: ...through this guide to see if you missed anything or if something we think is intuitively obvious is anything but Let us know we ll fix it At the beginning of a section a short introduction discusses...

Page 7: ...ting temperature for your OMB device is 86 F 30 C Battery Information OMB products are powered by rechargeable LiPo batteries The batteries are not user replaceable If the operating time of your OMB g...

Page 8: ...attery over to the applicable collection point for the recycling of waste batteries For more detailed information about recycling of this product or battery please contact your local Civic Office your...

Page 9: ...r is connected Consult the dealer or an experienced radio TV technician RF Exposure Warnings Mobile Device RF Exposure Statement Mobile Device definition a Mobile 2 1091 b A mobile device is defined a...

Page 10: ...ting in the OMB App so no special hardware adjustments are required during installation See Settings on page 33 for more information Almost everything you need is included in the OMB Upgrade Kit All y...

Page 11: ...to what kind of installation H A B C F G D E I J K OMB OMB A Add On Device B USB C Cable 0 5 m C Fine Steel Wool D Flat Conductive Tape 25 x 2 65 cm x 2 E Diamond Conductive Tape 20 50 cm F Add On De...

Page 12: ...two clasps of the Base inward 2 and lift the Brain straight up 3 Take the supplied USB C cable and plug it into a power source 4 and insert the other end into the Brain USB connector to begin the cha...

Page 13: ...board taking special care to remove any residue of the steel wool J We recommend that you do not use alcohol for cleaning your guitar 3 Continue cleaning the side of the neck directly below the frets...

Page 14: ...e your community collects recyclable electronics 2 Temporarily place the Base on the body of the guitar so the holes on the flex connector line up with the pin holes on the bridge 3 If the level of th...

Page 15: ...rip or damage it J Most nickle coated steel strings are compatible with OMB technology However we recommend that you use the strings provided in the OMB Upgrade Kit 4 Lock the first string in place wi...

Page 16: ...base Then press it down on the body of the guitar to fix it in place Continue with Attaching the Diamond Conductive Tape for Acoustic Guitars page 23 Attaching the Add On Device to Bridge Pin Acoustic...

Page 17: ...he bridge with a soft cloth and your favorite cleaning fluid 3 Set the base on the body of the guitar and gently fold the flex connector so the holes line up with the string holes 4 Begin stringing yo...

Page 18: ...une o matic Bridge Electric Guitars page 20 3 4 1 2 1 With a pair of scissors cut the flex connector on the third perforation after the large set of holes Discard the excess where your community colle...

Page 19: ...the flex connector through the small opening below the bridge 4 Turn the guitar over again and bend the flex connector over the holes in the string spacer 5 Insert the guitar strings one by one takin...

Page 20: ...nd put the adhesive strip under the base Then press it down on the body of the guitar to fix it in place 5 Bend the String through spacer block insulation sleeve over the bridge 6 and then cut it just...

Page 21: ...ides 4 Thread the strings that go through the string guides into the cut insulating sleeves 5 and place the insulated string in the string guide Then continue tightening the string 6 Continue until al...

Page 22: ...2 4 5 9 6 8 7 1 3 1 With a pair of scissors cut the flex connector on the second perforation after the large set of holes Discard the excess where your community collects recyclable electronics 2 Cle...

Page 23: ...stringing your guitar taking care not to rip or damage the flex connector 7 When you re finished stringing your guitar slightly angle the base upward 8 remove the adhesive backing take the adhesive st...

Page 24: ...of your guitar 3 Complete stringing your guitar but tighten them only until they sit losely on the tailpiece saddles 4 Take the Base and thread the strings through the openings at the end of the flex...

Page 25: ...OMB logo toward the body of the guitar 2 Pull a small section of the backing away to reveal the adhesive and press the end of the Flat Conductive Tape against the neck of the guitar as close to fret 1...

Page 26: ...3 1 Solder the ends of both sides of each fret to the flat conductive tape Examine each joint when it is done to make sure that it is clean and shiny 2 After you have completed soldering both sides of...

Page 27: ...d conductive tape and attach the first few segments to the body of the guitar 4 Plan out a design that matches the lines of your guitar or go crazy and form any shape that suits your mood keeping the...

Page 28: ...st segment 9 Place the cut end of the diamond conductive tape against the copper point at the end of the flat conductive tape and solder them together Make sure that you make a good clean joint You ca...

Page 29: ...ress its snap connector on the base until you hear it snap 3 Remove a portion of the adhesive strip from the diamond conductive tape and attach the first few segments to the body of the guitar 4 Plan...

Page 30: ...esign measure the end of the diamond conductive tape 8 and cut it in the center of the closest segment 9 Place the cut end of the diamond conductive tape against the copper point at the end of the fla...

Page 31: ...asps on the sides 2 Push the Base down until it snaps into the clasps J If the brain has not completed a full two hour charge you may leave it plugged in while you set up the OMB App and begin to play...

Page 32: ...end of the plate and pull it slightly outward toward the neck of the guitar 2 Tilt the plate down 3 push it back 4 and then pull it out and set it aside When you are ready to return to full volume 5...

Page 33: ...OMB experience just that much better Whether you have a problem an improvement we might make or an idea for an amazing new feature let s work together to make it happen When connecting to the OMB App...

Page 34: ...Calibration page 38 And that s enough to get you started When you want to explore more features and possibilities or have questions about how things work dip back into this User Guide 30 OMB User Guid...

Page 35: ...uitar C OMB to OMB App connection OMB Guitar paired to OMB App D OMB Pedal to OMB App connection Battery level of paired OMB Foot Pedal E Link to http ombguitars com Click here to get news about futur...

Page 36: ...ggle Playing in Solo Mode page 44 P Solo level volume control Controls the volume in Solo mode Q Master level volume control Adjusts the volume of device where the OMB App is installed R Input levels...

Page 37: ...s and add ons B Settings OMB App Settings page 33 C Calibration Guitar Calibration page 38 D OMB View the OMB About popup window E Pad Mode Playing in Pad Mode page 46 F Bluetooth Bluetooth Pairing pa...

Page 38: ...can toggle your OMB guitar into left hand mode B Tap Refresh C to do what or Cancel D to exit the Settings window without making any changes Tap OK E to save your changes and exit to the Settings men...

Page 39: ...USB charger with a C type USB cable 2 The red LED flashes about once a second during the charging process J You may continue setting up your guitar and play with it as well while it is charging up 3...

Page 40: ...t your OMB guitar to the device where the OMB App is installed if you prefer not to use Bluetooth 2 1 3 4 1 Go to your device s settings and enable Bluetooth if it is not already enabled 2 When it fin...

Page 41: ...he app doesn t automatically connect your guitar tap it to make the connection 4 Return to the main screen The guitar icon indicates successful pairing To verify form a chord or two and see how the ap...

Page 42: ...ging strings with your first finger it is much easier to use a capo Follow the instructions below to use Calibration in the Settings menu to calibrate your guitar Make sure that your OMB powered guita...

Page 43: ...The first fret turn red 3 and the Start button begins to blink 4 Put a capo on the guitar to bridge the first fret of your guitar When the first fret has been calibrated it turns green Calibration 39...

Page 44: ...or and the next fret turns red Place the capo on that fret until it turns green 6 Continue this process until you see the Success window Tap OK to return to the Settings menu And that s it You re read...

Page 45: ...tifies the chord B and responds to your fretwork Before you play or while you are playing you can decrease or increase the tempo C and lock the tempo D so it stays uniform when you change to a differe...

Page 46: ...heme While playing you may change the fill by tapping one of the four fill buttons K When you have completed the piece you may either tap Start H again or Outro J to give a graceful end to your number...

Page 47: ...and then tap Delete F to remove it Tap Done G to confirm the deletion or Back C to cancel and return to the Themes flyout You can also download additional styles as follows 1 2 3 4 1 Tap Download in t...

Page 48: ...rom Chord mode to Solo mode by pressing the OMB SET button once or in the OMB App by tappting Solo Level A Now the OMB App responds to individual notes or chords using the last selected voice To chang...

Page 49: ...B App or tap one of the available varieties F to select it and return to the Local Instruments panel Turn on Sustain G to have the OMB App play a continuous chord in your selected voice while you play...

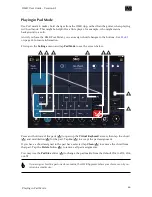
Page 50: ...ow H A B C G D EF Press and hold one of the pads A to open up the Virtual Keyboard screen then tap the chord B and modulation C for the pad Tap Go D to accept the pad assignment If you have a chord as...

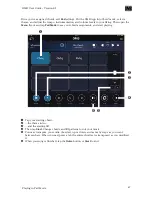
Page 51: ...laying 1 2 3 4 6 5 1 Tap your starting chord 2 the theme intro 3 and the starting fill 4 Then tap Start Change chords and fill patterns to suit your music 5 You may transpose your entire chord set up...

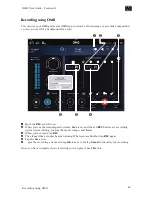
Page 52: ...ave icon and the red REC button set everything up for your recording such as the mode tempo and theme 3 When you are ready tap REC 4 The elapsed time counter begins running When you are finished tap R...

Page 53: ...heme menu and tap the Recorded genre 2 Select your recorded theme 3 Tap Play to hear your recording Once the recording has started you may Pause the playback or Stop it Recording using OMB 49 OMB User...

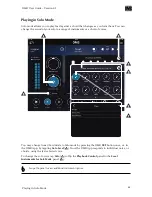
Page 54: ...solo instrument you used when you launch it again The OMB App does not go into sleep mode as long as it is open so it won t quick on you in the middle of a long solo If you want to take a break withou...

Page 55: ...lmost any feature on the app completely hands free It includes legs that you can attach to set it at a comfortable angle Super useful whether you re recording or playing for an audience The OMB Foot P...

Page 56: ...USB port or a standard USB charger with a C type USB cable so that after you set it up you can use it without being limited to the length of a wire B F D A C E A USB C cable connection B On Off switc...

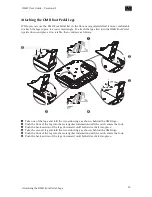
Page 57: ...he two side wings as shown behind the OMB logo 2 Push the front of the leg into the rectangular indentation until the catch enters the lock 3 Push the back section of the legs downward until both side...

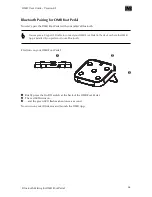
Page 58: ...device where the OMB App is installed if you prefer not to use Bluetooth First turn on your OMB Foot Pedal 1 3 2 1 Briefly press the On Off switch at the back of the OMB Foot Pedal 2 The red LED turn...

Page 59: ...e one of the Chord mode actions to associate with a pedal button See Playing in Chord Mode on page 41 for more information C Select Chords not selected Tap to associate chords you defined in Pad Mode...

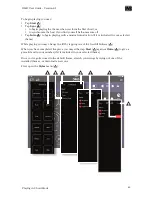
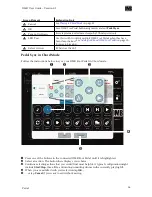
Page 60: ...ct Action What does this do Pedal Sync in Chord Mode Follow the instructions below to sync your OMB Foot Pedal in Chord mode 5 4 1 2 3 1 Press one of the buttons in the connected OMB Foot Pedal until...

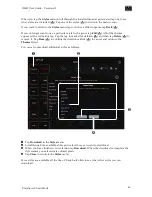
Page 61: ...structions below to sync your OMB Foot Pedal in Solo mode 5 4 1 2 3 1 Press one of the buttons in the connected OMB Foot Pedal until it is highlighted 2 Select a chord The button then displays your ch...

Page 62: ...On Off switch briefly on each OMB Foot Pedal to turn them on 3 After checking that your iOS device identifies all of the pedals tap the Settings menu and select Pedal Sync You should see all of the pe...

Page 63: ...on on page 38 for more information My OMB sometimes doesn t recognize my chord changes Probably some moisture or corrosion has accumulated on one or more of your frets Loosen your strings enough to cl...

Page 64: ...and is at least functionally equivalent to the original product If a defect arises and a valid claim is received by OMB after the first ninety 90 days of the Warranty Period a shipping and handling ch...

Page 65: ...OMB Guitars Ltd info ombguitars com Version 0 I...

Reviews: