background image

: Press and hold the button for 1 second or longer to put

the recorder in menu mode.

: Switch the items of the setting screen in the mainmenu

or submenu screen.

: Go to the setting screen from the mainmenu or

submenu screen.

Confirm the item selected in the setting screen, and go

back to the mainmenu or submenu screen.

: Complete the menu mode setting. (If pressed while the

setting screen is displayed, the item being selected will

not be set.)

s

The recorder will stop if you leave it idle for 3 minutes during a menu setup operation,
when a selected item is not applied.

- 8 -


1

Press and hold the 

2

 (MENU) button for 1

second or longer while the recorder is
stopped.


2

Press the 

9

 or 

0

 to select the menu

item, and press 

t

 button.

Go to the setting screen of the selected menu item.

s

To set the submenu, select the “Sub Menu” from

the mainmenu screen. And select and set the
menu item from the submenu screen in the same

  manner.

Guide icon

: Tells you the next button to use by flashing.

a

: Use 

t

. (Goes to the next screen.)

b

 or   : Use 

9

 or 

0

.  (Changes the item.)


3

Press the 

9

 or 

0

 to select the setting

item, and press 

t

 button.

To go to the mainmenu screen after the submenu
setting, select “Main Menu” from the submenu screen.


4

Press the 

5

 button to exit the menu mode.

- 8 -

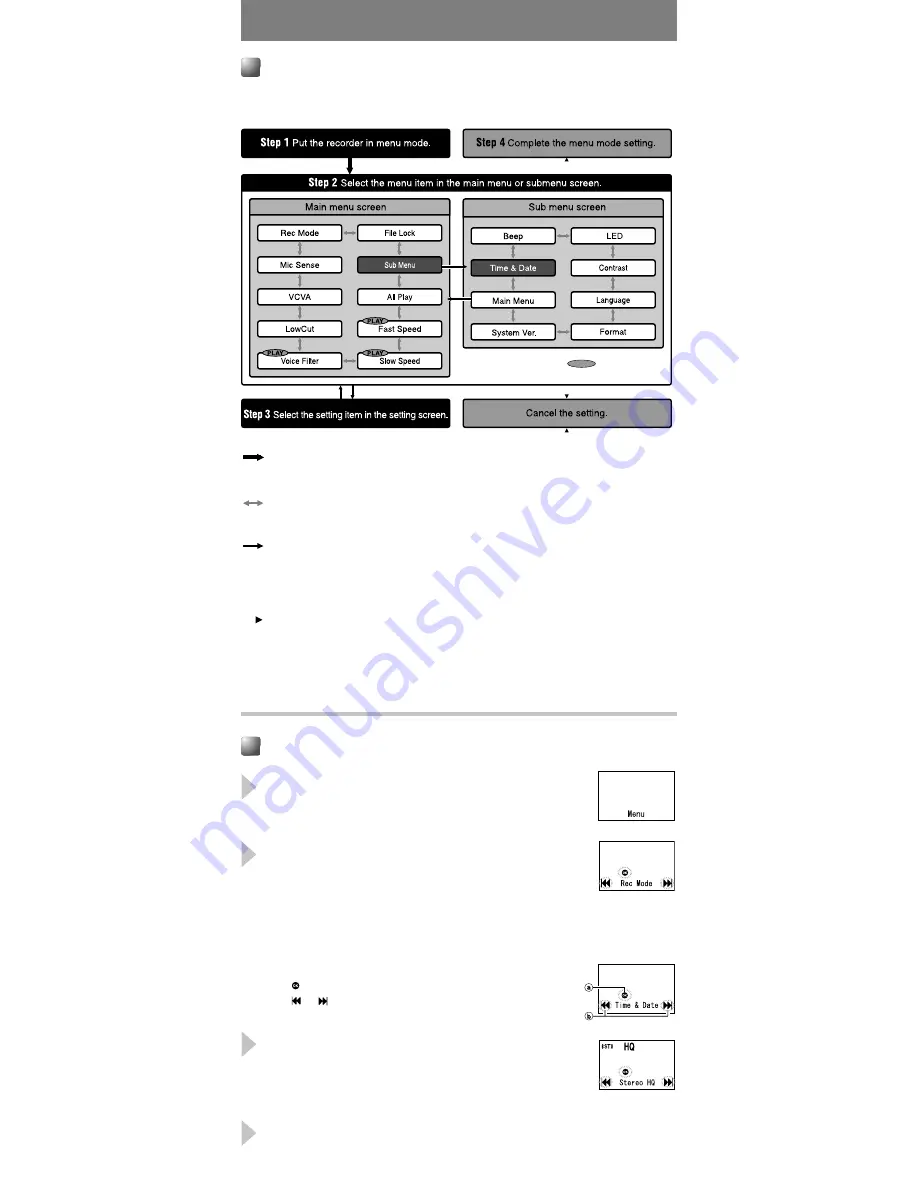
Basic Operation of the Menu Mode

Menu mode

2

 (MENU)

9

 or 

0

t

5

 or 

4

The levels of the menu screen and the operation buttons

(Main Menu/Sub Menu)

The setting can be switched by putting the recorder in menu mode.

The menu item with the 

PLAY

 mark can be set

even during playback.

Guide icon

Summary of Contents for WS-110

Page 1: ...ser is encouraged to try to correct the interference by one or more of the following measures Reorient or relocate the receiving antenna Increase the separation between the equipment and receiver Conn...

Page 2: ...e heated short circuited or disas sembled Do not attempt to recharge alkaline lithium or any other non rechargeable bat tery Never use any battery with a torn or cracked outer cover Keep battery out o...

Page 3: ...The main unit can be connected to a PC USB port or a USB hub s Strap is not supplied Use the optional accessory Note Under no circumstances insert any other parts than the main unit into the battery...

Page 4: ...o reset the time Example June 14 2007 Hold Setting the HOLD switch to the direction of the arrow holds the current status and all button operations are disabled This feature is useful when the recorde...

Page 5: ...w speaker s voice recording in Stereo XQ Stereo HQ Stereo SP or HQ is recommended Also usage of an external microphone sold separately could improve the quality of recordings s The input level cannot...

Page 6: ...temp mark in the middle of the file the recorder will stop at that location Forwarding and Rewinding Press and hold 9 or 0 during playback When you release the button the recorder will resume normal...

Page 7: ...e Cancel and Erase flashes alternately 3 Press the 9 button The All File Erase indicator flashes 4 Press the t button The deletion is completed when All Erase flash and Erase DONE is displayed Display...

Page 8: ...the 9 or 0 to select the menu item and press t button Go to the setting screen of the selected menu item sTo set the submenu select the Sub Menu from the mainmenu screen And select and set the menu it...

Page 9: ...CVA Level b Start level moves to the right left according to the set level s The record play indicator light is lit during recording When the recorder is in Standby mode the record play indicator ligh...

Page 10: ...d press t button The setting of Slow Speed or Fast Speed starts 3 Press the 9 or 0 to select the playback speed to set and press t button Slow Speed x0 5 x0 625 x0 75 x0 875 Fast Speed x1 125 x1 25 x1...

Page 11: ...ress the 9 button After the Data All Cleared message is on for 2 seconds Sure Start will turn on 4 Press the t button Formatting begins and Format DONE displays when formatting ends s It may take up t...

Page 12: ...a storage device sYou can save the voice files recorded with this recorder on your PC as back up sYou can save images text data etc on this recorder sThe recorder will record in WMA Windows Media Aud...

Page 13: ...General Precautions Read this manual carefully to ensure that you know how to operate it safely and correctly Keep this manual in an easily accessible location for future reference The warning symbols...

Page 14: ...WS 110 HQ mode Approx 18 hours SP mode Approx 18 hours LP mode Approx 21 hours Ni MH rechargeable battery WS 210S Stereo XQ mode Approx 11 hours Stereo HQ mode Approx 12 hours Stereo SP mode Approx 12...

Reviews: