background image

8

- -

2

 Press the 

9

 or 

0

 but-

ton to select the index or 
temp mark to erase.

3

 While the index or temp 

number appears for 
approximately 2 seconds 
on the display, press the 

ERASE

 button.

•  The index or temp mark is 

erased.

Notes:

•  Up to 16 index and temp marks can be set in a fi le. If you try to place more than 16 index or 

temp marks, [

Index Full

] message will appear for index marks, and [

Temp Mark Full

] for temp 

marks.

•  Index or temp marks cannot be set or erased in a locked fi le.

•  Index or temp numbers after the erased index or temp 

number will automatically move up.

h

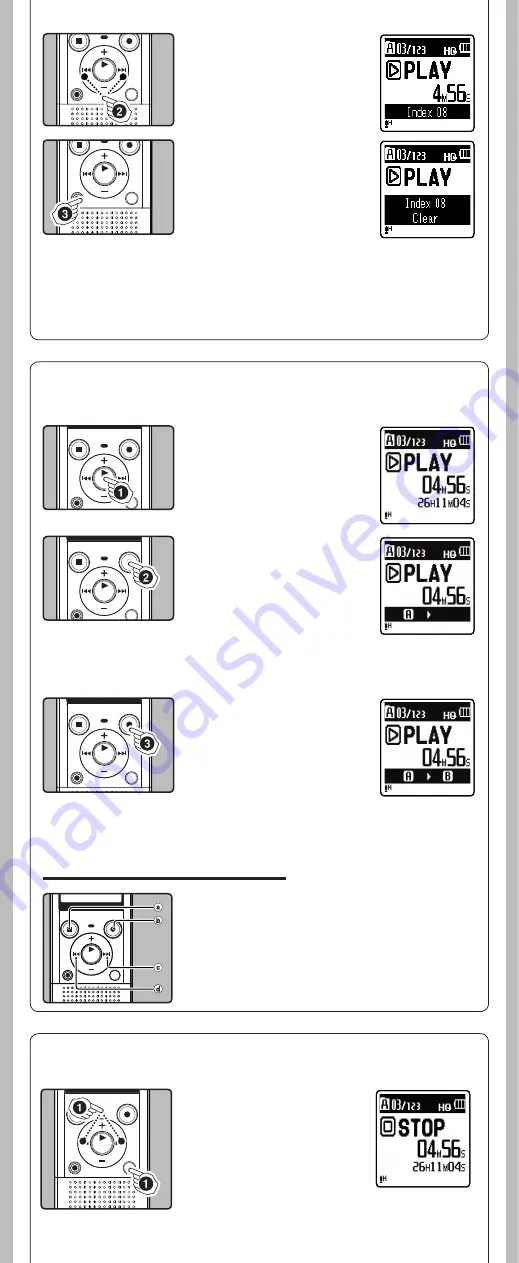
 How to begin segment repeat playback

1

 Press the 

`

OK/MENU


button to start playback.

2

 Press the 

REC

 (

s

) button 

at the point you want 
to start segment repeat 
playback.

•  Fast forwarding and rewinding 

can be conducted when [

w

] is 

flashing in the same manner as 
during normal playback, and 
you can quickly proceed as far as the end position. 

•  When it reaches to the end of the file while [

w

] is flashing, 

the point will become the end position, and repeat playback 
will start.

3

 Press  the 

REC

 (

s

) button 

again at the position where 
you want to end segment 
repeat playback.

•  The recorder repeatedly plays 

back the segment until the 
segment repeat playback is 
cancelled.

Note:

•  As in normal playback mode, playback speed can be changed during segment repeat playback as 

well. If an index mark and temp mark are inserted or eliminated during segment repeat playback, 
segment repeat playback will be canceled and it will return to normal playback mode.

Cancel the segment repeat playback function:

Pressing any of the following buttons will release the 
segment repeat playback.

a


Press the 

STOP

 (

4

) button

b


Press the 

REC

 (

s

) button

c


Press the 

9

 button

d


Press the 

0

 button

This function enables repeated playback of part of the file being played.

h

 Erasing

A selected file can be erased from a folder. Also, all files in a folder can be erased simultaneously.

1

 Select the folder or file 

you want to erase.

Summary of Contents for VN 8100PC

Page 1: ...utions Beforeusingyournewrecorder readthismanualcarefullytoensurethatyouknowhowtooperate it safely and correctly Keep this manual in an easily accessible location for future reference Thewarningsymbolsindicateimportantsafetyrelatedinformation Toprotectyourselfandothersfrom personal injury or damage to property it is essential that you always read the warnings and information provided Introduction ...

Page 2: ...cator 4 During recording mode Elapsed recording time During playback mode Elapsed playback time 5 Microphone Sensitivity indicator VCVA indicator 0 Low Cut Filter indicator Voice Filter indicator 1 6 File lock indicator 7 Battery indicator 8 Recording mode indicator 9 During recording mode Remaining recording time During playback or stop mode File length 0 Playback mode indicator File name 2 Durin...

Page 3: ...bers the stop position before the power is turned off Power save mode If the recorder is stopped not used for over 5 minutes after it is turned on it goes into standby power save mode and the display shuts off To exit standby mode and turn on the display press any button Set the recorder to HOLD mode A Slide the POWER HOLD switch to the HOLD position After Hold appears on the display the recorder ...

Page 4: ...ght be used to store private information while Folder might be dedicated to holding business information 2 Press the REC s button to start recording Turn the microphone in the direction of the source to be recorded b Recording mode c Elapsed recording time d Remaining recording time Rec Mode cannot be changed in the recording standby mode or while recording Configure this while the recorder is sto...

Page 5: ...is set to a monaural recording mode audio will be recorded to the L channel only When an external monaural microphone is used while Rec Mode issettoastereorecordingmode itenablesrecording only with the L channel microphone For VN 8100PC only Notes Toensurerecordingfromthebeginning startrecordingafteryouseethedisplayandtherecording indicator lights on Whenremainingrecordingtimeislessthan60seconds t...

Page 6: ...he middle of the file the recorder will stop at that location 9 The recorder stops when it reaches the end of the file Continue pressing the 9 button to proceed with the cue from the beginning of the next file 0 The recorder stops when it reaches the beginning of the file Continue pressing the 0 button to proceed with the review from the end of the previous file hLocating the beginning of the file...

Page 7: ...hey will be automatically erased if you move to another file or connect the recorder to a computer Clearing an index mark or a temp mark 1 Locate the index or temp mark you want to clear hChanging play speed The playback speed of the file can be changed between 0 5 and 2 times speed Change the speed according to need such as listening to meeting content at a fast speed or reviewing spots that you ...

Page 8: ...d as far as the end position When it reaches to the end of the file while w is flashing thepointwillbecometheendposition andrepeatplayback will start 3 Press the REC s button againatthepositionwhere you want to end segment repeat playback The recorder repeatedly plays back the segment until the segment repeat playback is cancelled Note As in normal playback mode playback speed can be changed durin...

Page 9: ...y take over 10 seconds to complete processing Never remove batteries during this time becausedatamaybecorrupted Inaddition replacethebatterieswithnewonesinordertoensure that the batteries will not run out while processing You cannot delete folders through the recorder hMenu setting method Items in menus are categorized so that you can quickly set a desired item You can set each menu item as follow...

Page 10: ...Files with large capacities and long recording times can be split so that they are easier to manage and edit 1 Select the file you want to divide 2 Start Playback or fast forward the file and stop the playback at divide position 3 Select File Divide from the menu on the File Menu 4 Pressthe buttontoselect Start andthenpress the OK MENU button Dividing will be displayed and file splitting will star...

Page 11: ... close to the speaker s mouth 5 10 cm If the RecScene is set to a setting other than Off the MicSense function will not be available Set Rec Scene to Off to use this function Rec Mode Besidesstereo andmonauralrecording youcanalsoselectrecordingwith priority to sound quality and recording with priority to recording time Select the recording mode appropriate to your needs For VN 8100PC only 1 Select...

Page 12: ... dictation Meeting Suitable for recording meetings Conference Suitable for seminars with a small number of people User Setting Recording with menu settings saved using Scene Save a Rec Scene indicator When Scene Save is selected Press OK MENU button You can save the current Rec Menu menu settings in User Setting To change the Rec Scene return the screen to Scene Select by pressing and holding the ...

Page 13: ...hisfunctionenablesyoutoskip forward orreverseskip rewind afilebe ing played for a set period This function is convenient for quickly skipping to another playback position or repeatedly playing back short phrases 1 Select Skip Space from the menu on the Play Menu In Menu mode selection When Forward Skip is selected File Skip 10sec Skip 30sec Skip 1min Skip 5min Skip 10min Skip When Reverse Skip is ...

Page 14: ...press the OK MENU button After Data will be cleared message is on for two seconds Start and Cancel will turn on Skip Space Forward Skip File Skip Reverse Skip File Skip LCD Sound Menu Font Size Large Contrast Level 06 LED On Beep On Language Lang English 1 For VN 8100PC only 2 For VN 8000PC only Note After resetting the settings the time settings and file numbers will be preserved from before the ...

Page 15: ...ection cables other than the supplied cable Using cables from other manufacturers could result in damage to the recorder Do not use the supplied USB extension cable with devices from other manufacturers Refer to the user s manual for your PC regarding the USB port on your PC Be sure to push the cable connector all the way in Otherwise the recorder may not operate properly When connecting the recor...

Page 16: ... excluded from the Olympus s liability Batteries f Danger Batteries should never be exposed to flame heated short circuited or disas sembled Never store batteries where they will be exposed to direct sunlight or subjected to high temperatures in a hot vehicle near a heat source etc f Warning Do not solder lead wires or terminals directly onto a battery or modify it Do not connect the and terminals...

Page 17: ...5 mm mini jack impedance 8 Ω or more 4 Input power requirement AAA battery LR03 or Olympus Ni MH rechargeable battery 4 External dimensions 108 mm 39 mm 16 8 mm without protrusions 4 Weight 66 g including battery 4 Operating temperature 0 C 42 C For VN 8100PC only Overall frequency response 4 During recording or playback mode MP3 format For VN 8100PC only Recording mode Overall frequency response ...

Page 18: ...above values are strictly rough guides Caution is required since the differences in the available recording time will increase when the bit rate is low Available recording time may be shorter if many short recordings are made The displayed available recording time and recorded time are approximate indications Maximum recording time per file 4 MP3 format For VN 8100PC only 192 kbps approx 49 h 40 m...

Reviews: