


Olympus FV1200 User guide
June 23, 2015
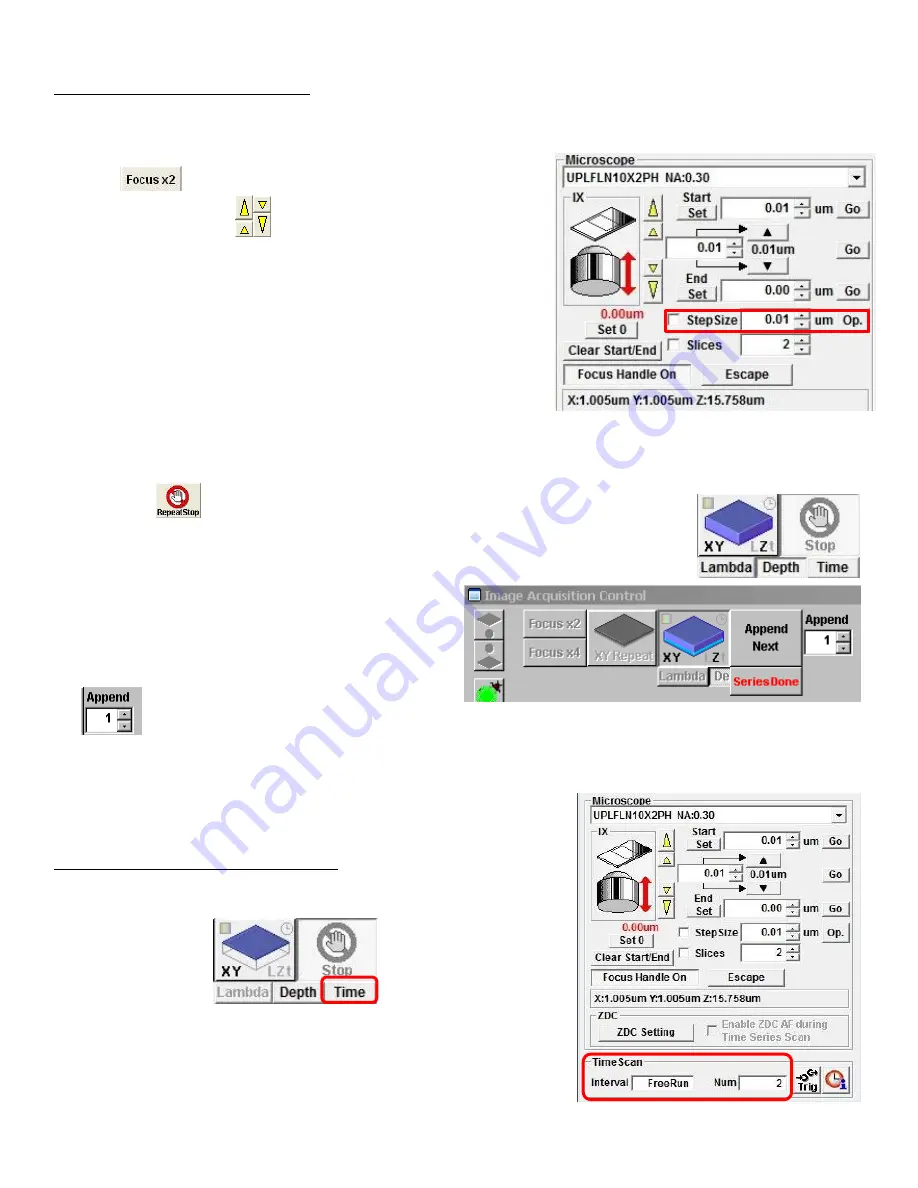
G. Z-Series (xyz) Image Acquisition
Use this mode to obtain optical section through the depth (z dimension) of your sample that can be used for
3D visualization. Before starting the following procedure, make adjustment for xy multicolor imaging
condition as described above.
1.
Click
button to scan.
2.
Use the arrowheads
buttons or the
focus knob
on the
remote controller
to focus into different Z-axial planes (large
arrowhead buttons shift a full step size and small ones a half
step size that you define).
3.
When you find an upper limit of your sample by moving the
objective up, click
Start Set
button. Bring the objective down
until you find lower limit and click
End Set
button.
4.
Determine the
Step Size
and the number of
Slices
, which correlate with each other. It is recommended to
set the
step size
similar to the optical section thickness of the objective you are using, so that there is no
gap between the optical sections upon projection into 3D. The step size can be fixed by checking the box.
5.
Click Stop
button. Adjust the Scan
Speed
if needed, click
Depth
button (“
Z
”
will be appear on the
XY button
to become
XYZ
), and then click
XYZ
button.
6.
When acquisition is done,
Append
Next/
SeriesDone
button will appear over the
Stop button. If you need add additional sections,
click
Append Next
button (enter the number of
sections you want to add into the Append box
) or click
SeriesDone
to finish the
acquisition.
7.
Save the image.
H. Time-Series (xyt) Image Acquisition
Use this mode for imaging time-lapse of live specimens. Before
starting time series imaging, make adjustment for xy imaging as usual.
1.
Click Time button
. It becomes
XY_t
.
2.
In the
TimeScan
option, enter the
interval time
(in second)
between one acquisition start and the next acquisition start (for
example; to set up a 1 min interval, type 60 and press Enter key. If
you put 0 and enter (FreeRun), the interval will be the acquisition
time that is required for each frame).


