background image

Olympus FV1200 User guide 

June 23, 2015 

E. Viewing with Transmitted or Epifluorescence  Light 

Before scanning the sample with laser light, look at the sample and find 
the region of interest first with either transmitted or fluorescent light. 

M

AKE SURE THE SLIDE AND COVERGLASS ARE CLEAN AND SEALED

.  Place the slide on 

the microscope stage. 
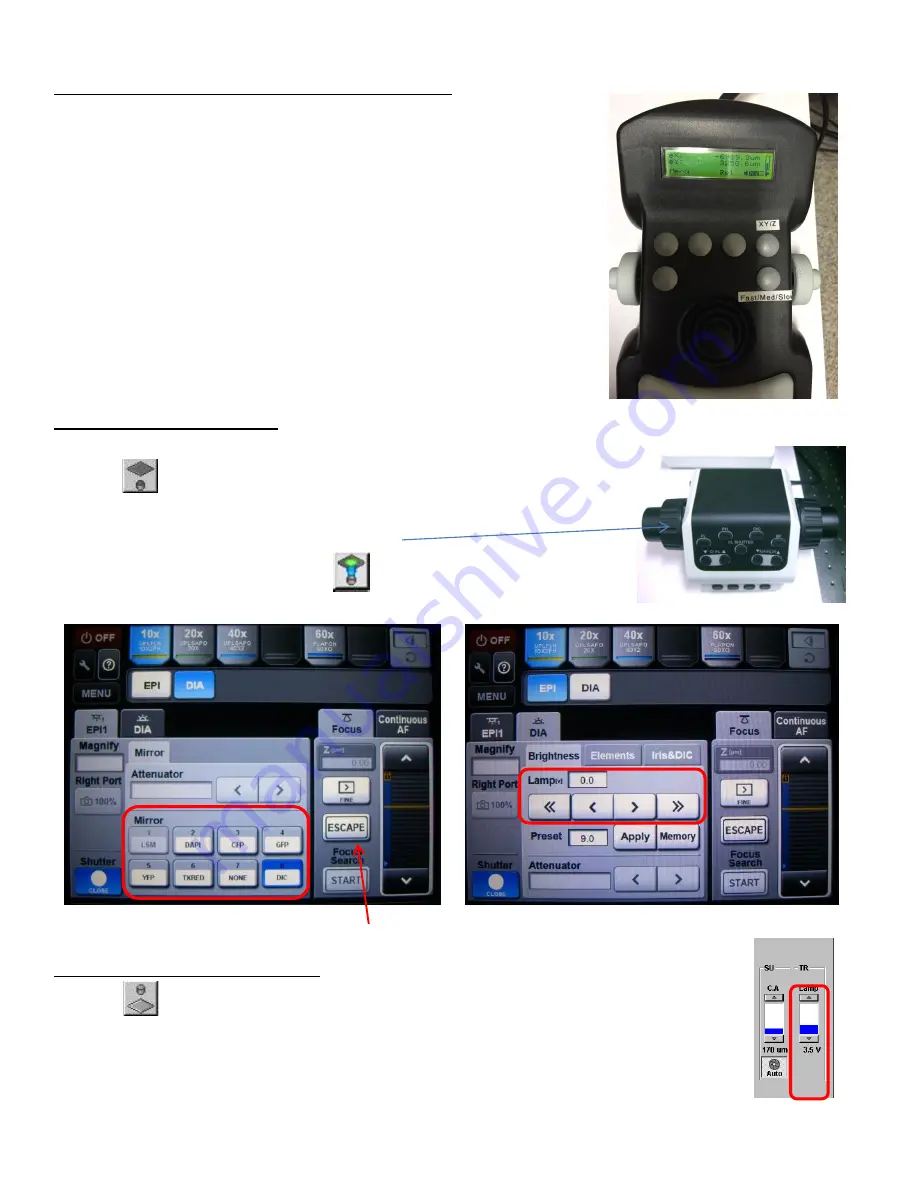
Move the stage using the joystick on the XY stage controller. Push the 

speed (Fast/Med/Slow) button

 to change how fast the stage moves. 

(You can also use the side wheels to control x and y separately by pushing 
the 

XY/Z button

 to select XY on screen.)


Press 

Esc button

 (on LED touch panel 

 or on FV10 program) to move 

the objective completely away from the sample and press again to bring 
the objective to the original position. 
 

Fluorescent image observation 

1.


Select an objective lens using the touch panel controller (TPC).  

2.


Click  

 of the FV10-ASW program or [EPI] button of TPC. 

3.


Select the appropriate 

fluorescence filter

 by touching a mirror button on 

TPC. Adjust focus using the focusing knob.


4.


After finding area of interest, click 

 or [EPI] button on the TPC to 

close the fluorescence light shutter and change the light path to the laser 

scanner.  


Transmitted light image observation 

1.


Click 

 or [DIA] button of the TPC to turn on bright field light.  

2.


Click on [BF], [DIC], or [Phase] button on the TPC.  Adjust the light intensity with the lamp 
controller or by touching Lamp arrows on [DIA] tab. 

3.


For DIC viewing, insert the DIC slider and adjust the DIC contrast using the prism 
controller.  


Summary of Contents for FV1200 MPE

Page 1: ...supply by pushing the ON OFF button and releasing it The light should lights up in Blue 3 Turn on microscope controller and XY stage controller 4 Turn on the touch panel controller and touch Start Ope...

Page 2: ...power supplies a Multi Ar laser Switch to ON and turn the Key to ON b MCPSU 405 440 473 559 635nm Switch ON c LD559 laser Switch on and WAIT UNTIL THE TEMPERATURE LIGHT STOPS BLINKING and THEN turn th...

Page 3: ...to 1x With zoomed view you can select the scanning area by moving the blue lined box around Laser power control Checking the box will activate the laser The power can be adjusted by pointing the mouse...

Page 4: ...e sample at 2us pixel because of its fast display refreshing rate this will be good for focusing and searching for ROIs without bleaching your sample Focus x4 will be faster but the display quality ma...

Page 5: ...jective completely away from the sample and press again to bring the objective to the original position Fluorescent image observation 1 Select an objective lens using the touch panel controller TPC 2...

Page 6: ...u selected If the Selected dyes upon opening the program are not ones that you want to use click the All Clear button first before selecting your dyes 2 Choose Image size default 512x512 from Size pan...

Page 7: ...ckground in blue e Click to stop the fast scanning and click to scan at the imaging speed and to check the image quality Adjust more if needed 7 Repeat the above procedure for 515 nm EYFP and for 635...

Page 8: ...one channel first and then scans the next channel If there is no bleed through between the emissions of some fluorophores you are using you can group them together to scan them simultaneously as a gro...

Page 9: ...f the objective you are using so that there is no gap between the optical sections upon projection into 3D The step size can be fixed by checking the box 5 Click Stop button Adjust the Scan Speed if n...

Page 10: ...icking My Image Folder button select Tools Option menu Click General tab and specify the path of your image folder with Browse button Upon creating a user account each user will have its own folder in...

Page 11: ...pe for export ROI Overlay section allows saving the file with ROI information Output Format RGB Color the red green and blue channel will be saved in color as individual tif files in a folder RGB Colo...

Page 12: ...hour or so leave the microscope system ON If not shut down the system as described below Shutting Off the system 1 Shut down the computer 2 Turn the mercury lamp off by pushing ON OFF button for two s...

Reviews: