background image

Olympus FV1200 User guide 

June 23, 2015 

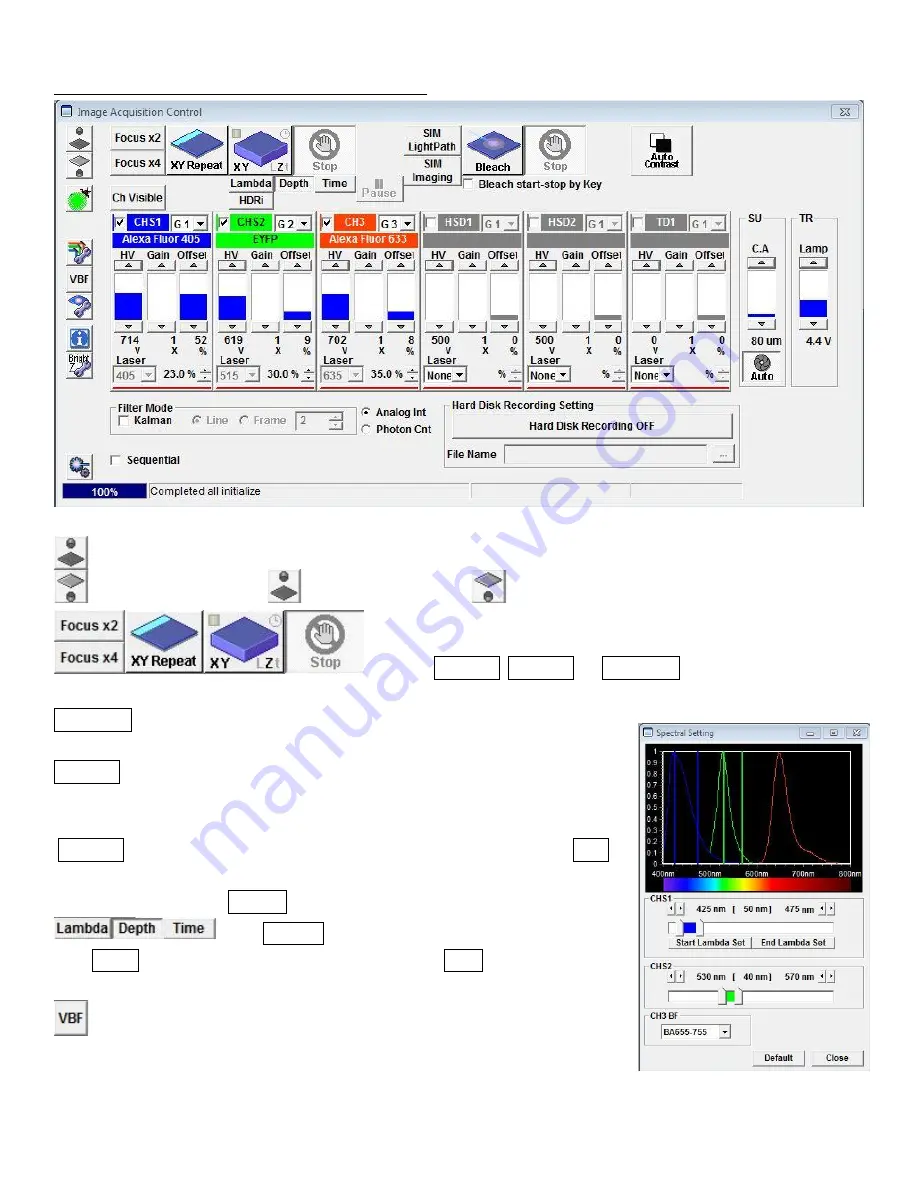
D. Overview of Image Acquisition Control window 


: Click Transmission light

 or Epifluorescent light 

  to turn it on and off. 

: Click on 

Focus x2, Focus x4, 

or 

XY Repeat

 begins scanning without 

image acquisition.  

XY Repeat

 scans at the imaging speed that you set with scan speed on Mode 

panel.   

Focus x2

 automatically scans the sample at 2us/pixel – because of its fast 

display refreshing rate, this will be good for focusing and searching for ROIs 
without bleaching your sample. 
 

Focus x4

 will be faster, but the display quality may be too rough. Click 

Stop


scanning.   
To acquire image, click  

XY (LZt)

 .  

: Click 

Lambda

 to acquire lambda scan imaging (XYL).  

Click 

Depth

 for z-series image acquisition (XYZ). Click 

Time

 for time-lapse 

image series (XYt).  

: Click on this will open the 

Spectral Setting

 window, where the range of 

emission wavelength can be adjusted to prevent overlap between 
fluorescences. 
 

Summary of Contents for FV1200 MPE

Page 1: ...supply by pushing the ON OFF button and releasing it The light should lights up in Blue 3 Turn on microscope controller and XY stage controller 4 Turn on the touch panel controller and touch Start Ope...

Page 2: ...power supplies a Multi Ar laser Switch to ON and turn the Key to ON b MCPSU 405 440 473 559 635nm Switch ON c LD559 laser Switch on and WAIT UNTIL THE TEMPERATURE LIGHT STOPS BLINKING and THEN turn th...

Page 3: ...to 1x With zoomed view you can select the scanning area by moving the blue lined box around Laser power control Checking the box will activate the laser The power can be adjusted by pointing the mouse...

Page 4: ...e sample at 2us pixel because of its fast display refreshing rate this will be good for focusing and searching for ROIs without bleaching your sample Focus x4 will be faster but the display quality ma...

Page 5: ...jective completely away from the sample and press again to bring the objective to the original position Fluorescent image observation 1 Select an objective lens using the touch panel controller TPC 2...

Page 6: ...u selected If the Selected dyes upon opening the program are not ones that you want to use click the All Clear button first before selecting your dyes 2 Choose Image size default 512x512 from Size pan...

Page 7: ...ckground in blue e Click to stop the fast scanning and click to scan at the imaging speed and to check the image quality Adjust more if needed 7 Repeat the above procedure for 515 nm EYFP and for 635...

Page 8: ...one channel first and then scans the next channel If there is no bleed through between the emissions of some fluorophores you are using you can group them together to scan them simultaneously as a gro...

Page 9: ...f the objective you are using so that there is no gap between the optical sections upon projection into 3D The step size can be fixed by checking the box 5 Click Stop button Adjust the Scan Speed if n...

Page 10: ...icking My Image Folder button select Tools Option menu Click General tab and specify the path of your image folder with Browse button Upon creating a user account each user will have its own folder in...

Page 11: ...pe for export ROI Overlay section allows saving the file with ROI information Output Format RGB Color the red green and blue channel will be saved in color as individual tif files in a folder RGB Colo...

Page 12: ...hour or so leave the microscope system ON If not shut down the system as described below Shutting Off the system 1 Shut down the computer 2 Turn the mercury lamp off by pushing ON OFF button for two s...

Reviews: