background image

6

  Chapter 1 – Camera Setup and Control Reference

sections, in which I offer suggestions for the best use of the various setting choices for dif-
ferent styles of photography.

There is an individual chapter for all the visual display touch screens and for each menu 

system in the camera, giving you a detailed examination of virtually every aspect of the 
camera’s control systems.

Because the E-M5II is a camera made primarily for advanced and professional users, this 

book assumes you have knowledge of basic things like depth of field; lens focal length and 
angle of view; and how the aperture, shutter speed, and ISO sensitivity control exposure.

If you need to brush up on these subjects, you can find a lot of helpful information in 

my book 

Beyond Point-and-Shoot

. It assumes absolutely no previous knowledge of pho-

tography and covers the basics for new users of MILC and DSLR cameras. You can find out 
more about 

Beyond Point-and-Shoot

 at Darrell’s website:

http://www.PictureAndPen.com/BeyondPS

I sincerely hope this book is useful to you and greatly expands your understanding of 

your new E-M5II camera.

Charge the Battery

When you first open the box that contains your new E-M5II, you should charge the camera’s 
battery. The battery may have enough life in it for an hour or two of use, so it may not be 
critical to charge it immediately. However, for extended configuration and use, it is best to 
have a fully charged battery in the camera.

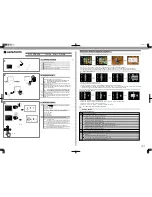
Super Control Panel or Live View Screen?

When you turn your new camera on, the first screen that appears on the monitor is the 
Super Control Panel (figure 1.4, image 1). This panel allows you to control things like the 
shutter speed, aperture, ISO, autofocus, and several other key camera functions. It is a very 
convenient screen, and we will consider it in detail in the chapter Screen Displays for 
Camera Control
.

When the Super Control Panel is displayed on the monitor, you will need to use the elec-

tronic viewfinder (EVF) to compose your pictures. If you want to use the Live View screen 
(figure 1.4, image 3) to compose your pictures instead of the EVF, you will need to press 
the LV button (figure 1.4, image 2). Note that on the E-M5II, this is actually the Fn2 but-
ton, which can have any one of 27 different functions assigned to it. The factory-default 
assigned function is Live View, and the icon for Live View is engraved on the button top. 
Hereafter, we’ll refer to this button simply as the LV button. 

My camera’s Live View screen is displaying my current subject, a battery and some Lego 

blocks in my light tent. The LV button toggles between the Super Control Panel and the 
Live View screen, as shown in figure 1.4. Regardless of whether the monitor is displaying 

Summary of Contents for E-M5 Mark II

Page 1: ...1 Camera Setup and Control Reference Image Jay Dickman...

Page 2: ...o splash proof dust proof and freeze proof It should remain a reliable camera for years of faithful service Figure 1 1 Olympus E M5II front view The small size of the camera allows great portability f...

Page 3: ...the E M5II as a new photographer and grow into the camera gradually learning about custom features and relying less on automatic features over time Or as an experienced photographer you can take imme...

Page 4: ...ll give new E M5II users a place to start Later as you progress through the book we ll look at all the buttons switches dials and menu settings in detail You will be able to fully master the operation...

Page 5: ...life in it for an hour or two of use so it may not be critical to charge it immediately However for extended configuration and use it is best to have a fully charged battery in the camera Super Contr...

Page 6: ...t arm s length to compose with the Live View screen you may want to leave the Super Control Panel active to have quick access to its settings To use the Super Control Panel press the OK button However...

Page 7: ...g with several other functions that all camera users should set up according to their needs especially with a new camera This section lists the most important camera settings for immediate configurati...

Page 8: ...ISO Noise Filtration Page 369 Long Exposure Noise Reduction Page 367 Beep sound Page 361 Image review Page 335 Image display rotation Page 238 Grid display Page 439 Low battery warning level Page 448...

Page 9: ...ill often read scroll to the right or some other direction This is a reference to using the Arrow pad buttons The Arrow pad buttons have some programmability through Cus tom Menu functions as describe...

Page 10: ...ed to choose various individual items within groups of items This is not a programmable button Lens release button This non programmable button has one function re leasing the lens lock so that you ca...

Page 11: ...the screen This is not a programmable button Playback button This non programmable button is for reviewing images and movies You will press this button to examine images and videos saved on the camera...

Page 12: ...s a Mode Dial on top that allows you to change how the camera works You can select from modes that turn your camera into a fully automatic iAUTO point and shoot camera or a fully manual M user control...

Page 13: ...to move the lever to the Off position and then back to On to bring the camera back to life Unusual Icons in Menu Names Olympus uses unusual icons in some of its camera menus in some cases making it ha...

Page 14: ...Darrell has created a public Facebook site that allows members to freely as sociate with general Olympus camera users It is called Olympus Digital Camera Photo Enthusiasts ODCPE and is found here http...

Reviews: