background image

2

Recording

24

EN

Recording

Recording linear PCM format files of over 
2 GB

When recording a linear PCM format file, 
recording will continue even after the file size 
exceeds 2 GB. 

• 

The data is divided and saved in separate 

files of up to 2 GB. The files are processed 

as multiple files during playback.

• 

After recording 200 files which exceed 2GB 

recording stops.

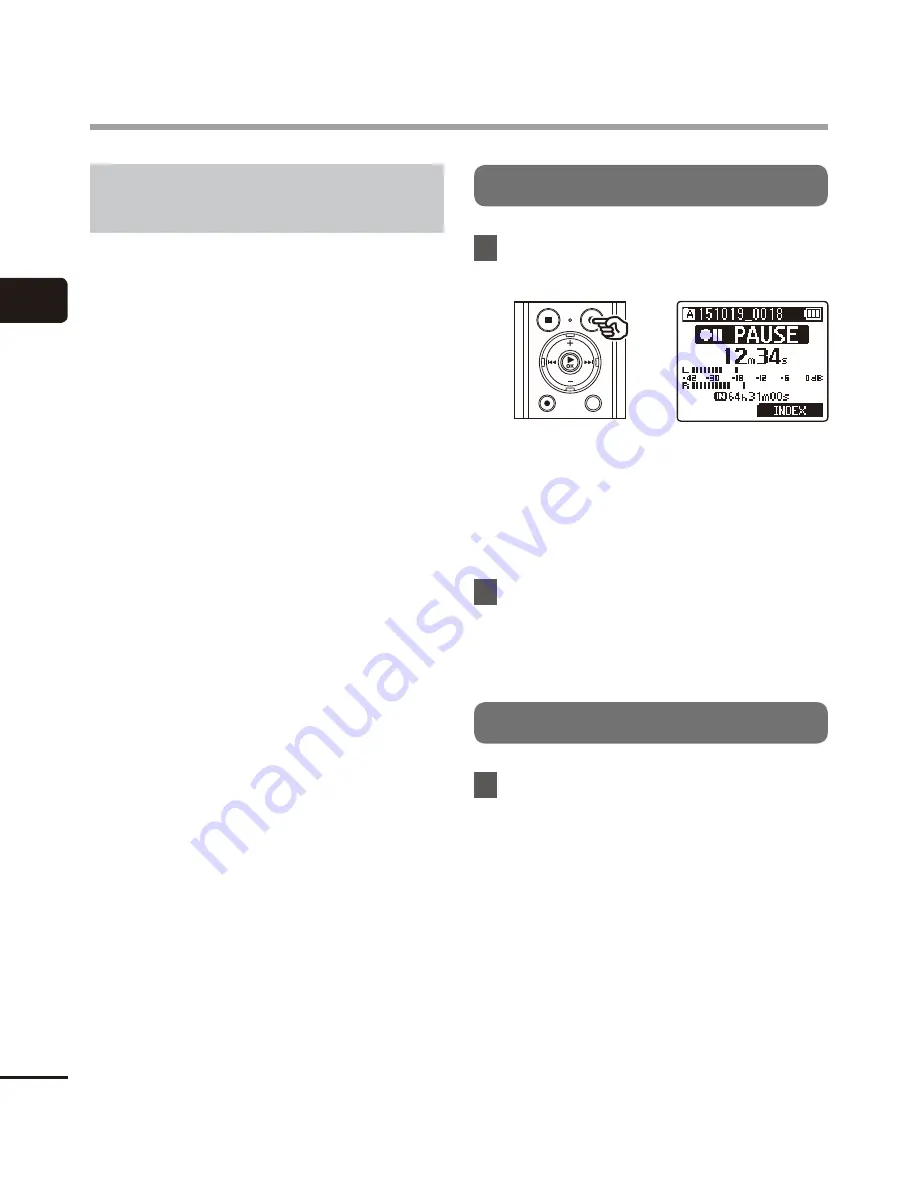
Pausing/resuming recording


1

  Press the 

REC

 ( 

s

) button during 

recording.

• 

Recording pauses, and the blinking 

message [

75

 PAUSE

] appears in the 

display.

• 

Recording is stopped automatically 

after being paused for at least 60 

minutes.


2

  Press the 

REC

 ( 

s

) button again 

while recording is paused. 

• 

Recording resumes from the position it 

was paused at.

Quickly checking a recording


1

  Press the 

`

OK

 button during 

recording. 

• 

Recording ends, and the file just 

recorded is played.

Summary of Contents for dm-770

Page 1: ...ER USER MANUAL Thank you for purchasing an Olympus digital voice recorder Please read these instructions for information about using the product correctly and safely Keep the instructions handy for fu...

Page 2: ...Scene 26 Recording with an external microphone 28 Recording from another connected device 29 Recording audio from another device with this recorder 29 Recording audio from this recorder with another...

Page 3: ...56 Restoring the default settings Reset Settings 57 Formatting a recording media Format 58 Checking voice recorder information System Info 59 5 Use with a PC PC operating environment 60 PC connection...

Page 4: ...nnector slide lever 8 ERASE button 9 Built in stereo microphone R 0 MENU SCENE button F2 button REC record s button LED indicator light LED LIST button OK button 0 button button 9 button button Attach...

Page 5: ...ing indicator Recording pause indicator Stop indicator Playback indicator Fast playback indicator Slow playback indicator Fast forward indicator Fast rewind indicator 5 Elapsed recording time 6 Level...

Page 6: ...the settings Time Date and Remain amount of possible recording time remaining If the current time date is set incorrectly see Setting the time date Time Date P 55 2 1 3 5 6 4 1 Current time date 2 Rec...

Page 7: ...ng the battery setting Select the battery setting to match the inserted battery Select the setting for a nickel metal hydride rechargeable battery or the setting for an alkaline battery Getting starte...

Page 8: ...rtment of the voice recorder 1 Press and hold the battery card cover lock button and then slide the battery card cover to open 2 Insert a AAA battery making sure its positive and negative terminals ar...

Page 9: ...ess the or button to select the type of battery you inserted Ni MH Select if you inserted an Olympus nickel metal hydride rechargeable battery model BR404 Alkaline Select if you inserted an alkaline b...

Page 10: ...the clock You can change the clock display format See Setting the time date Time Date P 55 for the procedure Setting the voice guidance Using this feature a voice announces the operating conditions o...

Page 11: ...voice recorder 3 After making sure the voice recorder is stopped connect the USB connector to a USB port on a PC 4 Press the OK button to start charging the battery When Battery P 55 is set to Ni MH...

Page 12: ...argeable battery provided and set Battery to Ni MH P 8 P 9 Use only the Olympus USB connecting AC adapter model provided A514 1 Connect the voice recorder to the USB connector on the AC adapter To USB...

Page 13: ...auto power OFF mode Do not use a USB hub when charging the battery by connecting to the PC You cannot charge the battery if 1 or 2 is blinking Charge the battery in an ambient temperature of between 5...

Page 14: ...C 4 to 86 F Use of a rechargeable battery outside the temperature ranges above may result in drops in battery performance or life When not using the voice recorder for an extended period remove the re...

Page 15: ...us nickel metal hydride rechargeable battery model BR404 Even if the battery indicator is playback with the built in speaker at some volumes may result in a drop in battery output voltage causing the...

Page 16: ...placed correctly as shown Insert the microSD card straight avoiding crooked insertion Inserting a microSD card the wrong way or crookedly could damage its contact surface or cause it to jam in the sl...

Page 17: ...nd not be recognized properly For microSD card compatibility under Olympus verification please contact our customer support at http www olympus europa com Note that our customer support will provide i...

Page 18: ...he POWER HOLD switch to the HOLD position Hold appears in the display and the recorder enters HOLD mode Releasing HOLD mode 1 Slide the POWER HOLD switch to position A shown below NOTE When any button...

Page 19: ...k stop position at power OFF is stored in memory TIP Turning the power OFF whenever the voice recorder is not in use minimizes battery consumption Power Save mode When the voice recorder has been stop...

Page 20: ...each time you press the F1 FOLDER button a Folder indicator b File name 2 Press the 9 or 0 button to select the desired file c d f e The following information is displayed for just 2 seconds immediat...

Page 21: ...changes to the calendar screen 2 Press the 9 or 0 button to to select the desired date a b c a Date file was recorded b Displayed when dates with files exist before and after c Number of files saved r...

Page 22: ...he folder to save the recording in Each new voice recording file is saved in the selected folder 2 Point the built in microphone in the direction of the sound to record 3 Press the REC s button to sta...

Page 23: ...g of the recording being cut off start recording after the LED indicator light has lit or mode indicator has appeared in the display When the remaining possible recording time is 60 seconds the LED in...

Page 24: ...recording 200 files which exceed 2GB recording stops Pausing resuming recording 1 Press the REC s button during recording Recording pauses and the blinking message 75 PAUSE appears in the display Reco...

Page 25: ...ming sounds from equipment such as air conditioners or projectors Mic Select P 42 Selects whether or not the built in center microphone is to be turned on or off Timer Rec P 43 Sets the content such a...

Page 26: ...ume of the input sound Suited to recording all sounds Lecture This is suitable for recording with the microphone pointed in a specific direction such as at a large venue where the speaker is far away...

Page 27: ...Conference Rec Level High Rec Mode MP3 128 kbps Zoom Mic Off Low Cut Filter On Mic Select Central Mic On Meeting Rec Level Middle Rec Mode MP3 128 kbps Zoom Mic Off Low Cut Filter Off Mic Select Centr...

Page 28: ...To microphone jack 2 Start recording See Recording P 22 for descriptions of recording operations TIP See Accessories optional P 79 for the compatible external microphones NOTE Microphones with plug in...

Page 29: ...rnal device perform a test recording and adjust the output level of the connected device as needed Recording audio from this recorder with another device Audio from this recorder can be recorded to an...

Page 30: ...Normal playback Slow playback Fast playback The playback speed can be changed in Play Speed of the playback menu P 47 3 Press the or button to adjust the volume to the desired level The volume can be...

Page 31: ...ing stops when the end of the file is reached Press and hold the 9 button again to fast forward from the beginning of the next file Rewinding Rewinding while the voice recorder is in stop mode 1 With...

Page 32: ...yback position is the beginning of the file To skip to the beginning of the previous file during playback press the 0 button twice consecutively NOTE If an index mark or temp mark is reached when skip...

Page 33: ...ring playback Play Mode P 46 Selecting from two playback modes Play Speed P 47 The playback speed can be adjusted between x0 5 Play and x3 5 Play in 0 1 increments Skip Space P 48 A handy function for...

Page 34: ...s The sampling rate bit count and bit rate combinations supported for music file playback by the voice recorder are shown below File format Sampling rate Bit count bit rate WAV format 44 1 kHz 48 kHz...

Page 35: ...are automatically erased when you select a different file transfer the file to a PC or move the file on a PC You can write up to 200 index marks temp marks in a single file The message Further marking...

Page 36: ...stop mode The voice recorder returns to the stopped mode if no operation is performed for 8 seconds 3 Press the or button to select All in folder or One file All in folder Erases all the files saved i...

Page 37: ...oice recorder will not be erased nor will folders containing these files The voice recorder must be connected to a PC to erase these files and folders Before erasing a file or folder charge or replace...

Page 38: ...were not sure what was said through voice guidance press and hold the F2 button to have the item read out aloud again P 52 1 While the voice recorder is in stop mode press the MENU SCENE button 2 Pres...

Page 39: ...the setting A message indicating the setting has been entered appears You can cancel the setting and return to the previous screen by pressing the 0 button instead of the OK button 8 Press the STOP 4...

Page 40: ...ing dictation Auto The recording level always automatically changes according to the volume of the input sound Suited to recording all sounds TIP To record the speaker s voice clearly set Rec Level to...

Page 41: ...rding with a connected mono microphone records on the left channel only Selecting microphone directivity Zoom Mic The voice recorder s built in stereo microphone provides directivity ranging from broa...

Page 42: ...Mic function will make the battery deplete more quickly Reducing noise during recording Low Cut Filter The voice recorder s low cut filter function lets you make recordings that reduce humming sounds...

Page 43: ...e Replace or charge the battery if needed P 8 P 11 Check that there is sufficient remaining memory space Erase unneeded files or use a new microSD card if needed P 36 P 16 The recorded file is saved i...

Page 44: ...cursor then press the or button to change the number After you have finished in the reservation settings screen you can press the 9 button to check the settings for the selected reservation number Pr...

Page 45: ...atically skips the non voice portions of the file and plays only the speaking portions Off The voice playback function is disabled Reducing noise during playback Noise Cancel Use the Noise Cancel func...

Page 46: ...lete more quickly Selecting playback modes Play Mode Several playback modes are available for different listening styles File Stops playback after the current file has been played Folder Plays all the...

Page 47: ...n be adjusted between x0 5 Play and x0 9 Play in 0 1 increments When Fast Playback was selected The playback speed can be adjusted between x1 1 Play and x3 5 Play in 0 1 increments Playback speed indi...

Page 48: ...ack after moving the playback position backward by the set amount 2 Press the or button to select a setting When Forward Skip was selected File Skip 10 sec Skip 30 sec Skip 1 min Skip 5 min Skip 10 mi...

Page 49: ...ected file While recording Extract the speech portion while recording 2 Press the OK button When Current File was selected The progress of the operation is shown as a percentage in the display Voice D...

Page 50: ...2 dB or less or due to surrounding noise The time needed for the extraction process will increase in proportion to the size of the recorded file Before starting extraction it s recommended to charge o...

Page 51: ...lect Start and then press the OK button Dividing appears in the display and the file dividing process starts File divide completed appears when the process has finished TIP After dividing a file the f...

Page 52: ...f was selected 1 Press the or button to select On or Off On Voice guidance will be enabled Off Voice guidance will be canceled 2 Press the OK button to exit the selection screen When Speed was selecte...

Page 53: ...inverting the colors Normal The display is normal Invert Inverts the colors of the display Setting the backlight Backlight The display backlights are switched on for a preset amount of time when a but...

Page 54: ...of the display to 12 different levels The setting can be adjusted to between 01 to 12 Changing the display language Language You can select the language used in the voice recorder s displays Deutsch...

Page 55: ...e dry cell battery Setting the time date Time Date If you set the date and time you will be able to check when a file was recorded in the information for each file accessed from Property of the menu 1...

Page 56: ...g the USB connection USB Settings The PC setting lets you connect the voice recorder to a PC to transfer files The AC Adapter setting lets you connect the voice recorder to a USB connection AC adapter...

Page 57: ...Rec Menu Rec Scene Auto Rec Level Auto Rec Mode PCM 44 1kHz 16bit MP3 128kbps Zoom Mic Off Low Cut Filter Off Mic Select Central Mic On Timer Rec Off Play Menu Voice Playback Off Noise Cancel Off Voic...

Page 58: ...format the voice recorder from a PC Formatting erases all the existing data including locked files and read only files Before formatting charge or replace the battery to ensure it will not run out be...

Page 59: ...u 59 EN Device menu Device Menu Checking voice recorder information System Info You can display voice recorder information from a menu screen The voice recorder s Version system version and Serial No...

Page 60: ...t Windows Operating system Microsoft Windows Vista Service Pack 2 32 bit 64 bit Microsoft Windows 7 Service Pack 1 32 bit 64 bit Microsoft Windows 8 8 1 32 bit 64 bit Microsoft Windows 10 32 bit 64 bi...

Page 61: ...sh file management screen may be reordered or become unrecognizable Note that it will still be possible to read and write data on the voice recorder after setting the attribute of the voice recorder s...

Page 62: ...isplay when the USB connector is connected The voice recorder will not connect to the PC if AC Adapter was selected for the voice recorder s USB connection setting Select PC for USB Settings P 56 TIP...

Page 63: ...rly Connecting the voice recorder through a USB hub may result in unstable operation Do not use a USB hub if operation is unstable Use only a compatible Olympus USB extension cable KP 19 Operation is...

Page 64: ...heck that the LED indicator light of the voice recorder has stopped blinking and then disconnect the USB cable Macintosh 1 Drag and drop the removable disk icon for the voice recorder shown on the des...

Page 65: ...ouch Effect Function you can easily apply special effects to the voice file and carry out noise reduction in any specified area Sending files by email Voice files are stored in the Message folder on t...

Page 66: ...bine them into one file Dividing a file You can divide a specified voice file into two files Audio Notebook makes it easy to use sound files Extract the useful parts of the audio and display and edit...

Page 67: ...Olympus Sonority Setup The Installer will open Follow the Installer Wizard instructions 6 Accept the terms of the Licensing Agreement You must accept the terms of the Licensing Agreement to install O...

Page 68: ...ment You must accept the terms of the Licensing Agreement to install Olympus Sonority After checking the Agree box click Next 7 Set the Installation destination Click Next if you do not want to change...

Page 69: ...llation is completed Maintenance Complete screen is displayed 7 Click Finish to complete uninstalling Macintosh 1 Exit Olympus Sonority 2 Open Finder 3 Double click the SonorityUninstaller pkg in the...

Page 70: ...n explanation of the topic is displayed 3 Double click the of the item you wish to search for An explanation of the topic is displayed 2 3 Search by Keyword 1 Display the online help and click the Ind...

Page 71: ...B FOLDER_C FOLDER_D and FOLDER_E Fig C You can copy voice recorder files to any folder on the PC Fig D Copying files recorded with the built in microphone to a PC B A C D RECORDER FOLDER_A FOLDER_B FO...

Page 72: ...nnect the voice recorder from the PC P 64 Macintosh 1 Connect the voice recorder to the PC P 62 When the voice recorder is connected to the Macintosh operating system it is recognized and displayed on...

Page 73: ...umber of temp marks 200 have been written in the file Erase unneeded temp marks P 35 Folder full The maximum number of files 200 have been saved in the folder Erase unneeded files P 36 Memory error An...

Page 74: ...onnect the voice recorder to a PC and erase unneeded files Cannot play this file The file s format is not supported Select a file that can be played by the voice recorder P 34 Select a file No file ha...

Page 75: ...he built in speaker disconnect the earphones The volume is set to 00 Adjust the volume P 30 The recording is too quiet A low recording level has been set Redo recording after setting the recording lev...

Page 76: ...45 Unable to erase a file The file is locked You must unlock the file before you can erase it P 50 The file is a read only file Unlock the file or undo the read only setting on a PC Unable to erase a...

Page 77: ...onfirmation screen shown when connecting the USB connector The PC is unable to recognize the voice recorder AC Adapter has been selected for USB Settings Select PC for USB Settings P 56 Playback speed...

Page 78: ...If the recorder is very dirty soak the cloth in mild soapy water and wring well Wipe the recorder with the damp cloth and then wipe it with a dry cloth s s Display Wipe gently with a soft cloth NOTE D...

Page 79: ...ording conferences that enables connection of up to three left and three right channel units Cascade connection enables the left right channel connections to be extended up to about 12 meters to captu...

Page 80: ...authorized reproduction of this manual or unauthorized distribution of reproductions thereof Note that Olympus will assume no liability in the event of damages lost earnings or any claims from third p...

Page 81: ...t use the voice recorder in an atmosphere that might contain flammable or explosive gases It may cause fire or explosion s s Do not attempt to disassemble repair or modify the voice recorder It may ca...

Page 82: ...se fire or burns Remove the battery immediately taking care not to burn yourself Contact your place of purchase or an Olympus repair center or service center Do not touch the battery with bare hands w...

Page 83: ...th tape and discard them as general waste in the manner prescribed by the local authority Remove the battery from the voice recorder as soon as the battery becomes unusable It may cause leakage s s Ba...

Page 84: ...erve local laws and regulations Software f WARNING s s Do not use a music CD player to play back the included CD ROM It may damage the speaker and headphone or hearing loss may result Operating precau...

Page 85: ...ture or cause thereof Recorded file precautions Note that Olympus will assume no liability for recorded files being erased or becoming unplayable due to voice recorder or PC failure Recording of copyr...

Page 86: ...GB Some recording media memory capacity is used as a management area so the actual usable capacity will always be slightly less than the displayed capacity 4 Speaker Built in 18 mm diameter round dyna...

Page 87: ...kHz 128 kbps 20 Hz to 17 kHz 64 kbps mono 20 Hz to 13 kHz 8 kbps mono 20 Hz to 3 5 kHz 4 4 When recording with built in stereo microphone 20 Hz to 20 kHz Central Mic On 60 Hz to 20 kHz Central Mic Of...

Page 88: ...peaker playback Recording mode Alkaline dry cell battery Nickel metal hydride rechargeable battery Linear PCM format 48 0 kHz 16 bits 13 hours approx 11 hours approx 44 1 kHz 16 bits 13 hours approx 1...

Page 89: ...rd Recording time The figures below are guideline values 4 4 Linear PCM format Recording media Recording mode 48 0 kHz 16 bits 44 1 kHz 16 bits Internal memory 8 GB 10 hours 30 minutes approx 11 hours...

Page 90: ...bout 4 GB in the MP3 format and to about 2 GB in the linear PCM WAV format Regardless of the amount of remaining memory the maximum recording time per file is restricted to the following values 4 4 Li...

Page 91: ...do not throw the equipment into the domestic refuse Please use the return and collection systems available in your country for the disposal of this product This symbol crossed out wheeled bin Directi...

Page 92: ...burg Germany Tel 49 40 23 77 3 0 Fax 49 40 23 07 61 Goods delivery Modul H Willi Bleicher Str 36 52353 D ren Germany Letters Postfach 10 49 08 20034 Hamburg Germany European Technical Customer Support...

Reviews: