background image

OLYMPUS CIX100 Cleanliness Inspector System

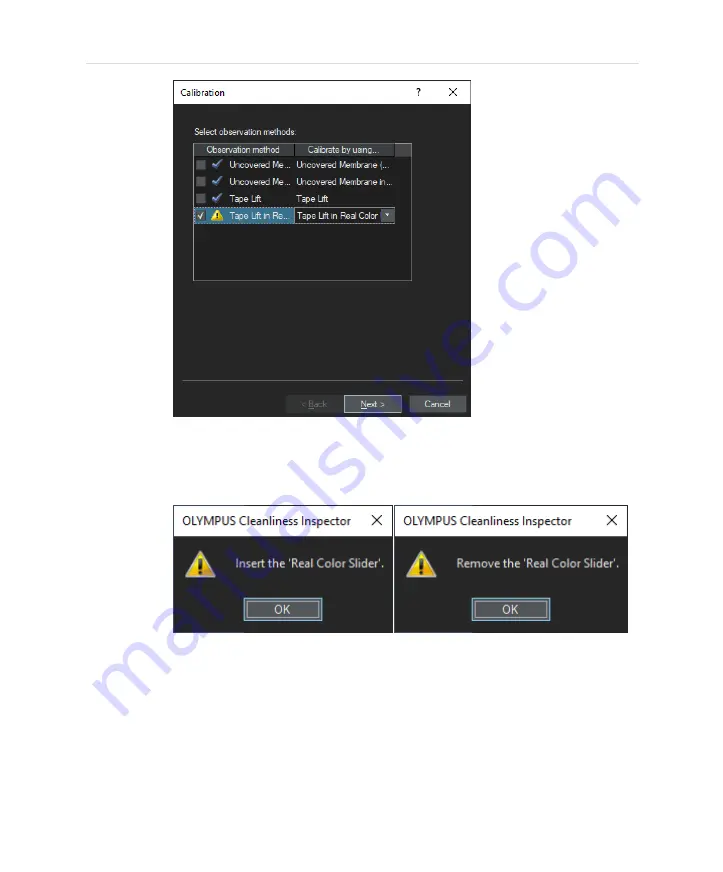
Whenever the Real Color Slider is applied for a calibration, the system will
remind you to insert or remove the real color slider with a respective pop-
up window. Please follow these instructions and click [OK] after you have
inserted or removed the slider.

15. When the process is finished successfully, the [White Balance] entry will be

marked with a blue tick in the [Calibration] dialog box indicating that a white
balance has been performed for all observation methods now.

16. Now it is recommended to perform the [Check System] workflow.

32

Summary of Contents for CIX100

Page 1: ...Instructions Sample Holders OLYMPUS CIX100 Cleanliness Inspector System Optical Microscope Accessory English ...

Page 2: ...to time revise the software described in this manual and reserves the right to make such changes without obligation to notify the purchaser In no event shall EVIDENT Technology Center Europe GmbH be liable for any indirect special incidental or consequential damages arising out of purchase or use of this manual or the information contained herein No part of this document may be reproduced or trans...

Page 3: ...13 5 Calibrating Shading Correction for a new sample type 15 6 Calibrating White Balance for a new sample type 24 7 Performing an inspection with different sample types with a CIX100 system 33 8 Best Practices for the versatile sample holders for your CIX100 system 36 8 1 Mounting and inspection of filter membranes in the CIX100 system 36 8 2 Mounting and inspection of tape lift samples in the CIX...

Page 4: ...entioned in this manual are intended for the inspection of technical cleanliness It is mandatory to follow the sample preparation procedure for each type of sample which is described according to the applications and the standard used Follow the mounting instructions for each sample type as outlined in this manual All sample holders are designed for use under normal environmental conditions Use un...

Page 5: ...s and sample types E9701689 HW CIX FH 25B E9701690 HW CIX FH 47B E9701691 HW CIX FH 55B E9701692 HW CIX FH 25W E9701591 HW CIX FH 47W E9701592 HW CIX FH 55W Sample type name in CIX ASW software uncovered membrane 1 clamp 2 desk white or black 5 ...

Page 6: ... with marks for tape widths 50 mm and 19 mm 2 black base with white surface 3 back side marked with dots E9701696 HW CIX HPT Sample type name in CIX ASW software particle trap E9701688 HW CIX PT 10 Particle traps 1 Black base with a green rubber as sample stabilizer 1 Open particle trap with sticky surface 2 Plastic container 6 ...

Page 7: ...55 mm diameter E9701692 HW CIX FH 25W Holder with white desk for filter membranes with 25 mm diameter Holders with white background can be used to inspect all opaque membranes The white coating can be damaged by aggressive solvents The main advantage of the white background holders is the inspection of woven membranes without showing artifacts from the holder when looking through the mesh E9701591...

Page 8: ...onment with a defined exposure time The particle traps can be ordered as a box of ten traps E9701694 HW CIX SIFP CIX100 alternative stage insert not compatible with sample holders listed above This stage insert is a flat plate which can be mounted to the CIX100 stage This is useful when CIX100 is to be used for metallurgy The samples can be placed on top of this flat plate 8 ...

Page 9: ...ION indicate situations where irreparable damage to the product can occur if ignored The warning sign and the word CAUTION indicate dangerous situations that can lead to light injuries if ignored ATTENTION Device damage through overloading the stage The maximum permitted load of the stage must not exceed 2 kg Overloading the stage can hinder the movement of the stage or damage the microscope Make ...

Page 10: ... the sample or sample holder at all This is particularly important when a new sample type has been mounted ATTENTION When the stage is moved either actively by the user or automatically by the system make sure that the current sample and sample holder do not impede the movement of the stage When the CIX100 software is used or the joystick is used to control the stage movement make sure that nothin...

Page 11: ...ransmission If necessary clean the surfaces with compressed air or with a dust free lens paper and a few drops of alcohol Please pay attention to the safety instructions for the substances applied CAUTION Pinching hazard When the stage moves gaps appear This creates a pinching hazard Make sure that you are not within the stage s range of movement when it is moving Try never to put your hands or fi...

Page 12: ...ype is referred to as uncovered membrane Additional filter holders can be ordered Two filter holders can be mounted to your CIX100 system simultaneously For convenient use of samples with different reflectivity than a matt white filter membrane e g made of cellulose nitrate it is sensible to redo the white balance calibration Whether a white balance recalibration is recommended can be seen when th...

Page 13: ...you have full access to the system configuration on the start page of your CIX ASW software 1 On the start page click the Hardware button l The Device List dialog box opens 2 Click the OK button l The Device Settings dialog box opens 3 In the Device Settings dialog box select the Sample Type entry l On the right you find a list of possible samples Uncovered membrane refers to the standard precalib...

Page 14: ...ple which is always activated in the CIX100 system 4 Select the appropriate other sample type or types you want to activate If you are unsure please compare with the list of sample types and holders you find on page 4 of this manual and click OK 14 ...

Page 15: ...x select Shading Correction and click Calibrate l In the following dialog box you find a list of observation methods In your CIX100 system each observation method represents a list of software settings optimized for the analysis under specific optical conditions Each sample type requires its own observation method If your system is equipped with a real color slider two observation methods will hav...

Page 16: ...ding correction has been performed already and marked with a yellow exclamation mark if the shading correction is still missing 3 Select an observation method which is still undefined If you start on top you will start with the new sample type without real color slider selected Click Next to continue 16 ...

Page 17: ...Skip the acquisition of the dark current correction image The dark current calibration does not need to be repeated here as it was already calibrated during installation i e keep the check box checked and click Next 17 ...

Page 18: ... System 5 Select all check boxes in the following dialog except White Balance and click Next l All objectives your CIX100 system is equipped with are listed in this dialog and must be calibrated Standard objectives are 1 25x 5x and 10x 18 ...

Page 19: ...re on the display area on the left side Usually this can be done by moving the stage a low position of the Z range A Z movement can either be performed by joystick or by the buttons in the Calibration dialog box The relative position of the sample in the calibrated Z range is displayed on the right side 19 ...

Page 20: ... acquire the correction images for all objectives in your system l A green bar indicates the progress Do not change any settings until the acquisition has been finished 8 Follow the software instructions in the dialog box and click Next to continue with the following objective 20 ...

Page 21: ...Sample Holders 9 Click Finish when all images have been acquired 10 Follow the instruction in the message and click OK 21 ...

Page 22: ...brated for all observation methods listed in the calibration dialog box Whenever the Real Color Slider is applied for a calibration the system will remind you to insert or remove the real color slider with a pop up window Please follow these instructions and click OK after you have inserted or removed the slider 22 ...

Page 23: ... When the process is finished successfully the Shading Correction entry will be marked with a blue tick in the Calibration dialog box indicating that a white balance has been performed for all observation methods now 23 ...

Page 24: ...d in the CIX ASW software s help Insert the new sample type with the new sample which you activated in the Hardware Device List Device settings dialog box as described in chapter Adding new sample types to your CIX100 system on page 13 These may be l tape lift l particle trap or l covered membrane For a list of samples and applications please refer to chapter Available sample holders and sample ty...

Page 25: ...od reflects a list of optimized software settings for the analysis under specific optical conditions Each sample type requires its own observation method If your system is equipped with a real color slider two observation methods will have to be calibrated for each sample type for optimal results The observation method with real color slider is named after the particle type appended with in Real C...

Page 26: ...e without real color slider selected 4 Make sure that the matching sample type is mounted If not carefully mount the sample following the safety instructions in the chapter Safety on page 9 5 Click Next to continue 6 Skip the acquisition of the dark current correction image Dark current calibration does not need to be repeated here as it was already calibrated during installation i e keep the chec...

Page 27: ...Sample Holders 8 All objectives your CIX100 system is equipped with are listed in this dialog box and must be calibrated Standard objectives are 1 25x 5x and 10x 27 ...

Page 28: ...OLYMPUS CIX100 Cleanliness Inspector System 9 Approximately focus the sample and image a clean part of sample without any particulate contamination 28 ...

Page 29: ...ple Holders 10 Follow the instructions of the pop up windows until all images are acquired l A green bar indicates the progress Please do not change any settings until the acquisition has been finished 29 ...

Page 30: ...OLYMPUS CIX100 Cleanliness Inspector System 11 Click Finish when all images have been acquired 12 Follow the instruction and click OK 30 ...

Page 31: ...tain objective repeat the process for the respective objective and increase the exposure time before acquiring the image 14 Repeat these calibration steps until the white balance is calibrated for all observation methods listed in the calibration dialog box 31 ...

Page 32: ...ive pop up window Please follow these instructions and click OK after you have inserted or removed the slider 15 When the process is finished successfully the White Balance entry will be marked with a blue tick in the Calibration dialog box indicating that a white balance has been performed for all observation methods now 16 Now it is recommended to perform the Check System workflow 32 ...

Page 33: ...rd inspection configuration are explained which are specific when new sample types have been added to the system For all other functionality of your CIX100 software please refer to the CIX ASW software s help 1 Start a sample inspection 2 If you want to change the sample select Move Stage to Mounting Position CAUTION Stage and objectives will be moving 3 Mount your sample Be careful to only mount ...

Page 34: ...ng By default the last sample type used with your CIX100 system will always be activated here Usually it is not necessary to calibrate stage limits in this dialog box when EVIDENT CIX100 accessories are used If you have trouble finding the autofocus during the Inspect Sample workflow it may still be useful to recalibrate the stage limits at this step for optimal calibration for your sample type A ...

Page 35: ... and described in the CIX ASW software s help For a recalibration of Z mark Z Axis in the appropriate step After the calibration your system automatically returns to the Mount Sample step of your inspection workflow Now you are ready to continue with your sample inspection For details please refer to the CIX ASW software s help 35 ...

Page 36: ...n of filter membranes in the CIX100 system A filter membrane inspection is the standard application of a CIX100 system 6 different filter holder types for different sizes of filter membranes and backgrounds of the membrane are available They are all used identically To open the filter holder rotate the clamp remove any filter from the desk place a new filter centrally on the desk Then slide the fi...

Page 37: ...Sample Holders 37 ...

Page 38: ...CIX100 system The recommended type of tape is 3M No 480 It is not guaranteed that other types of tapes can be used with the CIX100 system 1 To mount the tape to the sample holder place the frame on the holder such that the markings 50 and 19 face upwards 2 Glue the tape to the frame such that the 50 mm wide tape is inside the respective markings Make sure that the sample is as flat as possible and...

Page 39: ...rame such that the sticky side of the tape faces upwards The frame is secured by magnets 5 Slide the tape holder into the CIX100 stage insert in position 1 in the same way as the standard filter holder The dots imprinted in the sample holder base should be at the rear of the stage 39 ...

Page 40: ...IX100 Cleanliness Inspector System If a rectangular inspection area is to be used specify this in the inspection configuration Also a fixed inspection area size can be defined in the inspection configuration 40 ...

Page 41: ...0 particle traps which is a pack of ten traps Having gathered and fixed particles on the trap by following the instructions given on the particle trap card board remove the trap from the card board and open the trap container before starting inspection Put the particle trap on the holder as it s shown in the images The provided green rubber on the holder stabilizes the sample during inspection and...

Page 42: ...OLYMPUS CIX100 Cleanliness Inspector System 42 ...

Page 43: ...Sample Holders 43 ...

Page 44: ...OLYMPUS CIX100 Cleanliness Inspector System 44 ...

Page 45: ...ns given in the stage manual Push the stage insert to the front left towards the red dot marking and subsequently lift the stage insert starting with the right back edge Be careful not to affect the clamps fixing the stage insert When placing samples for metallurgy on the stage keep in mind that the Z range might not be suitable for the sample height Carefully follow all safety instructions Detail...

Page 46: ...0 969 0456 Evident Korea Co Ltd Seocho dong Seocho Central IPARK 5th 6th Floor 36 Banpo daero 18 gil Seocho gu Seoul Evident Scientific Singapore Pte Ltd 25 Ubi Road 4 04 04 05 Ubix Singapore 408621 Evident Scientific Private Ltd 201 202 203 2nd Floor Tower C Unitech Cyber Park Sector 39 Gurgaon 122022 India Evident Australia Pty Ltd Level 4 97 Waterloo Road Macquarie Park NSW 2113 Australia The p...

Reviews: