background image

50

How to use the menu (Cont.)
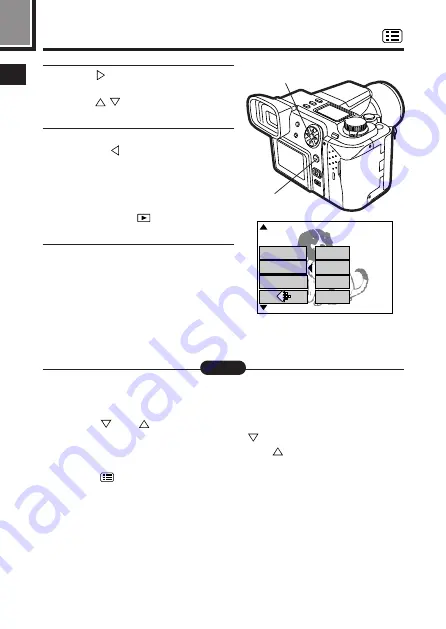
1

5

Press 

to view additional menu

options (for each selection), then
press 

to select the desired

option.

6

When finished, press the OK
button or 

.

The green frame moves to the left
and adjusted items are displayed
on the right.

When in the record mode (any
mode except 

) pictures can be

taken.

7

Press the OK button.

The setting will be saved and the
normal display will be restored.

5

6, 7

[

5 / 5

]


F2.8  1/800   0.0


P

ISO

[

SM

]

S-Prg

100

AUTO

200

400

MODE SETUP

ISO setting

When you want to go back to previous menu pages (or forward to the next
pages)

[

When the green frame is at the bottom of the displayed menu options,
press 

(or 

). The display will go to the next page.  When the

monitor displays the last page, press 

to go back to the first page.

You can move to the last page by pressing 

on the first page.

When you want to cancel the menu

[

Press 

(Menu button).  Adjustment settings are canceled and the

normal display is restored.

When you want to save an adjustment

[

Set “ALL RESET” — “OFF”. The adjustment settings are then
automatically saved when the camera is turned off (P.148).

When the adjusted item does not function

[

The OK button was not pressed after the adjustment.  Reset the
adjustment, then press the OK button.

Note:

Summary of Contents for CAMEDIA E-100 RS

Page 1: ...CTIONS n Before using your camera read this manual carefully to ensure correct use n We recommend that you take test shots to get accustomed to your camera before taking important photographs DIGITAL...

Page 2: ...ghts to this manual Radio and Television Interference Change or modifications not expressly approved by the manufacturer may void the user s authority to operate this equipment This equipment has been...

Page 3: ...interference received including interference that may cause undesired operation This Class B digital apparatus meets all requirements of the Canadian Interference Causing Equipment Regulations Tradem...

Page 4: ...ames of parts 25 Camera 25 Control panel indications 27 Viewfinder Monitor indications Picture information 29 1 GETTING STARTED 31 Attaching the strap 32 Loading the batteries 33 Service life of NiMH...

Page 5: ...mber of storable pictures and remaining time 62 Number of storable pictures 63 Adjusting the diopter 64 Holding the camera 64 Using the shutter release correctly Pressing fully halfway 65 How to press...

Page 6: ...g portrait pictures 86 Taking pictures of moving subjects 86 Taking pictures focusing on both subject and the background 87 Taking night scenes 88 Using the scene program S Prg mode 89 Setting the ape...

Page 7: ...cially available external flashes 115 Usable commercially available external flashes 116 7 ADVANCED SHOOTING TECHNIQUES 117 Focusing 118 Subjects that are difficult to focus on 118 Focusing on subject...

Page 8: ...ures 146 Displaying multiple pictures at one time Index display 147 Setting the number of pictures displayed on the screen 4 9 16 frames 148 Displaying multiple pictures automatically in sequence Slid...

Page 9: ...he camera warning sound volume 188 Setting the assist lamp for focusing AF ILLUMINATOR 189 Displaying the image during recording REC VIEW 190 Setting the times for power saving mode SLEEP 191 Selectin...

Page 10: ...nnecting to a computer using the exclusive USB cable 000 Connecting to a computer 000 Removing the card 000 12 MISCELLANEOUS 211 Troubleshooting 212 Operating problems 212 Problems with images 216 Use...

Page 11: ...d in a triangle alerts you to the presence of uninsulated voltage points inside the product which could cause a serious electrical shock An exclamation point enclosed in a triangle alerts you to impor...

Page 12: ...stand or bracket Follow the instructions which describe how to safely mount the product and use only the mounting devices recommended by the manufacturer 9 Power Sources Connect this product only to t...

Page 13: ...liquid has been spilled or any object has fallen into the product b If the product has been exposed to water c If the product does not operate normally while following operating instructions Adjust on...

Page 14: ...ock or burns DANGER 1 When using NiMH batteries use only Olympus brand NiMH batteries and charger 2 Never load batteries with their terminals reversed Never force batteries into the battery compartmen...

Page 15: ...in stores 3 If NiMH batteries are not charged within the specified time stop charging them and do not use them 4 Before loading always inspect batteries carefully for leaks discoloration warping or an...

Page 16: ...if they have not been used for a long period 6 While the camera is not in use always remove the batteries to prevent accidental leakage which could damage the battery compartment 7 If a battery leaks...

Page 17: ...revent the following dangerous situations which could cause serious injury Becoming entangled in the camera strap causing strangulation Accidentally swallowing a battery or small part Accidentally fir...

Page 18: ...variation in temperature or strong shocks and constant vibration Protect the camera at all times from dust and sand Never store the camera near any type of appliance or equipment which generates high...

Page 19: ...attery contacts could prevent them from operating Before loading batteries wipe the terminals with a dry clean cloth Before going on a long trip especially before traveling abroad purchase an ample su...

Page 20: ...low temperatures will recover in normal temperatures Do not push the monitor forcibly otherwise the image may become vague resulting in a Display mode failure or damage to the monitor When a subject i...

Page 21: ...000 pixel CCD Wide angle TFT LCD monitor Electronic viewfinder Remote cable jack Various exposure modes program aperture priority shutter priority manual and scene program are available allowing you t...

Page 22: ...22 Camera Strap A V cable USB cable Remote control Lens cap Warranty card Instructions Remote control Registration card Quick Start Guide instructions Software CD s Package contents...

Page 23: ...23 SmartMedia Static free case Index labels SSFDC 8MB 2 pieces Write protect adhesive Instructions seals 4 pieces Battery charger AA NiMH batteries Power plug 4 pieces Instructions...

Page 24: ...1 157 5 Control panel P 27 6 Diopter adjustment dial P 64 7 5 pin external flash socket P 112 8 Microphone P 123 9 Strap eyelet P 32 0 Remote control receiver P 121 Lens Flash built in P 72 106 116 Fl...

Page 25: ...tes the vertically oriented pictures 90 clockwise during display mode y AE lock button AEL P 130 Multi metering button P 133 Print button P 168 178 u Arrow pad P 45 47 i Monitor P 28 29 65 o OK button...

Page 26: ...ayed when is set on the menu Card error P 61 203 When the power is turned on the camera checks the card If there is a problem with the card this indication appears If the card functions properly this...

Page 27: ...is set on the menu AF system P 96 Displayed when AF MODE is set If SPOT is selected this indication does not appear Manual focus P 94 Displayed when the focus is adjusted manually Stabilization syste...

Page 28: ...nformation display P 00 Viewfinder Monitor indications Picture information SM F2 8 1 800 2 0 P 2 9 3 4 1 5 6 7 0 SM 8 F2 8 1 800 2 0 ISO100 SQ P SLOW1 SM Full information These indications are display...

Page 29: ...89 6 Shutter speed P 88 7 Exposure compensation Exposure differential P 99 8 Drive mode P 102 117 120 9 AF target mark P 67 68 0 Memory gauge P 69 Card P 00 Number of storable pictures Metering mode...

Page 30: ...30...

Page 31: ...ING STARTED This chapter outlines all of the things you need to do before you start using your camera such as loading batteries and inserting cards It also explains how to use the Mode dial and the Me...

Page 32: ...strap to the strap eyelet on the other side of camera following steps 1 and 2 as explained above Be careful with the strap when you carry the camera as it can easily catch on stray objects causing se...

Page 33: ...ff ONLY from the terminals 1 Make sure that the camera power switch is in the off position 2 Slide the battery compartment lock on the battery compartment cover in the direction of 3 Slide the battery...

Page 34: ...any other direction 6 Close the battery compartment cover then press it down and slide it in the opposite direction of the arrow printed on it When pressing the battery compartment cover shut be sure...

Page 35: ...l the internal settings will revert to the default settings Note Caution Do not use batteries whose bodies are not completely covered by an insulating sheet If such batteries are used they may cause l...

Page 36: ...Full time AF turned off Digital Zoom off No displaying on or connecting to a PC Temperature 25 C 2 Repeated sequential display in the slide show mode with periodic breaks Note When connecting the cam...

Page 37: ...in the off position 2 Plug the AC adapter into a power outlet 3 Open the jack cover and plug the connection cord into the DC In jack 4 To disconnect turn the camera switch off and unplug the AC adapt...

Page 38: ...AC adapters not designed for this camera Never plug or unplug the AC adapter if you have wet hands When unplugging the adapter hold the body of the unit not the cord Never pull bend twist or modify t...

Page 39: ...edia instruction manual carefully Do not touch the contact area of the card Do not use 5V cards Use Olympus cards or other 3V 3 3V cards Non Olympus 3V 3 3V cards must be formatted by the camera see p...

Page 40: ...Using a LEXAR Media device equipped with a USB connector you can transfer images to a computer at high speed using a JumpShot cable Compatible CompactFlash cards Commercially available LEXAR Media 16...

Page 41: ...end of the card and push in the card When the tab pops out place it on its side Note the orientation of the card If it is inserted incorrectly it may become jammed 4 Close the cover tightly 1 2 3 Inse...

Page 42: ...camera power switch is in the off position 2 Open the Card cover 3 When using the SmartMedia card Push the card in slightly When using the CompactFlash card Raise the tab and push it in 1 2 3 Tab When...

Page 43: ...The card is ejected When using the SmartMedia card When using the CompactFlash card NEVER open the Card cover eject the card remove the batteries or disconnect the optional AC adapter while the camer...

Page 44: ...n 3 Press on the Arrow pad to select SM CF then press 4 To use SmartMedia select SM To use CompactFlash select CF Press the OK button Press the OK button again to save the setting and restore the norm...

Page 45: ...isplayed on the monitor 3 Press to select then press When SETUP appears on the monitor press the OK button Date time setup screen will be displayed on the monitor 4 Press to set the date format when i...

Page 46: ...he OK button when the clock hits 00 seconds The clock will start when you press the OK button Mode setting screen will appear here 8 Press the OK button twice Menu screen will disappear The date time...

Page 47: ...e shutter priority mode Set it to a high speed for a still picture of a moving object Set it to a low speed to show motion Aperture is set automatically by the camera M Manual mode You can set both ap...

Page 48: ...Press on the Arrow pad to select the item you want to adjust The green frame will move from item to item To select the following items read these pages BKT P 00 to 00 MODE SETUP P 00 to 00 WB P 00 to...

Page 49: ...Example When PRE CAPTURE is set 1 5 F2 8 1 800 0 0 P SM CF WB SM OFF ON PRE CAPTURE To set up OK or The adjustment is saved If you finish by pressing Menu button any adjustments you have made will not...

Page 50: ...o previous menu pages or forward to the next pages When the green frame is at the bottom of the displayed menu options press or The display will go to the next page When the monitor displays the last...

Page 51: ...PRE CAPTURE BKT MULTI METERING Function Allows you to select the card you are going to use P 00 Sets the sequential shooting speed P 00 Able to record pictures by pressing the Shutter button halfway...

Page 52: ...tically focuses without pressing the shutter button halfway P 95 2 7x digital zoom is available Changes the picture color to monochrome P 00 Formats the card P 42 Able to record sound after taking pic...

Page 53: ...white balance according to the light source P 134 Adjusts the ISO sensitivity P 101 Obtains the appropriate exposure by metering multiple objects P 132 Adjusts the focal point range with autofocus P...

Page 54: ...3 3 Display FUNCTION CARD SETUP MODE SETUP Function Changes the picture color to monochrome P 00 Formats the card P 42 Change the camera to your desired setting Mode setting menu P 144 Sets the recor...

Page 55: ...unction Allows you to select the card you are going to use P 00 Runs through all stored pictures automatically P 127 Copies all pictures or selected pictures between SmartMedia and CompactFlash Dubs s...

Page 56: ...lect the card you are going to use P 00 Plays back movie pictures P 74 Copies all pictures or selected pictures between SmartMedia and CompactFlash Adjusts sound volume of pictures P 00 Erases all fra...

Page 57: ...orrespond to the function you will use You can get as close as 8 to your subject An approx 2 4 x 3 subject can be photographed almost fully within the frame 1 Press several times until appears on the...

Page 58: ...58 1...

Page 59: ...ORD AND DISPLAY BASICS This chapter demonstrates how to use your camera s basic functions such as taking pictures displaying stored pictures and erasing stored pictures Please read this section carefu...

Page 60: ...gs 1 Push the edge of the lens cap as shown by the arrows in the illustration to remove the lens cap 2 Turn the mode dial to P 3 Turn the power switch on The card access lamp blinks Battery check as w...

Page 61: ...d The camera will activate again as soon as you touch any switch or button You can adjust the sleep mode time P 159 Please turn the camera off when you are not planning to use it Note How to use the v...

Page 62: ...of storable pictures on the control panel after you take a shot or when you turn on the power If this happens the picture you have just taken will not turn out properly Replace the batteries and take...

Page 63: ...the monitor Format the card or use a new card When the card needs to be formatted The card error indicator turns on in the monitor and the card format confirmation screen appears on the viewfinder For...

Page 64: ...number of storable pictures will appear When the power is turned on with the mode dial The seconds remaining will appear When there is no storable space left for pictures in the still picture record...

Page 65: ...H quality NORMAL HIGH quality NORMAL 1024x768 640x480 If the recording mode is set to TIFF sound will not be recorded with a picture when the Mode dial is set to P A S or M but it can be added later d...

Page 66: ...oving Improper Keep your fingers away from the lens Keep your fingers away from the flash Keep your finger and the strap away from the lens flash and AF assist lamp Note 66 Adjusting the diopter 2 1 T...

Page 67: ...re The camera emits a shutter sound when the shutter is released The card access lamp blinks while the picture is being recorded You can change the volume of the beep sound emitted when operating the...

Page 68: ...us and exposure are not locked the AF confirmation mark blinks Subjects that are difficult to focus on P 00 Focus lock P 00 If a subject is not well lit and is difficult to focus on the AF assist lamp...

Page 69: ...n more than two images are recorded the center block will light up When the buffer memory is full the upper block will light up and no more pictures can be taken P F2 8 1 30 0 0 SM Number of storable...

Page 70: ...ure will be displayed Setting the Mode dial to will also display recorded pictures 2 All stored pictures in the card can be displayed by pressing the Arrow pad Displays the next picture Displays the p...

Page 71: ...up in red while shooting movies You cannot take movies if the entire image memory gauge is lit up The seconds of recording time remaining in the memory will appear on the monitor When recording start...

Page 72: ...y a recorded movie P 73 2 Select images with the mark using the Arrow pad 3 Press Menu button The menu screen will appear 4 Select MOVIE PLAY then press to select START Press the menu button to cancel...

Page 73: ...continuously Every time the left arrow is pressed the previous frame will be displayed A movie is displayed in reverse by holding down the left arrow continuously 6 Press to leave the movie picture di...

Page 74: ...splay P 126 and Index display P 125 3 Press the OK button The displayed picture will then be protected will appear on the monitor To cancel protection Press the OK button a second time while the pictu...

Page 75: ...will be displayed 2 Select the images you want to erase using the Arrow pad 3 Press Erase button A message asking you to confirm the erasure will appear 4 Make sure that YES is selected then press the...

Page 76: ...en will be displayed 3 Select CARD SETUP then 4 Press the OK button A message asking you to confirm the erasure will appear To cancel Press on the Arrow pad to select NO then press the OK button or Er...

Page 77: ...hen you take a picture from a distance telephoto Press the zoom lever toward T to zoom in When you take a picture at close range wide angle Press the zoom lever toward W to zoom out m The speed of the...

Page 78: ...The flash charges while is blinking The shutter cannot be released at this time Wait until turns off before taking pictures 3 Press the shutter button fully The flash will go off Flash working range W...

Page 79: ...n extended period of time turning off the power is still highly recommended 1 Turn the camera s power switch off The power will now be off If an image is being recorded on the card the card access lam...

Page 80: ...80 2...

Page 81: ...3 SHOOTING PICTURES CONSECUTIVELY 3...

Page 82: ...and white balance are locked at the first frame The number of still pictures that can be stored depends on the selected speed The approximate number is shown below AF sequential Shooting Takes pictur...

Page 83: ...If the battery power runs out during sequential shooting and the battery check mark blinks shooting stops Pictures already taken will be written to the card You can display high speed sequential shots...

Page 84: ...the normal screen The selected speed is displayed in the viewfinder monitor however the speed is displayed on the control panel only when 15 is selected When a speed other than 15 is selected is disp...

Page 85: ...to select PRE CAPTURE then press 3 Press to select ON then press 4 Press to select the number of pictures you wish to capture see below then press the OK button Set the number of pictures you want to...

Page 86: ...ars to show that you are moving to subsequent frames A representative frame is displayed When sequential shots are displayed in the index display mode the indication is the same as in the single image...

Page 87: ...4 DIFFERENT SHOOTING OPTIONS TO SUIT EVERY APPLICATION 4...

Page 88: ...g subjects If the subject of your photograph is moving quickly such as athletes in a sports scene or fast moving vehicles you can adjust the shutter speed to capture the action without blurring or to...

Page 89: ...ifferent ways of achieving this effect m With the mode dial set to S Prg select S Prg in the Menu p 86 Focus on the subject Exposure is adjusted automatically according to the conditions m Set the mod...

Page 90: ...Your camera offers two different ways of capturing twilight scenes m With the mode dial set to S Prg select S Prg in the Menu p 86 This mode uses the lower shutter speed compared to the normal mode E...

Page 91: ...ress on the Arrow pad to select S Prg then press 3 Select the desired S Prg mode from then press the OK button p 82 84 4 Press the OK button again The settings will be stored in memory and the Menu wi...

Page 92: ...ALL RESET the setting will be canceled and reset to off when the power is turned off p 148 Note You can set the aperture manually in the Aperture priority mode This is especially useful for taking por...

Page 93: ...Unless OFF is selected in All Reset the setting will be canceled and reset to off when the power is turned off p 148 Note You can set the shutter speed manually in the Shutter priority mode Set the sh...

Page 94: ...nual mode To check the exposure refer to the exposure differential on the display Aperture differential The difference ranging from 3 0 to 3 0 between the exposure determined by the currently selected...

Page 95: ...when the power is turned off p 148 Note Use the Macro mode to shoot subjects at close range You can get as close as 4 inches to your subject when the zoom lever is set to W to the maximum position al...

Page 96: ...link for approx 2 seconds and the shutter will be released In the mode movie recording starts To stop recording wait until the camera stops recording i e until maximum continuous recording time passes...

Page 97: ...splay pictures using the remote control P 76 Before use attach the camera to a tripod securely 1 Press until self timer remote control appears 1 Control panel Self timer Remote Control Taking pictures...

Page 98: ...ed in approx 2 seconds Recording will then start To stop recording press the shutter button The card will then begin storing the picture data taken so far When the remote control does not work If the...

Page 99: ...5 RECORD MODE SELECTION 5...

Page 100: ...hot in SQ and HQ With the mode dial set to for motion picture recording You can select from HQ and SQ The image quality increases in the order of SQ HQ 1 Press to display Menu 2 Press on the Arrow pad...

Page 101: ...w many frames to capture frame rate RATE P 00 Still picture recording Record mode TIFF SHQ HQ SQ NORMAL Resolution 1360 x 1024 640 x 480 pixels pixels Uncom Low Standard Standard Compression pressed C...

Page 102: ...1 Display the Mode setting screen See How to use the Mode Setting Menu Screen 1 3 P 145 2 Press to select TIFF then press SETUP will be displayed Press the OK button The picture size setting screen ap...

Page 103: ...he SQ mode See the table below for selectable picture sizes SQ Mode Picture Quality Picture Size File Format HIGH 1280 x 960 NORMAL SQ HIGH 1024 x 768 JPEG NORMAL HIGH 640 x 480 NORMAL 2 1 3 SETUP ALL...

Page 104: ...ps 2 and 3 of Selecting the record mode picture size P 00 SQ 1024x 768 640 x 480 1280x 960 NORMAL HIGH SM SQ 1024x 768 640 x 480 1280x 960 NORMAL HIGH SM 4 4 5 The setting remains in effect until it i...

Page 105: ...6 SHOOTING WITH FLASH 6...

Page 106: ...s in low light and No display backlight conditions Red Eye Reduction Significantly reduces the Flash p 107 phenomenon of red eye subject s eyes appearing red Fill In Flash p 107 Fires regardless of av...

Page 107: ...t to shoot a natural looking twilight or night scene To use this mode push the flash back into the camera Since a slow shutter speed is automatically selected in low light situations when in the OFF m...

Page 108: ...on and wait until the flash mark lights steadily before taking the picture Pay attention to the Notes for each mode p 106 107 4 Press the Shutter button all the way down How to use the flash 3 4 2 1 T...

Page 109: ...V step with each press Correction can be made within a range of 2EV ExposureValue 4 Press the OK button The setting is stored in memory and the Menu disappears 2 3 4 1 2 5 F2 8 1 800 0 0 P BKT MULTI M...

Page 110: ...CURTAIN To capture the subject at the beginning of the shutter release The streak made by the headlights of a moving car will go in the direction that the car is moving SLOW 2 2nd CURTAIN To capture...

Page 111: ...ol panel Slow shutter synchronization flash mode It is impossible to select OFF when the Mode dial is set to S or M If the Mode dial is switched to S or M when OFF has been selected SLOW 1 will be set...

Page 112: ...arate instruction manual for the external flash flash bracket and flash cable The 5 pin external flash socket cover on the camera is threaded Unscrew and remove it before connecting the bracket cable...

Page 113: ...xternal flash is TTL AUTO 4 Slide flash switch on the camera to open the main flash 5 Press Flash mode button to select the camera s flash mode Auto Flash P 72 Red Eye Reduction Flash P 107 and Fill i...

Page 114: ...n the following order Auto Flash no display Red Eye Reduction Flash Fill in Flash Flash off 3 4 When using both the FL 40 external flash and the main flash If close up pictures are overexposed try usi...

Page 115: ...ernal flash to select its modes 5 pin external flash socket 2 The camera s flash mode will have no effect on the external flash The external flash will fire even when the camera s flash mode is set to...

Page 116: ...compensation cannot be made Exposure compensation in the camera is made invalid in extension flash photography 3 Use a flash which is capable of covering an illumination angle for a 32 mm or larger l...

Page 117: ...7 ADVANCED SHOOTING TECHNIQUES In this section you will find out how to take pictures using more advanced functions such as manual focus brightness adjustment special effects etc 7...

Page 118: ...hange it to the horizontal position to take the picture p 93 3 Subjects in excessively bright light in the center of the frame Lock the focus on an object that is at the same distance from the camera...

Page 119: ...ation mark blinks The focus or exposure is not locked Position your subject again and repeat step 1 until the AF confirmation mark lights 2 Compose your shot again while keeping the Shutter button pre...

Page 120: ...stored and MF appears in red To cancel Manual focus press the OK button to display MF then press to select AF Press the OK button Focusing is not possible at Although MF is displayed and the distance...

Page 121: ...ect ON then press the OK button Confirm your settings If you want to take a picture now you can do so 4 Press the OK button The settings are stored and the Menu disappears 2 3 3 4 1 3 5 F2 8 1 800 0 0...

Page 122: ...the image within the AF target mark 1 Press to display Menu 2 Press on the Arrow pad to select AF MODE then press 3 Press to select NORMAL or SPOT then press the OK button If you want to take a pictur...

Page 123: ...red 3 Press the Shutter button halfway It takes about for 1 sec to stabilize the image after setting Check the image on the screen 4 Press the Shutter button all the way down This mode does not work e...

Page 124: ...To go back to the normal screen press the OK button again The setting is stored 4 Press the zoom lever towards T to magnify the image The zoom bar is displayed The white area of the bar indicates opti...

Page 125: ...r than 0 is displayed on the control panel 125 Brightness exposure Changing the brightness Exposure compensation Images become darker Images become lighter 1 2 P F2 8 1 200 2 0 SM Exposure compensatio...

Page 126: ...rs the center of the subject digital ESP metering and the area around the subject digital ESP metering Center weighted Meters the center of the subject averaging metering primarily Spot metering Meter...

Page 127: ...setting is stored ISO appears on the control panel when a setting other than AUTO is selected ISO blinks on the control panel even when the ISO is automatically increased in the AUTO mode 2 3 1 200 40...

Page 128: ...L appears when the exposure is being recorded When MULTI METERING is set to ON in the menu the light meter is displayed on the Monitor Set it to OFF to turn off the display P132 To change the locked e...

Page 129: ...ke a picture m AE lock is possible even after pressing the shutter button halfway down When the AE lock is canceled The AE lock and AE Memory are canceled when The Mode Dial setting is changed The pow...

Page 130: ...ct Center weighted averaging metering or Spot Metering P 100 2 Press The Menu screen appears 3 Press on the Arrow pad and select MULTI METERING then press 4 Press and select ON then press the OK butto...

Page 131: ...hese values are recalculated every time another metering point is added indicates the average for the 2 metering points The average is always shown at the center of the bar indicates how much the pres...

Page 132: ...g conditions and assure natural looking colors Settings for tungsten and fluorescent lights are also available allowing you to get better results indoors 1 Press The Menu screen appears 2 Press on the...

Page 133: ...reen comes back on When any setting except Auto is selected WB appears in the control panel 133 7 Manual White Balance Mark 4 4 Set to Auto for most shooting conditions Under certain lighting conditio...

Page 134: ...SET P 00 1 Do steps 1 and 2 in Selecting the tint PRESET P 00 2 Press on the Arrow pad to select then press SETUP is displayed Press the OK button The white balance setting screen appears 2 AUTO 1 5 F...

Page 135: ...button to exit from the white balance setting screen When not using the white balance setting change the WB setting Adjusting the white balance with colors except white In step 3 substitute colored p...

Page 136: ...LACK WHITE then press the OK button If the OK button is pressed again the setting is stored and the Menu screen disappears The normal screen comes back on 4 Take a picture 4 1 2 3 BLACK WHITE 4 5 F2 8...

Page 137: ...dently Sound can be added to still pictures after they are taken P 139 1 When taking a still picture Set the mode dial to P A S M or S Prg When recording a movie Set the mode dial to movie 2 Press The...

Page 138: ...ly During recording it is not possible to take the next picture Recording a sound memo using an external microphone Connect an external microphone to the camera s external microphone jack and turn the...

Page 139: ...can also specify the number of pictures 1 Set the record mode to any mode other than TIFF If the record mode is set to TIFF is not available P 104 2 Press to display the Menu 3 Press on the Arrow pad...

Page 140: ...xposure select OFF 6 Press to select the number of pictures then press the OK button repeatedly until you go back to AE When WB is not selected press the OK button repeatedly until the menu disappears...

Page 141: ...f there is not enough room left in memory for the sequence mode with Bracketing it will not be possible to take next picture Unless OFF is selected in All Reset the setting will be canceled when the p...

Page 142: ...142 7...

Page 143: ...8 DISPLAY FUNCTIONS 8...

Page 144: ...pad Go back to the previous picture Go to the next picture Go back 10 pictures Go ahead 10 pictures To see information about a picture such as set items date or file name press the INFO button P 28 Th...

Page 145: ...om lever towards T With each further press of the zoom lever the picture will be enlarged 1 5x 2x 2 5x or 3x To return to 1x press the zoom lever to W To see a different area of the picture enlarged P...

Page 146: ...y a vertically oriented picture 2 To turn it 90 clockwise Press Macro button To turn it 90 counter clockwise Press Metering mode button 2 2 SM SM SM A vertically oriented picture Pressing macro button...

Page 147: ...ds 3 Select the picture you want to see using the Arrow pad Move to the left Move to the right Go to the previous page keeping the picture in the top left Go to the next page keeping the picture in th...

Page 148: ...ode Setting Menu Screen 1 3 P 145 2 Press on the Arrow pad and select then press 3 Press and select 4 9 or 16 then press the OK button to confirm the setting 4 Press the OK button repeatedly until the...

Page 149: ...ect PLAY 3 Press the OK button The slide show will start To cancel the slide show press the menu button 2 3 1 PLAY 1 2 SM CF COPY SM Use the AC adapter to run the slide show for long periods of time I...

Page 150: ...ndications disappear after a certain amount of time has elapsed Full information All indications are displayed all the time while in the Display mode Displaying picture information No information Part...

Page 151: ...ion ISO File number In the Movie picture display mode the total recording time is displayed Movie picture P 75 Full information Note The indications that appear on a movie picture that has been select...

Page 152: ...e TV When using the remote control point it towards the remote control sensor on the camera button Selects images W button Turns on the index display T button Lets you do close ups In this mode the ma...

Page 153: ...SETUP is displayed 3 Press the OK button The sound volume setting screen appears 4 To turn up the volume Press to move the cursor to To turn down the volume Press to move the cursor to 5 Press the OK...

Page 154: ...ding a sound memo to recorded still pictures You can add sound to still pictures or change the audio that has already been recorded How to use an external microphone Sound can be recorded with an exte...

Page 155: ...be sure to format them with the camera before use 1 Press Menu button The Menu screen appears 2 Press on the Arrow pad to select CARD SETUP then press Selected item is displayed 3 Press the OK button...

Page 156: ...NO NO YES SM Confirmation screen All existing data stored on the card will be erased when the card is formatted Make sure that you save or transfer important data before formatting a used card Recordi...

Page 157: ...SM or CF Press the OK button repeatedly until you go back to SM CF 3 Press to select COPY then press 4 Press to select ALL or SELECT then press the OK button 5 To copy selected frames Select the desir...

Page 158: ...ed 8 To start copying press to select YES To cancel press to select NO 158 Image copy between cards Cont 8 8 7 6 Index display Copy confirmation screen If the power is turned off or the Mode dial is s...

Page 159: ...TINGS Recorded images can be printed out with a printer Selected images can be reserved in a SmartMedia card for printing on a printer or at a photo lab that supports the DPOF Digital Print Order Form...

Page 160: ...of a button For more information consult your printer s user manual m Images can be transferred directly to a personal computer via USB or a PC connection kit or by using an optional FlashPath PC Card...

Page 161: ...mera may overwrite the previous reservations Even if an image appears with the message PICTURE ERROR print reserve may be performed on it In such a case the print reserve icon does not appear on the s...

Page 162: ...Print reserve cannot be performed for a picture displayed with 2 Press The Print reserve setting screen is displayed If Print reserve data is already stored on the card a screen will appear giving you...

Page 163: ...erve indicator is not displayed Although you can use Print reserve with pictures protected with the Protect function it cannot be used on pictures stored on a write protected card 163 9 The setting wi...

Page 164: ...yed with 2 Press The Print reserve setting screen is displayed If Print reserve data is already stored on the card a screen will appear giving you the choice of resetting the data or keeping it P 178...

Page 165: ...page The number of pictures shown in the Index Display mode depends on the Index Display mode setting P 165 4 frame setting 2 frames 9 frame setting 6 frames 16 frame setting 12 frames When the numbe...

Page 166: ...rint reserve has been performed for a picture without date time settings P 54 you cannot select DATE and TIME in this step 8 Press the OK button to complete the setting The Menu screen disappears and...

Page 167: ...o pictures on the card this screen is not displayed 3 Press to select RESET then press the OK button To keep the print order select KEEP and press the OK button To remove the selected image only set t...

Page 168: ...168 9...

Page 169: ...laying techniques that give you greater creative flexibility You can control various settings and functions as precisely as desired Note that the items you can adjust in the Still Image Recording Disp...

Page 170: ...the cam era goes to sleep Specifies how to record file names on the card Cancels storing pictures on the card Adjusts the brightness of the Monitor and viewfinder Date setting Sets the focal length me...

Page 171: ...the selected item has more than one setting available go to step 5 When SETUP is displayed go to step 6 2 4 3 1 SETUP 5 5 F2 8 1 800 0 0 P ISO SM S Prg MODE SETUP Still picture record menu 1 3 ALL RE...

Page 172: ...When ALL RESET CUSTOM is selected 1 Press The Custom setting screen appears 2 Press and select the desired item and press 3 Press to select RESET ON or RESET OFF and then press the OK button Continue...

Page 173: ...option then press the OK button The Mode setting screen comes back on 7 Press the OK button The setting is stored and the Menu screen disappears The normal screen is restored 173 10 When storing the s...

Page 174: ...Press to select the items you want to set Press the OK button to set the selected items CUSTOM Please refer to P 150 ON The initial default settings will be restored when the camera is turned back on...

Page 175: ...ing P 88 Exposure compensation P 99 White balance P 134 ISO sensitivity P 101 Slow shutter synchronization flash P 110 AF mode P 96 Full time AF P 95 Focus mode P 94 INFO Image information display P 2...

Page 176: ...he Mode Setting Menu Screen 1 3 P 145 2 Press on the Arrow pad to select ALL RESET then press Press to select CUS TOM then press Custom setting screen will be dis played 3 Press to select items you wa...

Page 177: ...ms that can be selected in CUSTOM Flash Flash intensity control Metering mode Macro mode Multi metering Drive BKT setting Stabilization system Zoom Super tele Aperture Shutter speed Exposure compen sa...

Page 178: ...ing screen See How to use the Mode Setting Menu Screen 1 3 P 145 2 Press on the Arrow pad to select then press Press again to select the items see below you want to set Then press the OK button to set...

Page 179: ...ume cannot be set 1 Display the Mode setting screen See How to use the Mode Setting Menu Screen 1 3 P 145 2 Press on the Arrow pad to select then press 3 Press to select the desired item see below the...

Page 180: ...ike to set Press the OK but ton and confirm the setting Setting Items OFF LOW HIGH 4 Press the OK button repeatedly until the menu disappears 2 3 3 4 Sets the beep sound for warnings etc Still Picture...

Page 181: ...u Screen 1 3 P 145 2 Press on the Arrow pad and select AF ILLUMINATOR then press 3 Press and select ON or OFF then press the OK button to confirm the setting 4 Press the OK button repeatedly until the...

Page 182: ...the setting ON Displays the image on the Monitor or Viewfinder while it is being recorded to help you check the recording process OFF Displays the image that the camera is aimed at on the Monitor or...

Page 183: ...has passed with no operations This function can be disabled OFF Time settings can be selected for Record mode P A S M S Prg and Display mode separately 1 Display the mode setting screen See How to us...

Page 184: ...and Folder No The file number and folder number used for each image are expressed as shown Month Jan Sep 1 9 Oct A Nov B Dec C m The File No and Folder No in Each Mode RESET When RESET is selected th...

Page 185: ...convenience the folder numbers remain the same when transferred to a computer DCIM OLYMP Pmdd jpg Folder No AUTO When AUTO is selected the same folder number and a continuing num ber from the last fi...

Page 186: ...hen a card is used with a first file number larger than the last one in the previous card file numbers will continue from the larger number When the maximum file number 9999 of the maximum folder numb...

Page 187: ...ctures are standing by to be written to the card press flash mode button while hold ing down the INFO button Pictures remaining in the camera s memory will not be written to the card Settings will rem...

Page 188: ...will appear 4 To make the image brighter Press so that the cursor moves toward To make the image darker Press so that the cursor moves toward 5 Press the OK button to confirm your settings 6 Press the...

Page 189: ...lay the mode setting screen See How to use the Mode Setting Menu Screen 1 3 P 145 2 Press on the Arrow pad and select m ft then press 3 Press and select m or ft then press the OK button to confirm the...

Page 190: ...d 1 Display the mode setting screen See How to use the Mode Setting Menu Screen 1 3 P 145 2 Press on the Arrow pad and select RATE then press 3 Press and select 15fps or 30fps then press the OK button...

Page 191: ...A COMPUTER Your computer can save pictures stored on a card Once the image data is in your comput er you can take advantage of various image processing capabilities and use your images in publications...

Page 192: ...S Storage Support upgrade Note Computer operating environment Windows 2000 Professional Mac OS 8 6 9 Windows 98 98 Second Edition Camera connector USB connector USB connector Required items Cable Data...

Page 193: ...er Support Center Saving directly from a card Card type SmartMedia Computer operating environment Personal computer equipped with 3 5 floppy disk drive Personal computer equipped with a PC card slot P...

Page 194: ...uired devices CompactFlash PC card adapter With LEXAR Media CompactFlash image data is transferred to a personal computer equipped with a USB port via the exclusive cable Note Check for compatibility...

Page 195: ...higher 1 Open the camera s connector cover 2 Connect the end of the USB cable marked A to the USB connector on the personal computer 3 Connect the end of the USB cable marked B to the USB connector on...

Page 196: ...s like Netscape Communicator Microsoft Internet Explorer and CAMEDIA Master supplied with the camera For more details refer to the application s instructon manual 196 Connecting to a computer using th...

Page 197: ...l computer and the hub In such a case do not use a hub and connect the camera directly to the personal computer Note mMacintosh 1 Make sure the camera s access lamp is off 2 Drag and drop the Driver i...

Page 198: ...198 11...

Page 199: ...12 MISCELLANEOUS 12...

Page 200: ...le using the camera 5 Operate the camera as required 6 The camera will not operate while it is connected to a personal computer REF PAGE P 58 P 33 P 33 P 19 P 59 P 187 SYMPTOM No picture is taken when...

Page 201: ...Replace the batteries with new ones 6 Replace the batteries with new ones Do not open the Battery compartment cover when the Card access lamp is blinking 7 Wait until there is room in the memory gaug...

Page 202: ...e card 3 There is a problem with the card 4 The camera is connected to a TV 5 The viewfinder is on but there is no display CORRECTIVE ACTION 1 Set the Mode dial to 2 NO PICTURE appears on the monitor...

Page 203: ...after peeling off the seal Do not reuse the write protect seal REF PAGE P 43 SYMPTOM When the camera is connected to a computer an error message appears while data is being transferred to the computer...

Page 204: ...TOM The picture is out of focus POSSIBLE CAUSES 1 The camera moved when the shutter button was pressed 2 The AF target mark was not on the subject 3 The lens is dirty 4 The subject was too close 5 The...

Page 205: ...ation or change the camera position toward the subject REF PAGE P 107 P 99 SYMPTOM The picture is too dark POSSIBLE CAUSES 1 The flash was blocked by a finger 2 The subject was out of the working rang...

Page 206: ...tting is wrong CORRECTIVE ACTION 1 Set the flash mode to Fill In 2 Include white in the image or adjust the white balance 3 Adjust the white balance REF PAGE P 107 P 134 P 134 SYMPTOM The picture has...

Page 207: ...onitor and viewfinder Wipe gently with a soft cloth Lens Blow dust off the lens with a blower brush commercially available then wipe gently with lens cleaning paper When storing the camera for a long...

Page 208: ...ted to optional equipment Printer P 400 P 330N TV Personal computer MO drive SmartMedia FlashPath PC card adapter AC adapter Camera Conversion lens adapter Tele Conversion lens Wide conversion lens Ma...

Page 209: ...erase pictures in this card The recorded image cannot be played back with this camera Remedy Insert a card and close the cover Insert the card correctly Insert a different card Replace the card or er...

Page 210: ...ent The card is not formatted There are no pictures in the card so there is nothing to play back There is no empty space in the card so print data or sound cannot be recorded Remedy Format the card In...

Page 211: ...apter vPC Card Adapter vNiMH Batteries vNiMH Battery Charger vUSB SmartMedia Reader Writer Compatibility of the picture data Images taken by this camera may not be properly displayed or printed with o...

Page 212: ...TIFF 1600 x 1200 Approx 7 frames SHQ Approx 21 frames HQ Approx 38 frames SQ 1024 x 768 NORMAL Approx 82 frames SQ 640 x 480 NORMAL Erase One Frame erase All Frames erase Image pickup element 1 2 inch...

Page 213: ...splay No of monitor pixels Approx 114 000 pixels On screen display Date Time Frame number Protect Recording mode Battery check Picture information Print reserve Menu AF confirmation mark Flash stand b...

Page 214: ...for Built in lithium battery calendar Operating environment Temperature 32 to104 F operation 4 to 140 F storage Humidity 30 to 90 operation 10 to 90 storage Power supply For batteries use 2 CR V3 lit...

Page 215: ...Custom setting 150 D Data input output 180 187 Date time settings 54 DCF 2 Digital ESP metering 100 Digital zoom 98 Diopter adjustment 64 Displaying movies 74 Displaying multiple pictures at one time...

Page 216: ...Print reserve 170 Printer 168 Protection 79 Provided accessories 23 Q Quick view 73 R Record mode 104 Recording movies 70 Red eye reduction flash 107 Remaining battery power 60 Remote control 76 120 R...

Page 217: ...ite balance Auto 134 White balance PRESET 00 White balance overcast 134 White balance daylight 134 White balance tungsten light 134 White balance fluorescent 134 White balance 00 Wide angle shooting 7...

Page 218: ...218...

Page 219: ...219...

Page 220: ...99 Tokyo http www olympus co jp OLYMPUS AMERICA INC Two Corporate Center Drive Melville NY 11747 3157 U S A Tel 631 844 5000 Customer support Tel 1 888 553 4448 http www olympus com OLYMPUS OPTICAL CO...

Reviews: