background image

www.kodak.com/go/m1093support

1

ENGLISH

���

Installing the software

���

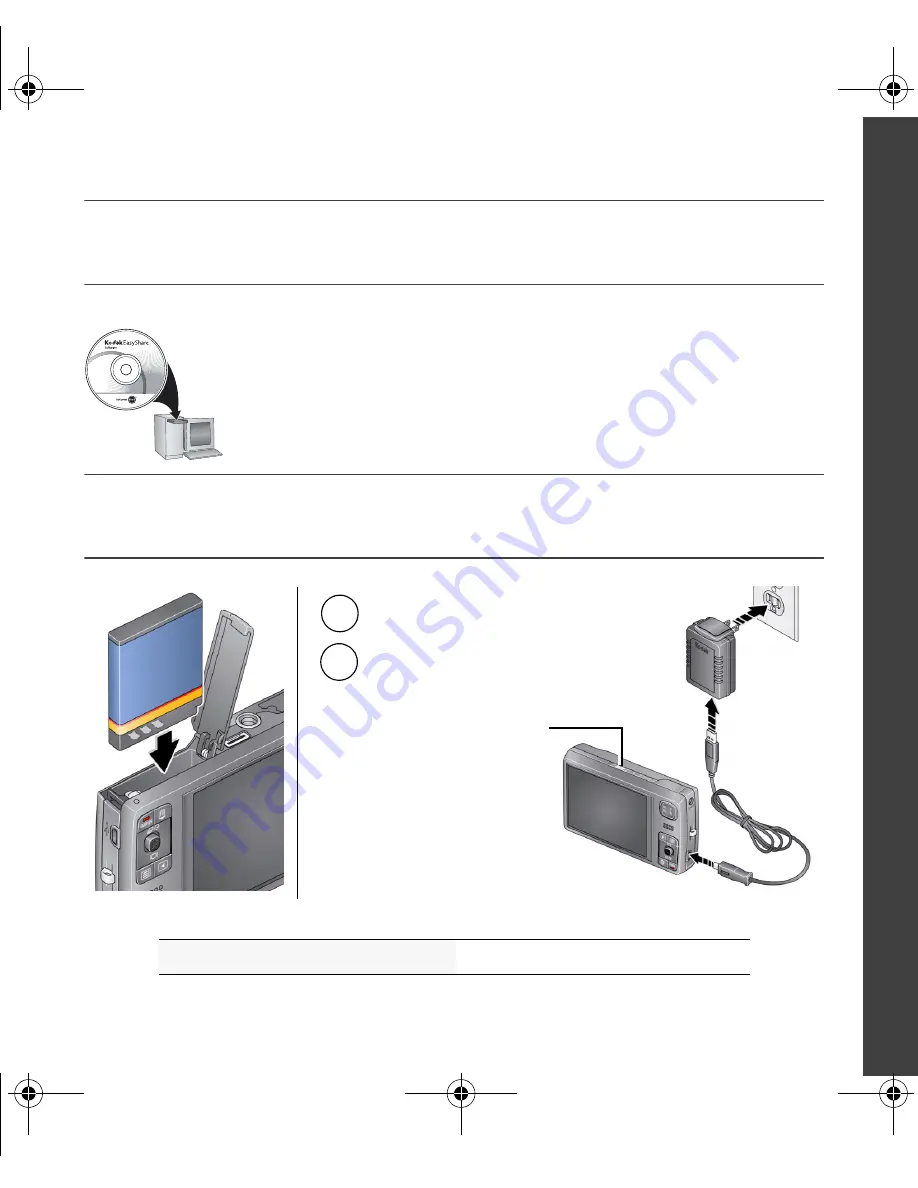
Loading and charging the battery

See the Extended user guide

www.kodak.com/go/m1093support

After installing the software, return to this user guide.

Before connecting any cables, install the software 
that was included with your camera. Follow the 
on-screen instructions.

KLIC-7004 battery

Battery Charging light:


• Blinking: charging


• Steady: finished charging

Turn OFF the camera.

1

Connect the cable.

2

urg_00916.book  Page 1  Wednesday, June 18, 2008  9:29 AM

Summary of Contents for M1093 - EASYSHARE IS Digital Camera

Page 1: ...t After installing the software return to this user guide Before connecting any cables install the software that was included with your camera Follow the on screen instructions KLIC 7004 battery Battery Charging light Blinking charging Steady finished charging Turn OFF the camera 1 Connect the cable 2 urg_00916 book Page 1 Wednesday June 18 2008 9 29 AM ...

Page 2: ...rately Kodak EasyShare camera printer or HDTV dock May be sold separately Kodak USB cable and a USB computer port Ensure that the USB cable is connected to a powered USB port and the computer is turned on not in sleep mode See the Extended user guide www kodak com go m1093support Purchase accessories www kodak com go m1093accessories urg_00916 book Page 2 Wednesday June 18 2008 9 29 AM ...

Page 3: ...See the Extended user guide www kodak com go m1093support Press the Power button to turn on the camera in Smart Capture mode to change for previous next field OK to accept At the prompt press OK to change OK to accept Language Date Time OK press urg_00916 book Page 3 Wednesday June 18 2008 9 29 AM ...

Page 4: ...w framing mark To change focus from the selected face to another face press Framing marks do not appear in all modes You can repeatedly press to turn on off status icons histogram and framing grid Press the Shutter button halfway to focus and set exposure When the framing marks turn green press the Shutter button completely down 1 Press the Power button to turn on the camera in Smart Capture mode ...

Page 5: ...ewing pictures videos See the Extended user guide www kodak com go m1093support Delete a picture video View previous next picture video Press the Review button to enter exit Review Play a video urg_00916 book Page 5 Wednesday June 18 2008 9 29 AM ...

Page 6: ...kodak com go m1093support Purchase accessories www kodak com go m1093accessories Dock compatibility www kodak com go dockcompatibility Kodak EasyShare printer dock camera dock or HDTV dock may be sold separately USB cable Connect then turn on the camera urg_00916 book Page 6 Wednesday June 18 2008 9 29 AM ...

Page 7: ...lp system It describes every setting for every menu choice If you learn nothing else about your camera learn how to use on camera Help Because the more you know your camera the more confident you become See the Extended user guide www kodak com go m1093support Turn off Help Scroll through a Help topic OK T Press the Menu button then highlight a menu choice Press the Telephoto T button 1 2 Menu urg...

Page 8: ...nteractive tutorials FAQs downloads accessories printing information product registration Congratulations You have set up your camera taken pictures transferred pictures to your computer Keep learning Finish reading this book so you can take and share your best pictures To better understand each menu option use camera Help highlight a menu choice then press the Telephoto T button urg_00916 book Pa...

Page 9: ...LISH Front View 1 Shutter button 5 Lens Cover 2 Mode button 6 Self timer light AF assist light 3 Flash button 7 Flash 4 Power button Battery Charging light 8 Microphone 3 1 8 4 2 6 5 7 urg_00916 book Page 9 Wednesday June 18 2008 9 29 AM ...

Page 10: ... 5V Review Menu buttons 6 7 Strap post Joystick OK button Display Self timer Burst 8 9 10 11 12 13 USB AV Out Delete Share buttons Slot for optional SD SDHC card Battery compartment Tripod socket Dock connector 6 9 7 4 2 12 13 5 1 optional 10 11 3 8 urg_00916 book Page 10 Wednesday June 18 2008 9 29 AM ...

Page 11: ... Perfect Touch technology is applied for better pictures You can choose the best picture size and aspect ratio for your needs just press the Menu button and choose Picture Size 3 2 the best choice when making 4 x 6 prints 16 9 wide screen 4 3 the default setting Video Capturing video with sound Program Advanced picture taking allows access to more manual settings than Smart Capture Scene Point and...

Page 12: ... Take the picture or video Using digital zoom Use digital zoom in any picture taking mode to get up to 5X magnification beyond optical zoom Press Telephoto T until the slider is at the end of the optical zoom range Release Telephoto T then press it again NOTE Digital zoom is not available in Smart Capture mode You may notice decreased image quality when using digital zoom The slider pauses and tur...

Page 13: ... light hold the camera steady or use a tripod NOTE Not available in Smart Capture mode Red Eye Your camera can correct red eye using 2 methods Preflash A preflash fires shrinking the eye pupil before the picture is taken Digital Correction A preflash does not fire the camera corrects red eye Off Never Press the flash button repeatedly to scroll through flash modes The current flash mode is shown i...

Page 14: ... tripod 2 shot The first picture is taken after a 10 second delay A second picture is taken 8 seconds later 2 Compose the scene Press the Shutter button halfway then completely down The camera takes the picture pictures after the delay Use the same procedure to take a 2 or 10 second self timer video but press the Shutter button completely down Using burst Use burst to take up to 3 pictures in quic...

Page 15: ...ne mode SCN mode For Portrait Full frame portraits of people Panorama L R R L 2 or 3 frame panoramic pictures Blur Reduction Reducing blur caused by camera shake or subject motion Sport Subjects that are in motion Landscape Distant scenes Close up Close range Use available light instead of flash if possible Night Portrait Reduces red eye of people in night scenes or low light conditions Night Land...

Page 16: ...e camera on a steady surface or tripod Self Portrait Close ups of yourself Assures proper focus and minimizes red eye High ISO People indoors in low light scenes Children Action pictures of children in bright light Backlight Subjects that are in shadow or backlit when light is behind the subject Panning Shot Shooting a fast moving subject The background gives the sense of movement while the subjec...

Page 17: ...main until you change them others until you change modes or turn off the camera 1 Press the Menu button 2 Press to highlight a tab Capture for the most common picture taking settings Capture for other picture taking settings Video for video taking settings Setup for other camera settings 3 Press to highlight a setting then press OK 4 Highlight an option then press OK urg_00916 book Page 17 Wednesd...

Page 18: ...el Capture mode Picture size Pictures time remaining Image storage location AF control White Balance ISO Zoom indicator Tag name Self timer Flash mode Long time exposure Date stamp Histogram Focus mode Exposure compensation AF zone Exposure metering Framing grid urg_00916 book Page 18 Wednesday June 18 2008 9 29 AM ...

Page 19: ...letion 1 Press the Review button 2 Press for previous next picture video 3 Press the Menu button 4 Press to highlight Protect then press the OK button The Protect icon appears with the protected picture video Press the Menu button to exit the menu CAUTION Formatting internal memory or an SD or SDHC card deletes all including protected pictures videos Formatting internal memory also deletes email a...

Page 20: ...otected Picture Video number Image storage location Scroll arrows Review Selected picture Battery level Perfect Touch tech Relative picture number Tag name Protected Picture Video number Image storage location Scroll arrows Review Favorite tag Email tag Video length Battery level Relative video number Tag name urg_00916 book Page 20 Wednesday June 18 2008 9 29 AM ...

Page 21: ...a time You can sort by the date a picture was taken or if you ve tagged pictures with a Favorites tag or a tag that you created you can sort by tags 1 Press the Review button then the Menu button 2 Press to highlight Search then press the OK button 3 Press to highlight Date Favorite or Tag then to select a folder 4 Press to select a folder 5 To see the results of your search highlight Exit then pr...

Page 22: ...noramic pictures or pictures to which Perfect Touch technology is already applied 1 Press the Review button 2 Press for previous next picture 3 Press the Menu button then to highlight the Edit tab Highlight Perfect Touch tech then press OK The enhancement is previewed Press to view other parts of the picture 4 Press OK Follow the screen prompts to replace the original picture or to save the enhanc...

Page 23: ...fire in all modes In Review a blue or black screen is displayed instead of a picture Transfer all pictures to the computer see page 6 Take another picture Memory card is almost or entirely full Transfer the pictures to the computer see page 6 Delete pictures from the card or insert a new card Pictures remaining number does not decrease after taking a picture Continue taking pictures The camera is ...

Page 24: ...o cool it may be hot Follow all warnings and instructions supplied by the battery manufacturer Use only batteries approved for this product to avoid risk of explosion Keep batteries out of the reach of children Do not allow batteries to touch metal objects including coins Otherwise a battery may short circuit discharge energy become hot or leak Do not disassemble install backward or expose batteri...

Page 25: ...ol This warranty does not apply when failure is due to shipping damage accident alteration modification unauthorized service misuse abuse use with incompatible accessories or attachments such as third party ink or ink tanks failure to follow Kodak s operation maintenance or repacking instructions failure to use items supplied by Kodak such as adapters and cables or claims made after the duration o...

Page 26: ...armful interference to radio or television reception which can be determined by turning the equipment off and on the user is encouraged to try to correct the interference by one or more of the following measures 1 reorient or relocate the receiving antenna 2 increase the separation between the equipment and the receiver 3 connect the equipment to an outlet on a circuit different from that to which...

Page 27: ...ause undesired operation Waste Electrical and Electronic Equipment labeling VCCI Class B ITE Australian C Tick Korean Class B ITE In Europe For human environmental protection it is your responsibility to dispose of this equipment at a collection facility established for this purpose separate from municipal waste For more information contact your retailer collection facility or appropriate local au...

Page 28: ...sharecenter China RoHS Eastman Kodak Company Rochester New York 14650 Eastman Kodak Company 2008 Kodak EasyShare and Perfect Touch are trademarks of Eastman Kodak Company 4F8129_en urg_00916 book Page 28 Wednesday June 18 2008 9 29 AM ...

Reviews: