6
Select the frame using the Arrow
pad, then press the OK button.
●
COPY is displayed on the
selected frames.
●
To cancel, press the OK button
again.
7
When you've finished selecting
images, press
(Menu button).
●
The copy confirmation screen is
displayed.
8
To start copying, press
to
select YES.
●
To cancel, press
to select NO.
158
Image copy between cards (Cont.)
8
8
7
6
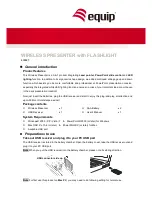
Index display
Copy confirmation screen
●
If the power is turned off or the Mode dial is set to another position while
you are selecting pictures, the selected information will be canceled.
Note:
1234 1235 1236 1237
1238 1239 1240 1241
1242 1243 1244 1245
1246 1247 1248 1249
[
SM
]
COPY
OK
CLEAR
EXIT
COPY
OK
YES
NO
NO
YES
[
SM
]
COPY
[
CF
]
Summary of Contents for CAMEDIA E-100 RS
Page 30: ...30...
Page 58: ...58 1...
Page 80: ...80 2...
Page 81: ...3 SHOOTING PICTURES CONSECUTIVELY 3...
Page 87: ...4 DIFFERENT SHOOTING OPTIONS TO SUIT EVERY APPLICATION 4...
Page 99: ...5 RECORD MODE SELECTION 5...
Page 105: ...6 SHOOTING WITH FLASH 6...
Page 142: ...142 7...
Page 143: ...8 DISPLAY FUNCTIONS 8...
Page 168: ...168 9...
Page 198: ...198 11...
Page 199: ...12 MISCELLANEOUS 12...
Page 218: ...218...
Page 219: ...219...