background image

38

Chapter 3

Taking still pictures

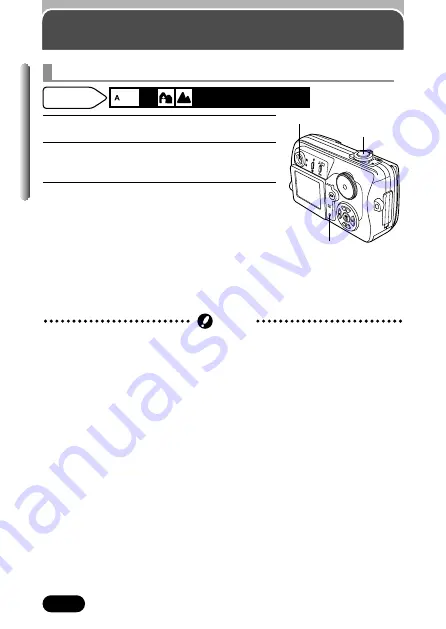
Taking pictures while looking through the viewfinder

1

Open the lens barrier.

2

Position your subject within the AF target
mark while looking through the viewfinder.

3

Take the picture (P. 35).

The card access lamp blinks while pictures
are being stored on the card.

Number of still pictures that can be stored on a 32 MB card:
HQ record mode (2560 x 1920): Approx. 26
SQ2 record mode (640 x 480 NORMAL): Approx. 199

Shutter button

Viewfinder

Press the shutter button gently using the ball of your finger. If the button is
pressed hard, the camera may move and pictures may come out blurred.

Recorded pictures will remain on the card if the camera is turned off or the
battery or card is replaced.

Never open the battery/card compartment cover or disconnect the optional
AC adapter while the card access lamp is blinking. Doing so could destroy
stored pictures and prevent storage of pictures you have just taken.

Note

Card access lamp

Available 
modes

Summary of Contents for C-50 - Camedia 5MP Digital Camera

Page 1: ...L CAMERA REFERENCE MANUAL Click Here C 50 ZOOM DIGITAL CAMERA PC CONNECTION OPERATION MANUAL Explanation of digital camera functions and operating instructions Explanation of how to download images between your digital camera and PC ...

Page 2: ...DIGITAL CAMERA C 50ZOOM ...

Page 3: ...ible Party Olympus America Inc Address 2 Corporate Center Drive Melville New York 11747 3157 U S A Telephone Number 1 631 844 5000 Tested To Comply With FCC Standards FOR HOME OR OFFICE USE This device complies with Part 15 of the FCC rules Operation is subject to the following two conditions 1 This device may not cause harmful interference 2 This device must accept any interference received inclu...

Page 4: ...apter 1 Getting started P 15 Chapter 2 Using the menus P 24 Chapter 3 Shooting basics P 31 Chapter 4 Advanced shooting P 54 Chapter 5 Adjusting image quality and exposure P 70 Chapter 6 Playback P 79 Chapter 7 Useful functions P 93 Chapter 8 Print setting P 104 Chapter 9 Miscellaneous P 108 ...

Page 5: ...3 How to use this manual 14 Chapter 1 Shooting basics 31 Shooting modes 31 Holding the camera 34 How to press the shutter button 35 Focusing 35 Auto focus 35 When Auto focus does not work Subjects that are difficult to focus on 36 Chapter 3 Getting started 15 Attaching the strap 15 Battery Card basics 16 Battery basics 16 Card basics 16 Loading Unloading the battery card 17 Using an optional AC ad...

Page 6: ...ting 43 Movie recording 44 Zoom Telephoto Wide angle shooting 46 Digital zoom 46 Flash shooting 48 Using the flash 50 Flash intensity control 53 Chapter 3 C o n t e n t s Advanced shooting 54 Spot metering Selecting the metering area 54 Macro mode shooting Taking close up pictures 55 Self timer shooting 56 Remote control shooting 57 Sequential shooting 59 Sequential shooting AF Sequential shooting...

Page 7: ...layback 79 Playing back still pictures 79 Single frame playback 79 Quick View 79 Slide show 80 Close up playback 81 Index display 82 Picture rotation 83 Playing back movies MOVIE PLAY 84 INDEX 86 Protect 87 Erasing pictures 88 Single frame erase 88 All frame erase 89 Editing still pictures 90 Creating black white or sepia toned pictures 90 Resizing pictures 91 Playback on a TV 92 Chapter 5 Chapter...

Page 8: ... View 100 Sleep timer 101 Video output selection 101 File name 102 Pixel Mapping 103 Chapter 7 Miscellaneous 108 Troubleshooting 108 User maintenance 115 Error codes 116 Menu maps 118 Menu functions factory default settings 121 Modes Shooting functions 122 Specifications 125 Glossary of terms 127 Index 130 Chapter 9 Print setting 104 How to print pictures 104 Applying print reserve to a card 106 C...

Page 9: ...er Remote control lamp P 56 57 Remote control receiver P 57 Lens barrier Strap eyelet P 15 Lens VIDEO OUT jack P 92 Connector cover USB connector DC IN jack P 19 Remove the cover before connecting the AC adapter Battery Card compartment cover P 17 Tripod socket Flash P 48 ...

Page 10: ...P 35 Orange lamp P 35 50 Green lamp P 35 Macro Spot button P 54 55 Protect button P 87 Flash mode button P 50 Erase button P 88 Viewfinder P 35 Arrow pad ÑñÉí Card access lamp P 35 Monitor OK Menu button Monitor button Quick View P 79 ...

Page 11: ...ions during movie playback When INFO is set to OFF When INFO is set to ON When INFO is set to OFF When INFO is set to ON When INFO is set to OFF When INFO is set to ON 1 2 3 4 5 6 7 8 9 0 ISO 80 02 09 12 12 30 20 t q w e HQ SIZE 320x240 02 09 12 12 30 FILE 100 0020 7 r y HQ 02 09 12 12 30 20 9 7 q w e ...

Page 12: ... AF target mark 6 Number of storable 24 P 39 still pictures Seconds remaining 24 P 44 7 Record mode TIFF SHQ HQ SQ1 SQ2 P 70 8 Memory gauge P 13 9 Battery check P 13 0 Self timer P 56 Remote control P 57 Drive mode BKT P 59 White balance P 77 ISO ISO80 ISO160 ISO320 P 74 Green lamp O Flash stand by mark P 50 52 Flash mode SLOW P 50 SLOW Spot metering P 54 55 Macro mode 11 Monitor indications ...

Page 13: ...e Frame number 20 r Pixel resolution 2560 x 1920 1600 x 1200 P 71 t Movie mark P 84 y File number FILE 100 0020 Recording time 0 15 during movie playback Monitor indications Total recording time 0 15 Playing time The monitor indications differ depending on the camera s settings You can select the amount of information displayed on the monitor P 97 Note ...

Page 14: ... The memory gauge lights when you take a picture When the gauge is lit the camera is storing a picture on the card xD Picture Card The memory gauge indication changes as shown below depending on the shooting status When the memory gauge is full wait until the light goes out before you take any more shots When taking still pictures Before shooting Gauge is off Shoot Wait When recording movies Durin...

Page 15: ...ing information is displayed for approximately 3 seconds then the monitor returns to the regular display For details on each piece of information displayed see page 10 Available modes In the top menu select MODE MENU T SETUP T INFO T ON or OFF Press Press again to cancel the menu Press to display the top menu Press É to turn INFO on To turn INFO off in the playback mode press again to bring up the...

Page 16: ...t is securely fastened Attaching the strap Be careful with the strap when you carry the camera as the strap can easily catch on stray objects causing serious damage Attach the strap correctly as shown so that the camera does not fall off If the strap is attached incorrectly and the camera falls off the strap Olympus is not responsible for any damages Note Chapter 1 Getting started Strap eyelet ...

Page 17: ...nnector AC cable AC wall outlet Battery basics Card basics This camera uses an xD Picture Card to record pictures This manual uses the term card when referring to an xD Picture Card Images recorded and stored on an xD Picture Card can easily be deleted overwritten and or edited on a computer Index area Write the card s contents here This camera may not recognize a non Olympus card or a card that w...

Page 18: ...ading the battery Insert the battery in the correct direction in the battery card compartment Make sure the knob is locked securely If the knob is not locked the battery may pop out when opening the battery card compartment cover Unloading the battery Slide the knob in the direction of the arrow The battery pops out Remove it 17 Chapter 1 Battery Card basics Lens barrier Monitor Loading Unloading ...

Page 19: ...y pulling it straight out 4 Close the battery card compartment cover in the direction of the arrow C then slide it in the direction of the arrow D If the battery is removed within 3 seconds after the power is turned off the settings saved in the mode may be canceled If the battery is removed from the camera for about 1 hour some settings may return to the factory default settings even when ALL RES...

Page 20: ...s turned on Repeated auto focus by pressing the shutter button halfway Repeated power zoom adjustments When communicating with a computer Do not remove or load the battery and or do not disconnect or connect the AC adapter while the camera is turned on Doing so could damage the camera s settings or functions Carefully read the Safety Precautions included in the package before use Note In addition ...

Page 21: ...r on Press with the lens barrier closed The camera turns on in the playback mode the monitor turns on Power off Press The camera turns off the monitor turns off The camera automatically enters the sleep mode to save power when the power is left on and no operations are performed The camera activates again as soon as you touch any button Sleep time interval can be set P 101 When closing the lens ba...

Page 22: ...n There is a problem with the card T Format the card if this does not correct the problem use a different card The card cannot be recognized with this camera system T Format the card Formatting erases all data saved on the card 1 Press ñ to select FORMAT then press The FORMAT screen appears 2 Press Ñ to select YES then press to start formatting When formatting is complete the camera is ready for s...

Page 23: ... on the arrow pad to select 4 When is selected on the screen press Ññ to select the date format Select any one of the following formats D M Y Day Month Year M D Y Month Day Year Y M D Year Month Day The following instructions show the procedure used when the date and time settings are set to Y M D CARD SETUP Date time setting Set the date time Because the date and time are saved with the recorded ...

Page 24: ...equently 2 p m would be 14 00 hours or 12 00 hours 2 00 hours 14 00 hours The first two digits of the year cannot be changed 7 Press For a more accurate setting press when the clock hits 00 seconds The clock starts when you press the button 8 To turn the camera off close the lens barrier SELECT SET GO SELECT SET GO The current settings remain the same even when the power is turned off unless they ...

Page 25: ...ARD WB CONTRAST CONTRAST SHARPNESS HQ SQ1 SQ2 TIFF SHQ PIC SET CARD ISO P A S M P CAMERA DRIVE OFF AUTO Shortcut menus MODE MENU Take you directly to the setting screens The shortcut menu items can be replaced with other functions P 94 Top menu Press the arrow pad to display the shortcut menus or MODE MENU Lets you set various functions such as the white balance etc Categorizes the settings into 4...

Page 26: ...ETUP CARD SETUP CAM CARD PIC OFF ON REC VIEW ALL RESET INFO INFO ON ON MY MODE SETUP MY MODE SETUP top menu CAM CAMERA tab Functions for shooting selecting drive modes using digital zoom etc PIC PICTURE tab Functions for adjusting images selecting record modes adjusting white balance etc CARD CARD tab Card functions such as formatting SET SETUP tab Functions for changing camera settings date and t...

Page 27: ... OFF ON REC VIEW ALL RESET INFO INFO MY MODE SETUP MY MODE SETUP SETUP CAM CARD PIC OFF ON REC VIEW ALL RESET INFO INFO MY MODE SETUP MY MODE SETUP The green frame moves to the selected item Pressing É or returns to the item selection Some menu items may not be available depending on the camera settings or status Unavailable menu items cannot be selected If you press the shutter button to take a p...

Page 28: ...es the optical zoom range to P 46 ZOOM a maximum of approximately 12x Sets the record mode P 70 CARD SETUP Formats the card P 98 WB Sets the appropriate white balance according P 77 to the light source Runs through all saved pictures one after P 80 another MOVIE Plays back movies You can also make P 84 PLAY indexes of still shots from movies INFO Changes the amount of information P 97 displayed on...

Page 29: ...ty P 74 P A S M Exposure mode can be selected from P 33 P Program auto A Aperture priority auto S Shutter priority auto or M Manual mode Adjusts the flash intensity P 53 DIGITAL ZOOM Digitally increases the optical zoom range to P 46 a maximum of approximately 12x PANORAMA Allows panorama pictures to be taken with P 66 Olympus CAMEDIA brand card 2 IN 1 Combines two pictures taken in succession P 6...

Page 30: ...er to display the image being P 100 recorded onto the card MY MODE Saves settings you customized P 63 SETUP SLEEP Sets the sleep timer P 101 FILE NAME Chooses how to name files and folders of P 102 images to be saved PIXEL Checks the CCD and image processing P 103 MAPPING circuit for errors Adjusts the monitor brightness P 99 Sets the date and time P 22 SHORT CUT Lets you assign frequently used fu...

Page 31: ...P 90 Makes the file size smaller and saves it P 91 as a new picture CARD tab CARD SETUP Formats the card FORMAT or erases all P 89 images in the card ALL ERASE 98 SETUP tab ALL RESET Selects whether to keep the current camera P 93 settings when you turn off the power Turns off the beep sound used for warning P 99 etc Adjusts the monitor brightness P 99 Sets the date and time P 22 Selects the numbe...

Page 32: ...taking photos of both your subject and the background The picture is taken with the background as well as the subject in the foreground in focus The camera automatically sets the optimal shooting settings Landscape Scene shooting Suitable for taking pictures of landscapes and other outdoor scenes This mode produces clear sharp pictures with excellent detail making it ideal for shooting natural sce...

Page 33: ...bilize the camera by using a tripod Sports shooting Suitable for capturing fast moving action without blurring The camera automatically sets the optimal shooting conditions Self Portrait shooting Enables you to take a picture of yourself while holding the camera Point the lens towards you and take a shot The focus is locked on you shooter The camera automatically selects the optimal settings for t...

Page 34: ...und are in focus P 41 S Shutter priority shooting Allows you to set the shutter speed manually The camera sets the aperture automatically Set the shutter speed according to the subject and the type of effect you want P 42 Aperture F number is decreased Aperture F number is increased Setting the shutter speed higher lets you capture fast moving action without blur The subject will be clear and shar...

Page 35: ...Hold the camera firmly with both hands while keeping your elbows at your sides to prevent camera movement When shooting vertically hold the camera so that the flash is at the upper end Correct Horizontal grip Vertical grip Lens Flash ...

Page 36: ...s lamp blinks mode The camera starts recording a movie and the orange lamp lights Viewfinder AF target mark Green lamp Card access lamp Shutter button Orange lamp Focusing When you place the AF target mark on a subject and press the shutter button halfway the green lamp lights up This means that focusing has been performed automatically If the green lamp blinks focusing is not correct If this happ...

Page 37: ...us does not work Subjects that are difficult to focus on 3 Subjects at different distances 4 Fast moving subjects Position the AF target mark in the viewfinder on an object that is the same distance from the camera as the subject then half press the shutter button to lock focus while keeping your finger half pressed on the shutter button frame the picture you want to shoot and then fully press the...

Page 38: ...utter button halfway to lock the focus Focus and exposure are locked and the green lamp lights up If the green lamp blinks focus and exposure are not locked Release your finger from the shutter button and position your subject again Repeat step 2 until the green lamp lights up without blinking 3 Compose your picture point the camera towards the subject while keeping the shutter button pressed half...

Page 39: ... Approx 26 SQ2 record mode 640 x 480 NORMAL Approx 199 Shutter button Viewfinder Press the shutter button gently using the ball of your finger If the button is pressed hard the camera may move and pictures may come out blurred Recorded pictures will remain on the card if the camera is turned off or the battery or card is replaced Never open the battery card compartment cover or disconnect the opti...

Page 40: ......

Page 41: ...e viewfinder As you get closer to the subject the actual image recorded striped area becomes lower than the one in the viewfinder see left Viewfinder Disadvantage When close to a subject the image in the viewfinder is a little different from the picture that the camera actually records Disadvantage Camera movement can occur easily and subjects may be difficult to see in bright dark places The moni...

Page 42: ...o decrease the aperture value appears Press Ñ to increase the aperture value To increase the aperture value F number press Ñ To decrease the aperture value F number press ñ Aperture value F number Zoom position Value Wide W f2 8 f8 0 Tele T f4 8 f8 0 HQ HQ Available modes Open aperture the widest aperture setting depends on the zoom position When the flash is set to the auto flash mode the shutter...

Page 43: ... is displayed in red The shutter speed you have set is unsuitable for the conditions appears Press ñ to set the shutter speed slower appears Press Ñ to set the shutter speed faster To set a faster shutter speed press Ñ To set a slower shutter speed press ñ Shutter speed HQ HQ Shutter speed range 1 2 1 1000 sec For Slow synchronization SLOW or Slow synchronization with red eye reduction SLOW flash ...

Page 44: ...posure determined by the currently selected aperture and shutter speed and the exposure considered optimal by the camera appears in the upper right hand corner When the exposure variance is set to less than 3 0 or more than 3 0 the exposure variance appears in red F number W T f2 8 f8 0 T T f4 8 f8 0 Shutter speed 8 1 1000 sec Aperture value F number Shutter speed Exposure variance Open aperture t...

Page 45: ...tal possible recording time and the mark are displayed on the monitor Focus locks when the shutter button is pressed halfway 2 Press the shutter button all the way to start recording The number of seconds remaining appear During movie recording lights in red Seconds remaining Available modes Total recording time ...

Page 46: ...inished writing the movie to the card If there is any space left on the card the number of seconds remaining is displayed You can start recording another movie If the displayed seconds remaining reach 0 shooting finishes automatically and the camera starts writing the movie to the card Card access lamp During movie recording the flash and optical zoom cannot be used To use zoom set DIGITAL ZOOM to...

Page 47: ... subject telephoto Press the zoom lever toward T to zoom in Shoot a wider view picture wide angle Press the zoom lever toward W to zoom out 1 In the top menu select DIGITAL ZOOM T ON Press In the top menu select MODE MENU T CAMERA T DIGITAL ZOOM T ON Press Press again to cancel the menu 2 Press the zoom lever towards T The zoom bar appears When is pressed the monitor turns off and DIGITAL ZOOM bec...

Page 48: ...iny Camera movement is likely to happen at higher magnifications Stabilize the camera with a tripod etc to avoid camera movement Note Digital zoom ON The cursor moves on the zoom indicator according to the zoom magnification Indicates digital zoom Indicates optical zoom HQ HQ Zoom area Factory default setting OFF ...

Page 49: ...pear red The flash fires regardless of available light This mode is useful for eliminating shadows on the subject s face or for correcting the color shift produced by artificial lighting especially fluorescent light Auto flash Red eye reduction flash After the pre flash it takes approximately 1 second before the shutter is released Hold the camera firmly after the pre flash to prevent camera movem...

Page 50: ...se Slow Synchronization yet also reduce red eye For instance when shooting a person against a brightly lit night background A normal flash might make the person s eyes red but slow synchronization with red eye reduction lets you capture the background correctly and reduce red eye at the same time The Slow Synchronization flash is designed for slow shutter speeds Normally when shooting with a flash...

Page 51: ...o the viewfinder lights up and the flash stand by mark is displayed on the monitor When is blinking the flash is charging When stops blinking the camera is ready to shoot Flash working range W max Approx 0 2 m 3 4 m 0 6 ft 11 2 ft T max Approx 0 3 m 2 0 m 1 0 ft 6 6 ft Auto flash SLOW SLOW 50 Chapter 3 Flash shooting Shutter button button Available modes Using the flash HQ HQ Mode indication Orang...

Page 52: ...Flash shooting Available Not available Factory default setting The factory default setting and the available settings differ depending on which shooting mode is selected Mode Flash mode Auto flash SLOW SLOW P A S M ...

Page 53: ...ement warning auto red eye reduction fill in When the orange lamp or camera movement warning lights up the shutter speed locks at its current level This helps prevent camera movement problems shutter speeds that are too slow can cause blur However if the zoom magnification is increased the camera will increase the locked shutter speed accordingly Zoom position shutter speed W max 1 30 sec T max 1 ...

Page 54: ...the contrast of images In the top menu select MODE MENU T CAMERA T To increase the light emission press Ñ To decrease the light emission press ñ To complete the setting press Press again to cancel the menu Factory default setting 0 Ñ Light emission is increased by a 1 3 EV each time you press the button ñ Light emission is decreased by a 1 3 EV each time you press the button EV Exposure Value Avai...

Page 55: ... subject can be shot with optimal exposure regardless of the background light such as when the subject is dark due to back lighting When is set you can use spot metering when shooting up close to a subject Available modes 1 Press repeatedly until spot metering or spot metering macro mode appears If is not pressed for 2 seconds the selection screen disappears 2 Take a picture Factory default settin...

Page 56: ...maximum T position You can fill the entire frame with a very small subject As the center of the frame within the AF target mark is metered and optimal exposure is obtained when is set the picture turns out well P 54 Available modes 1 Press repeatedly until macro mode or spot metering macro mode appears If is not pressed for 2 seconds the selection screen disappears 2 Take a picture while observing...

Page 57: ...ton To stop recording press the shutter button fully again To stop the self timer press The self timer remote control lamp will turn off Factory default setting OFF This function is useful for taking pictures where you want to be included in the photograph Available modes Self timer Remote control lamp The self timer is not saved after the power is turned off even if All Reset is set to OFF P 93 T...

Page 58: ...mote control mode is not canceled automatically after shooting Perform step 1 Set to OFF Factory default setting OFF Remote control shooting Available modes Shooting is possible using the remote control This is useful when you want to take a picture with yourself in it If you want to release the shutter without touching the camera when shooting night scene pictures etc you can use the remote contr...

Page 59: ...mer remote control lamp does not blink after pressing the shutter button on the remote control TThe remote control may be too far away from the camera Move the remote control or change your position as necessary so that the remote control signal can reach the camera then press the shutter button again on the remote control TThere may be signal interference Change the signal as described in the rem...

Page 60: ...tial shooting BKT Auto bracketing P 60 There are 3 sequential shooting modes sequential shooting AF sequential shooting and auto bracketing BKT Sequential shooting modes can be selected from the DRIVE mode menu Sequential shooting AF sequential shooting Available modes 1 In the top menu select MODE MENU T CAMERA T DRIVE T or Press Press again to cancel the menu 2 Take pictures Press the shutter bu...

Page 61: ... using the exposure setting considered optimal by the camera During auto bracketing exposure is changed for each frame The exposure variance can be selected in the menus Focus is locked at the first frame Example When BKT is set to 1 0 x3 Auto bracketing Shooting pictures sequentially with a different exposure for each frame BKT ...

Page 62: ...wice to exit the menu 4 Take pictures Press the shutter button all the way and keep it pressed to shoot the preset number of pictures You can stop shooting at any time by releasing the shutter button BKT SELECT GO 0 7 0 3 x3 x5 1 0 Modes Drive mode Available Not available Factory default setting The available settings differ depending on which shooting mode is selected Mode Drive mode BKT P ...

Page 63: ...not continue shooting If the battery power dies during sequential shooting shooting stops and the camera starts saving the pictures you have taken Whether or not all of the shots are saved depends on how much battery power remains Since the maximum shutter speed is set to 1 30 second during sequential shooting the flash will fire when shooting a dark subject It takes longer than usual to store pic...

Page 64: ...re using now RESET Restores the factory default settings CUSTOM Saves settings one by one Go to step 4 3 Set CURRENT or RESET on each MY MODE SETUP screen After selecting the setting press Go to step 7 To cancel the setting select CANCEL Available modes SETUP CAM CARD PIC RESET RESET CURRENT CUSTOM REC VIEW REC VIEW ALL RESET ALL RESET INFO INFO MY MODE SETUP MY MODE SETUP When CURRENT is selected...

Page 65: ...epeat steps 4 and 5 to change other functions 6 When you have made all the settings you want press to exit from the CUSTOM screen Custom setting registration is complete 7 Press twice to exit the menu CUSTOM CUSTOM FNo SHUTTER M OFF OFF LCD P A S M Example When setting the aperture on the CUSTOM screen CUSTOM screen Press í to go to the aperture setting screen CUSTOM CUSTOM FNo SHUTTER LCD P A S M...

Page 66: ...P 48 OFF P 54 55 OFF P 56 57 DRIVE P 59 ISO AUTO P 74 0 P 53 DIGITAL ZOOM OFF P 46 for still pictures HQ P 70 WB AUTO P 77 SHARPNESS NORMAL P 78 CONTRAST NORMAL P 78 Available items and factory default settings 1 This sets the monitor to ON or OFF when the camera is turned on 2 In the mode available zoom positions are 38 50 70 114mm these numbers are based on a 35 mm film ...

Page 67: ...e and white balance are set by the first picture You cannot adjust the zoom after the first picture Panorama shooting is possible for up to 10 pictures You can take advantage of panorama shooting with an Olympus xD Picture Card Panorama shooting lets you connect images with overlapping edges into a single panoramic image using CAMEDIA Master software contained on the provided CD ROM Connects a ser...

Page 68: ...s only available with an Olympus xD Picture Card The camera itself cannot connect panorama pictures To connect each picture use the CAMEDIA Master software Your computer s memory may be insufficient if you take too many panorama pictures in the HQ SHQ modes In this case the software may not complete stitching Images are saved in the SHQ mode when panorama shooting is done even when the camera is i...

Page 69: ... menu select MODE MENU T CAMERA T 2 IN 1 Press í 2 Take the first shot The subject will be on the left in the combined image To cancel the two in one picture mode after taking the first shot press The first shot will not be stored 3 Take the second shot in succession The subject will be on the right in the combined image 2 IN 1 1 st HQ 2 nd HQ íbutton button ...

Page 70: ...two in one 2 IN 1 shooting the following functions are not available Panorama shooting Sequential shooting AF sequential shooting Auto bracketing BKT When taking two in one 2 IN 1 pictures in the TIFF mode the pictures are saved in the SHQ mode Note ...

Page 71: ... which is the best for printing or image processing on a computer A high quality mode using the JPEG format Because the compression rate is very low high quality images can be stored A high quality mode using the JPEG format with medium compression Because the compression rate is higher than SHQ file sizes are smaller so more images can be saved to a card The most compressed modes SQ2 has 3 resolu...

Page 72: ...sion Normal TIFF JPEG 2 13 26 30 66 104 153 199 4 26 52 61 132 209 306 398 32MB 64MB Still Picture Record Modes The memory capacity listed here is approximate Movie Record Modes The memory capacity listed here is approximate Pixel resolution Memory capacity in seconds per movie Record mode HQ 320x240 15 frames sec Max recording time for one movie 16 seconds SQ 160x120 15 frames sec Max recording t...

Page 73: ...ress í When you have selected any other record mode Go to step 4 3 Press Ññ to select the resolution then press 4 Press to save the setting Press again to cancel the menu Factory default setting HQ 72 Chapter 5 Record mode Record mode Available modes Selecting still picture record modes Ññíbuttons Selecting movie record modes In the top menu select T HQ or SQ Press Factory default setting HQ Avail...

Page 74: ...However if the monitor setting is over 640x480 such as 1024x768 the picture only takes up part of the screen Compression rate In record modes other than TIFF image data is compressed The higher the compression rate the less clear the image will be File format P 71 This camera saves images with either TIFF or JPEG formats In record modes other than TIFF images are compressed in the JPEG format The ...

Page 75: ...However higher values also introduce electrical noise into the resulting image which may make give the image a grainy appearance In the top menu select MODE MENU T CAMERA T ISO Select the most suitable ISO AUTO 80 160 320 Press Press again to cancel the menu AUTO Sensitivity is automatically adjusted according to the lighting conditions and the subject brightness 80 160 320 80 is best when you wan...

Page 76: ...le is approximate When ISO is set to AUTO and you shoot in dark conditions without a flash ISO automatically increases otherwise the shutter speed will be reduced possibly resulting in blurred images due to camera movement If a subject is too far away for the flash illumination to reach it when the ISO is set to AUTO the ISO is automatically increased Note ...

Page 77: ... 3 steps Adjusts towards images become brighter Adjusts towards images become darker 2 0 2 0 0 0 Factory default setting Modes Exposure Compensation Often bright subjects such as snow turn out darker than their natural colors Adjusting towards makes these subjects closer to their real shades Adjust towards when shooting dark subjects TIPS Available modes A S M É í P Available Not available Availab...

Page 78: ...RE T WB then select the best WB for your shooting conditions Press Press again to cancel the menu In the top menu select WB T PRESET T or Press Press again to cancel the menu AUTO For any light source For shooting on a sunny day For shooting on a cloudy day For shooting under tungsten light For shooting under fluorescent light Factory default setting AUTO White balance Set white balance to AUTO fo...

Page 79: ...L SOFT HARD Press Press again to cancel the menu Available modes Contrast This function adjusts the contrast of images For example images with strong differences in light and shadow can become milder while those with weaker differences can become more vivid HIGH This produces light and shade clearly and the images are clear and crisp NORMAL Between HIGH and LOW LOW Images become softer with mild c...

Page 80: ......

Page 81: ...he card one after another It is not possible with movies If a movie is played back the camera only displays the first frame of the movie MODE MENU INFO Use of the optional AC adapter is recommended when running a slide show for long periods of time If a battery is being used the camera will end the slide show after about 30 minutes and turn off The slide show will not stop until you cancel it by p...

Page 82: ...h time you turn the zoom lever towards T pictures are enlarged by 1 5 4 times 1 With the arrow pad select the picture you want to enlarge Pictures with the mark cannot be enlarged 2 Turn the zoom lever toward T When a picture is enlarged ß å are displayed Use the arrow pad to scroll the picture vertically and horizontally on the monitor 2 5x If slide show is attempted during close up playback clos...

Page 83: ...yback press the zoom lever to T The picture framed in green is displayed in full size 82 Chapter 6 Playing back still pictures Index display This function lets you show many pictures at the same time on the monitor It is useful for comparing your pictures and choosing the best ones You can also select the number of frames displayed on the monitor This function lets you change the number of picture...

Page 84: ...he picture you want to rotate using the arrow pad Pictures with cannot be rotated 2 In the top menu select MODE MENU T PLAY T Press í 3 Press Ññ to select 90 90 then press The rotated image is saved Press again to cancel the menu HQ 02 12 23 21 56 24 HQ HQ 02 12 23 21 56 24 02 12 23 21 56 24 HQ HQ 02 12 23 21 56 24 02 12 23 21 56 24 New picture orientations are saved even when the power is turned ...

Page 85: ...Press Ñ The MOVIE PLAY screen is displayed 4 Press Ññ to select MOVIE PLAYBACK or INDEX MOVIE PLAYBACK Plays back movies INDEX Displays movies as indexes of 9 still frames P 86 This function lets you play back or edit movies MODE MENU MOVIE PLAY INFO MOVIE PLAYBACK INDEX MOVIE PLA MOVIE PLAY CANCEL SELECT GO 20 Arrow pad button ...

Page 86: ...Y screen appears To exit press É PLAYBACK FRAME BY FRAME FRAME BY FRAME EXIT MOVIE PLA MOVIE PLAYBACK YBACK Displaying movie frames using the arrow pad Ñ Displays the first frame of the movie ñ Displays the last frame of the movie í Every time you press the button the next frame appears The movie can be displayed continuously by holding the button down É Every time you press the button the previou...

Page 87: ...ecord mode when Record mode when stored as an index the movie is shot HQ SQ2 1024x768 SQ SQ2 640x480 5 For steps 1 to 4 see page 84 Press The INDEX screen appears The card access lamp blinks while the movie is being accessed 6 Press Ññ to select OK or CANCEL OK Saves the index on the card CANCEL Cancels the index 7 Press to run the selected movie When CANCEL is selected the MOVIE PLAY screen appea...

Page 88: ......

Page 89: ...88 ...

Page 90: ...L ERASE then press The ALL ERASE screen is displayed 4 Press Ñ to select YES To cancel erasing select NO and press twice 5 Press to start erasing A bar is displayed to show the progress of erasing This function erases all still pictures and movies on the card except protected ones P 87 ALL ERASE ALL ERASE YES N O N O SELECT GO All frame erase Ñíbuttons ...

Page 91: ... the still picture you want to edit 2 In the top menu select MODE MENU T EDIT T select BLACK WHITE or SEPIA 3 Press í 4 Press Ññ to select BLACK WHITE or SEPIA BLACK WHITE or SEPIA Converts pictures to black white or sepia and saves them as new files on the card CANCEL Cancels the conversion To edit other pictures instead select this item 5 Press to edit A bar is displayed to show editing progress...

Page 92: ...ves the new files on a card CANCEL Cancels resizing pictures To edit other pictures instead select this item 5 Press to edit A bar is displayed to show editing progress and the screen returns to normal display Resizing pictures EXIT SELECT GO 640 x 480 CANCEL 320 x 240 320 x 240 In the following cases EDIT is not available The card does not have enough memory Movie mode Pictures recorded in TIFF P...

Page 93: ...ack to the TV using the video cable 3 Press to turn on the camera Turn on the TV Set the TV to the video input mode For details on switching to video input refer to your TV s instruction manual 4 Select an image by using the arrow pad The selected image will be displayed on the TV 92 ...

Page 94: ...to all the modes The settings affected by All Reset are listed below Available modes Chapter 7 Useful functions Setting Factory default setting Ref page P A S M P P 33 FNo F2 8 P 41 43 SHUTTER 1 500 P 42 43 0 P 76 ZOOM 38mm P 46 FLASH MODE 1 AUTO 2 P 48 1 OFF P 54 55 OFF P 56 57 DRIVE P 59 ISO AUTO P 74 0 P 53 DIGITAL ZOOM 1 OFF P 46 for still pictures HQ P 70 WB AUTO P 77 SHARPNESS NORMAL P 78 CO...

Page 95: ...requently used functions Available menu Settings Ref page functions P 56 57 DRIVE BKT P 59 ISO AUTO 80 160 320 P 74 P A S M P A S M P 33 2 0 2 P 53 BKT 0 3 0 7 1 0 x3 x5 P 60 DIGITAL ZOOM OFF ON P 46 PANORAMA P 66 2 IN 1 P 68 for still pictures TIFF SHQ HQ SQ1 SQ2 P 70 WB AUTO P 77 SHARPNESS HARD NORMAL SOFT P 78 CONTRAST HARD NORMAL LOW P 78 WB MODE MENU Shortcut menu ...

Page 96: ...isplay the available menu functions 3 Select the function you want by pressing Ññ then press to save your setting Repeat steps 2 and 3 to set B and C SHOR SHORT CUT T CUT A WB B C SELECT SELECT GO A B C MODE MENU Assign settings to the A B and C positions on the top menu SHOR SHORT CUT T CUT A B C SELECT SELECT GO ISO DRIVE P A S M Setting the Shortcut Menu ...

Page 97: ...ding to the ß mark shown next to each function The monitor jumps directly to the setting screen of that function Example When DIGITAL ZOOM is set to the A shortcut Press this button Pressing Ñ takes you directly to the DIGITAL ZOOM setting screen Factory default setting A B C WB CAMERA PIC SET CARD DIGIT DIGITAL ZOOM AL ZOOM OFF ON 2 IN 1 PANORAMA ANORAMA Using the Shortcut Menu ...

Page 98: ...n the monitor returns to the regular display For details on each piece of information displayed see page 10 When INFO is OFF When INFO is ON Available modes In the top menu select MODE MENU T SETUP T INFO T ON or OFF Press Press again to cancel the menu Press to display the top menu Press É to turn INFO on To turn INFO off in the playback mode press again to bring up the top menu and press É ...

Page 99: ... T CARD T CARD SETUP Press í In the top menu select MODE MENU T CARD T CARD SETUP Press í Press ñ to select FORMAT Press 2 Press Ñ to select YES To cancel formatting select NO and press 3 Press to start formatting A bar is displayed to show the progress of formatting FORMAT YES NO CAUTION ERASING ALL All existing data stored on the card is erased when the card is formatted Make sure that you save ...

Page 100: ...menu select MODE MENU T SETUP T T ON or OFF Press Press again to cancel the menu Factory default setting ON Available modes Adjusts the monitor brightness 1 In the top menu select MODE MENU T SETUP T then press í 2 To brighten the monitor press Ñ To darken it press ñ To complete the setting press Press again to cancel the menu Factory default setting 0 ADJUST GO ...

Page 101: ...ve just taken Pressing the shutter button halfway at any time displays the image the camera is currently aimed at OFF The image being recorded is not displayed This is useful when you want to prepare your next shot while the previous image is being recorded In the top menu select MODE MENU T SETUP T REC VIEW T ON or OFF Press Press again to cancel the menu Factory default setting ON Available mode...

Page 102: ... AC adapter The camera always turns off if the camera is left in playback mode for about 3 minutes Note Video output selection You can select NTSC or PAL according to your TV s video signal type Select the video signal type of your area before shooting If you use the wrong video signal type you may not be able to play back the recorded images properly on your TV In the top menu select MODE MENU T ...

Page 103: ...rted in the camera The folder number returns to No 100 and the file number returns to No 0001 This is useful when grouping files on separate cards AUTO When AUTO is selected the same folder number is retained but the file number continues from the previous card so that the same file number is not used on different cards This helps you to manage multiple cards This is useful when a group of files s...

Page 104: ...few minutes after the monitor is used or continuous shots are taken to allow for proper performance of the Pixel Mapping function 1 In the top menu select MODE MENU T SETUP T PIXEL MAPPING Press í START appears 2 Press A progress bar appears during Pixel Mapping Press again to cancel the menu SETUP CAM CARD PIC START FILE NAME FILE NAME PIXEL MAPPING PIXEL MAPPING SLEEP Available modes If the powe...

Page 105: ...be printed easily by DPOF compatible printing service labs or a personal DPOF compatible printer Printing on an Olympus CAMEDIA P 400 or other DPOF digital printer If you use an optional PC card adapter printing is possible without using a computer For more details refer to the printer instructions Transferring pictures to a computer and printing them from a printer connected to the computer If yo...

Page 106: ...h quality pictures set the picture size in the camera as high as possible higher record mode P 70 TIPS DPOF reservations set by another device cannot be changed by this camera Make changes using the original device If a card contains DPOF reservations set by another device entering reservations using this camera may overwrite the previous reservations Even if an image appears with the message PICT...

Page 107: ...keep it If RESET is selected all print reserve data is canceled 3 Press Ññ to select RESET or KEEP Press 4 Press Ññ to select or Press Sets single frame print the number of prints and date time T Go to step 5 Sets all frame print and the date time T Go to step 8 makes one print for each frame 5 Press Éí to select a frame you want to print If print reserve has already been applied the number of pri...

Page 108: ... Prints the frame together with the shooting date TIME Prints the frame together with the shooting time 9 Check the number of print reserve frames the total number of prints and date time printing data Press Ññ to select SAVE and press CANCEL clears all print reserve data 10Press É to finish print reserve GO SELECT HQ HQ 02 12 23 21 56 02 12 23 21 56 24 24 2 To apply print reserve for other frames...

Page 109: ...wing it to return to room temperature or if outdoors putting it in an inner jacket pocket 4 The camera cannot operate while it is connected to a personal computer 5 The camera is in the sleep mode Operate the camera press the shutter button turn the mode dial etc P 17 P 20 P 101 POSSIBLE CAUSES CORRECTIVE ACTION REF PAGE The camera or monitor does not turn on 1 The battery is exhausted 1 Replace t...

Page 110: ...e lens barrier 2 Wait until there is room in the memory gauge 3 Remove your finger from the shutter button and wait until the orange lamp stops blinking Take your shot again 4 The flash is charging Shoot again when the orange lamp stops blinking 5 Insert a new card or erase unwanted pictures Before erasing download important images to a computer If the green lamp is blinking wait until it stops 6 ...

Page 111: ... single frame shooting 4 Set the mode dial to a mode other than 5 Cancel the Panorama shooting P 50 P 50 P 59 P 31 P 66 The date recorded with the image data is wrong 1 The date and time are not set 2 The camera has been left for too long with the battery removed 1 Set the date and time The clock adjustment is not factory preset 2 Set the date and time again P 22 P 22 The settings you made have re...

Page 112: ...nitor brightness is not adjusted properly 2 The monitor is exposed to direct sunlight 1 Adjust the monitor brightness 2 Block the sunlight with your hand or move out of the sunlight P 99 The monitor is not clear 1 The flash is in the auto flash mode 1 This red eye phenomenon occurs with all cameras when a flash is used It is caused by light from the flash reflecting off the retina at the back of t...

Page 113: ...ted 1 Set the exposure compensation to 0 2 Adjust the exposure compensation or change the camera position toward the subject P 76 P 76 The picture is too bright POSSIBLE CAUSES CORRECTIVE ACTION REF PAGE The picture is out of focus 1 The camera moved when the shutter button was pressed 2 The AF target mark was not on the subject 3 The lens is dirty 4 The shutter button was pressed while standing i...

Page 114: ...ors of pictures taken indoors look unnatural The picture has obscured edge s 1 The lens was partly blocked by a finger or the strap 1 Hold the camera correctly keeping your fingers and the strap away from the lens P 34 Halation produces unnatural colors in the picture 1 Excessively bright ultraviolet light on the subject such as sunlight shining through the leaves of trees window frames in bright ...

Page 115: ...connecting to the camera 1 The video output signal is incorrect 2 The camera is not in the playback mode 3 Your TV s video signal is incorrect 1 Set the video output signal correctly according to your region 2 Close the lens barrier and press the button 3 Set the TV to the video input mode P 101 P 20 P 92 ...

Page 116: ...camera with the damp cloth and then dry it with a dry cloth If you have used your camera at the beach use a cloth dampened with fresh water Monitor and viewfinder Wipe gently with a soft cloth Lens Blow dust off the lens with a blower brush commercially available then wipe gently with lens cleaning paper Card Wipe gently with a soft cloth Do not use a strong solvent such as benzine or alcohol or c...

Page 117: ...error codes below will appear Possible causes The card is not inserted or it cannot be recognized No more pictures can be taken Cannot record play back or erase pictures on this card The recorded image cannot be played back with this camera The card is not formatted Indications ...

Page 118: ...ty space on the card so it cannot record new information such as print data The battery card compartment cover is open Indications CARD COVER OPEN Corrective action Shoot then play back recorded pictures or insert a card that contains images Replace the card or erase unneeded pictures Close the battery card compartment cover ...

Page 119: ...FF ON TIFF SHQ HQ SQ1 SQ2 1600 x 1200 1280 x 960 1024 x 768 640 x 480 AUTO SOFT NORMAL HARD LOW NORMAL HIGH FORMAT CANCEL OFF ON OFF ON OFF ON OFF ON CURRENT SET CANCEL RESET ALL RESET CANCEL CUSTOM 30SEC 1MIN 3MIN 5MIN 10MIN RESET AUTO A B C all items included in CAMERA and PICTURE tabs NTSC PAL OFF Same settings as above AUTO PRESET CAMERA PICTURE CARD SETUP MODE MENU WB and modes For CUSTOM set...

Page 120: ...560 x 1920 SQ1 2048 x 1536 SQ2 640 x 480 OFF ON CAMERA CARD SETUP MODE MENU DIGITAL ZOOM ISO CARD SETUP ALL RESET PIXEL MAPPING VIDEO OUT OFF AUTO 80 160 320 FORMAT CANCEL OFF ON OFF ON NTSC PAL AUTO PRESET HQ 320 x 240 SQ 160 x 120 OFF ON CAMERA CARD SETUP MODE MENU WB DIGITAL ZOOM Top menu Tab Function Setting Top menu Tab Function Setting and modes ...

Page 121: ...CANCEL SEPIA CANCEL 640 x 480 320 x 240 CANCEL ALL ERASE FORMAT OFF ON OFF ON 4 9 16 NTSC PAL PLAYBACK FRAME BY FRAME EXIT OK CANCEL OFF ON MODE MENU 1 MOVIE PLAY 2 INFO 1 1 Not displayed during movie playback 2 Not displayed during still picture playback mode Top menu Tab Function Setting PLAY 1 EDIT 1 CARD SETUP ...

Page 122: ... default settings P AUTO A S M 80 OFF OFF OFF ON AUTO P OFF AUTO 0 NORMAL NORMAL ON ON 3MIN 0 Y M D 2002 01 01 00 00 A B C WB 9 CURRENT RESET When appears in a mode column it means that the corresponding function is not available in that mode or cannot be set in that mode Some function settings are automatically determined by the settings selected in other modes NTSC ON ON HQ ...

Page 123: ... A S M mode setting Aperture value setting Aperture priority shooting Shutter speed setting Shutter priority shooting Manual shooting My Mode setting My Mode shooting Zoom Digital zoom Auto focus Focus lock Auto Red eye Reduction Fill in Slow synchro nization Slow synchroni zation with red eye reduction Available Not available Depending on the P A S M mode setting some functions are not available ...

Page 124: ...g AF sequential shooting Auto bracketing Panorama shooting Two in one shooting Record mode setting ISO setting Exposure compensation Auto white balance Preset white balance Sharpness setting Contrast setting Shortcut setting Available Not available Depending on the P A S M mode setting some functions are not available For details refer to the individual function page ...

Page 125: ...on the P A S M mode setting some functions are not available For details refer to the individual function page Not available in Mode Function All reset Information display Beep Rec view Monitor brightness adjustment Sleep timer File name Pixel mapping Video output selection ...

Page 126: ...xels Image pickup device 1 1 76 CCD solid state image pickup 5 360 000 gross Recording image 2560 x 1920 pixels TIFF SHQ HQ resolutions 2048 x 1536 pixels SQ1 1600 x 1200 pixels SQ2 1280 x 960 pixels SQ2 1024 x 768 pixels SQ2 640 x 480 pixels SQ2 Lens Olympus lens 7 8 mm to 23 4 mm f2 8 to f4 8 7 elements in 6 groups equivalent to 38 mm to 114 mm lens on 35 mm camera Photometric system Digital ESP...

Page 127: ...r mini B VIDEO OUT jack Automatic calendar Up to 2099 system Operating environment Temperature 0 C to 40 C 32 F to104 F operation 20 C to 60 C 4 F to 140 F storage Humidity 30 to 90 operation 10 to 90 storage Power supply Only an Olympus LI 10B lithium ion battery AC adapter specified by Olympus optional Dimensions 99 5 mm x 58 5 mm x 41 5 mm W X H X D 3 9 x 2 3 x 1 6 excluding protrusions Weight ...

Page 128: ...e is measured in f stops Larger aperture values indicate smaller apertures and smaller aperture values indicate larger apertures Backlight A light source to illuminate the monitor from behind the screen CCD Charge coupled Device This converts light passing through the lens into electrical signals On this camera light is picked up at 5 36 million points and converted into RGB signals to build a sin...

Page 129: ...ter speed and the amount of light that passes through the lens aperture Gross Pixel Resolution The total number of pixels in a CCD Not all pixels are used to create the image ISO A method for indicating film speed by the International Organization for Standardization ISO Higher ISO values indicate greater sensitivity to light so images can be exposed even in low light conditions JPEG Joint Photogr...

Page 130: ... speed and the camera automatically varies the aperture so that the picture is taken with the best exposure TFT Thin Film Transistor Color Monitor A color Monitor constructed using thin film technology TIFF Tagged Image File Format An uncompressed format used for saving highly detailed black white or color image data TIFF image files can be handled by software programs for digital cameras scanners...

Page 131: ... 59 E Erasing pictures 88 Exposure compensation 76 Exposure variance 43 F File name 102 Fill in flash 48 Flash 48 50 Flash intensity control 53 Flash off 49 Fluorescent light 77 Focus lock 37 Focusing 35 Folder name 102 Format 98 Frame number 12 Full auto shooting 31 H High quality mode 70 HQ 70 I INDEX 86 Index display 82 Information display 97 ISO 74 J JPEG 71 L Landscape Portrait shooting 31 La...

Page 132: ...ng pictures 91 Rotation 83 S S Shutter priority shooting 33 Seconds remaining 44 Self Portrait shooting 32 Self timer shooting 56 Sepia 90 Sequential shooting 59 Sharpness 78 Shooting modes 31 Shortcut menu 94 SHQ 70 Shutter button 35 Shutter priority shooting 42 Single frame erase 88 Single frame playback 79 Sleep 101 Slide show 80 Slow synchronization 49 Sports shooting 32 Spot metering 54 SQ 70...

Page 133: ...ay ET E Mail distec olympus com Olympus software updates can be obtained at http olympus com digital OLYMPUS OPTICAL CO EUROPA GMBH Premises Goods delivery Wendenstrasse 14 18 20097 Hamburg Germany Tel 040 23 77 30 Letters Postfach 10 49 08 20034 Hamburg Germany Hotline Numbers for customers in Europe Tel 0 18 05 67 10 83 for Germany Tel 0 08 00 67 10 83 00 for Austria Belgium Denmark France Nethe...

Page 134: ...era Thank you for purchasing an Olympus digital camera This manual provides instructions on how to install the USB driver To ensure correct installation refer only to these installation procedures DIGITAL CAMERA PERSONAL COMPUTER DIGITAL CAMERA PC CONNECTION OPERATION MANUAL ...

Page 135: ...re its accuracy However if you find any errors or incomplete information please contact your local Olympus representative It is prohibited by copyright laws to duplicate in part or in whole the information contained in this manual except for personal use Reproduction without permission of the copyright owner is prohibited The PC screens shown in this manual may differ slightly from the actual disp...

Page 136: ...3 Macintosh Windows INDEX Flowchart 4 Identifying the OS 6 Windows 98 Me 2000 XP 8 Macintosh OS 9 X 23 Downloading image files using other OS For other OS users 31 ...

Page 137: ...Windows 95 NT 4 0 Windows 98 98 SE upgrade from Windows 95 Mac OS 8 6 or lower except Mac OS 8 6 equipped with USB MASS Storage Support 1 3 5 installed at the factory Data transfer is not guaranteed on a home built PC system or PCs with no factory installed OS Identifying the OS p 6 Windows 98 98 SE Second Edition Windows Me 2000 XP MacOS 9 0 9 1 OS X 10 0 For OS 8 6 see below Installing the USB d...

Page 138: ...the AC adapter disconnect the camera from the computer and make sure that the camera is turned off To avoid computer malfunctions do not turn off the camera when the camera is connected to a computer If the camera is connected to the computer via a USB hub operation may not be stable if there are any compatibility problems between the computer and the hub In such cases do not use the hub and conne...

Page 139: ... your desktop When the My computer icon is not on your desktop click Control Panel from the Start menu 2 Double click the Control Panel icon 3 Double click the System icon The way the file icons inside the folder appear may vary depending on your version of Windows If you don t see the icon you are looking for click on view all Control Panel options on the left of the window ...

Page 140: ...lose the window If your OS is Windows 98 98 SE proceed to Installing the USB driver for Windows 98 p 9 Users running Windows Me 2000 XP p 11 Users running other OS p 31 Mac OS Macintosh Select About This Computer from the Apple menu on the menu bar A window appears with the name of the computer s OS Confirm that the OS is OS 9 0 9 1 or OS X Users running Mac OS 9 X p 23 Users running other OS p 31...

Page 141: ...uns out while the computer is accessing the card in the camera the camera will turn off in the middle of the operation and this could destroy image files data If you are using batteries make sure that there is sufficient remaining battery power Installing the USB driver for Windows 98 When using Windows 98 98 SE 9 Connecting the camera to the computer 11 Confirming the computer recognizes the came...

Page 142: ...the procedure below as the USB driver will be automatically installed Proceed to Connecting the camera to the computer p 11 1 Insert the provided software CD into your CD ROM drive 2 The Olympus Windows Installer should automatically launch Click USB driver for Windows 98 If the installer is not automatically launched select Run on the Start menu and then execute drive letter Information exe The d...

Page 143: ...k Continue The installation of the USB driver will start 4 Click OK to restart your computer and the installation is complete 5 When the computer has restarted installation is complete If the Olympus Windows Installer screen appears click Close and remove the CD ROM from the CD ROM drive ...

Page 144: ...the USB port on your computer as shown below 2 After making sure that the camera is turned off connect the end of the USB cable to the USB connector on the camera The location of the USB connector or multi connector varies depending on the camera model Refer to the camera manual for details The location of the USB port varies depending on the computer For details refer to your computer s manual Lo...

Page 145: ...ch require you to press the monitor button When the camera is turned on the lamp on the right of the viewfinder lights up Camera with a mode Set the mode dial to If the camera has a power switch as well as a mode dial turn the power switch to ON Camera with a mode Camera setup connection mode Set the mode dial to to turn the camera on Lens barrier Lamp monitor button ...

Page 146: ...ows XP You can download image files from the camera easily Select Copy pictures to folder on my computer using Microsoft Scanner and Camera Wizard then follow the on screen instructions You may also select take no action to bypass the Microsoft Scanner and Camera Wizard You may then use a more advanced image viewing editing program such as Olympus CAMEDIA Master software For detailed instructions ...

Page 147: ... be other Removable Disk icons for other devices such as a removable media drive or USB SmartMedia Reader Writer In this case the digital camera is recognized as another Removable Disk If you cannot find the icon the camera and computer are not connected properly Turn the camera off disconnect the camera from the computer and connect again or proceed to Confirming the USB driver is installed p 15 ...

Page 148: ...le Disk follow the procedure below to check whether the USB driver has been fully installed 1 Open My Computer and double click the Control Panel icon For users running Windows XP open Control Panel from the Start menu 2 Double click the System icon 3 The System window will appear Click the Device Manager tab ...

Page 149: ...and start again Users running Windows 98 98 SE start again from Confirming the USB driver is installed and Users running Window Me 2000 XP start from Connecting the camera to the computer If the USB driver was successfully installed you can find the following in the Device Manager the name of the camera you have connected listed under Disk drives OLYMPUS Digital Camera listed as one of the items i...

Page 150: ...d as a Removable Disk 3 Double click the Dcim folder If an error message appears when you double click the icon there may be a problem with one of the following the camera s power source the AC adapter is not properly connected or the battery power is low Make sure that the AC adapter is correctly connected or that the batteries are not running low the card there is no card in the camera or there ...

Page 151: ...the My Documents icon The camera automatically assigns folder names and file names according to the following rules Serial numbers of image files run from 0001 to 9999 Serial numbers of folders run from 100 to 999 When file number 9999 is reached a new folder is created and assigned the next number Months January through September are expressed by the numbers 1 through 9 October by the letter A No...

Page 152: ...age files downloaded to your computer The files will be opened in the default image viewer of the operating system If you want to view the image a different size or process it you will need to open the image with software that supports JPEG or TIFF images files such as Paint Shop Pro Photoshop or CAMEDIA Master software The lamp on the right of the viewfinder or the card access lamp blinks while t...

Page 153: ... right of the viewfinder or the card access lamp is not blinking Some camera models have either a lamp on the right of the viewfinder or a card access lamp and the location varies depending on the model Refer to your camera s reference manual 2 Double click the My Computer icon and right click the Removable Disk to display the menu 3 Click Eject on the menu Lamp ...

Page 154: ...USB cable from the camera 6 Remove the USB cable from your computer Windows Me 2000 XP 1 Make sure that the lamp on the right of the viewfinder or the card access lamp is not blinking Some camera models have either a lamp on the right of the viewfinder or a card access lamp and the location varies depending on the model Refer to your camera s reference manual Lamp ...

Page 155: ...ars 3 Click on the message The Unplug or Eject Hardware window appears 4 When a message appears click OK 5 Remove the USB cable from the camera 6 Remove the USB cable from your computer If the window returns the following message when you click Unplug or Eject Hardware first make sure that no image data is being downloaded from the camera and then remove the USB cable ...

Page 156: ...f the operation and this could destroy image files data If you are using batteries make sure that there is sufficient remaining battery power If you are running Mac OS X the connection to the computer and downloading the image data are verified Restrictions such as the following may occur due to the OS The image file properties are not displayed correctly Images in the camera cannot be opened with...

Page 157: ...onnector or multi connector varies depending on the camera model Refer to the camera manual for details The location of the USB port varies depending on the computer For details refer to your computer s manual Look for this mark Terminal USB port Camera with a USB connector USB port Computer USB connector USB cable Smaller terminal Rectangular terminal Camera with a multi connector USB cable Small...

Page 158: ...rn the power switch to ON Camera with a mode Camera setup connection mode Set the mode dial to to turn the camera on 4 The computer recognizes the camera as a new device The computer recognizes the camera automatically and an Untitled icon appears on the desktop If you cannot find this icon turn off the camera and connect again Mac OS X When the computer has recognized the camera the Apple Image C...

Page 159: ...rror message appears when you double click the icon there may be a problem with one of the following the camera s power source the AC adapter is not properly connected or the battery power is low the card there is no card in the camera or there is a problem with the card Check that you can play back pictures on the monitor of your camera the USB cable the camera is not properly connected to the co...

Page 160: ...e names according to the following rules Serial numbers of image files run from 0001 to 9999 Serial numbers of folders run from 100 to 999 When file number 9999 is reached a new folder is created and assigned the next number Months January through September are expressed by the numbers 1 through 9 October by the letter A November by B and December by C Folder name Example File name Example Serial ...

Page 161: ...iles in the Hard Disk folder The files will be opened in the default image viewer of the operating system If you want to view the image a different size or process it you will need to open the image with software that supports JPEG or TIFF images files such as Paint Shop Pro Photoshop or CAMEDIA Master software The lamp on the right of the viewfinder or the card access lamp blinks while the image ...

Page 162: ... Capture software dialog appears 1 From the Download To menu select a destination folder 2 To download all images click Download All To selectively download images click Download Some and highlight the desired images The images are transferred from the camera to your computer If you are operating Mac OS X and you want to download images using the same procedure as for Mac OS 9 select File Close an...

Page 163: ...ght of the viewfinder or the card access lamp is not blinking 2 Drag the untitled icon on the desktop to Trash 3 Make sure that the lamp on the right of the viewfinder or the card access lamp is not blinking 4 Remove the USB cable from the camera 5 Remove the USB cable from your computer Lamp ...

Page 164: ...ng other OS For other OS users Users running other OS cannot connect the camera directly to a computer Windows 95 Windows NT Mac OS before OS 9 You can download images directly to your computer using an optional floppy disk adap usi ...

Page 165: ...ay ET E Mail distec olympus com Olympus software updates can be obtained at http olympus com digital OLYMPUS OPTICAL CO EUROPA GMBH Premises Goods delivery Wendenstrasse 14 18 20097 Hamburg Germany Tel 040 23 77 30 Letters Postfach 10 49 08 20034 Hamburg Germany Hotline Numbers for customers in Europe Tel 0 18 05 67 10 83 for Germany Tel 0 08 00 67 10 83 00 for Austria Belgium Denmark France Nethe...

Reviews: