


17
Setting Up Safely and Putting Into Operation
G
Setting Up Safely and Putting Into Operation
IMPORTANT!
Prior to starting up, check that the voltage specifications
of the laminator correspond to those of your power supply network
(220 V - 240 V, 50 Hz). Otherwise, it is possible that the laminator will
not work properly.
1.
Set the laminator down on a level, stable working surface close to an
easily accessible power socket.
2.
Plug the power cable into the power connector on the laminator and
to a mains power socket.
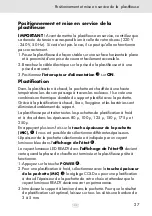
3.
Switch the
Power switch
3
to
ON
.
Laminating
During hot lamination, the laminating pouch is heated to a high temper
-
ature as it passes through the laminator rollers. This creates a permanent
thermal bonding of the laminated material and the laminating pouch. Hot
lamination permanently prevents the laminated material from coming into
contact with water, oxygen and bacteria.
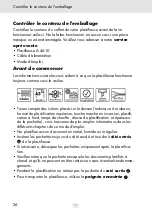
The laminator can process all cold and hot laminating foils in the thick
-
nesses 80 µ, 100 µ, 125 µ, 150 µ, 175 µ and 250 µ.
Various foil thicknesses can be selected by pressing the
Foil Thickness
(MIC)
5
button the respective number of times. The foil thickness select
-
ed is indicated by the blue control lamps in the
status indicator
8
.
The READY control lamp in the
status indicator
8
lights up green
when the heat-up phase is completed and the laminator is ready to
operate.
1.
Press the
POWER
4
button.
2.
Use the
Foil Thickness (MIC)
5
button to set COLD for cold lamina
-
tion or to select the foil thickness for hot lamination and then wait until
the READY control lamp lights up green continuously.
3.
Place the material to be laminated inside the laminating pouch. For
an optimal lamination result, leave an all-round spacing of 3 to 5 mm
from the edges of the pouch.
4.
Feed the prepared laminating pouch with the closed side first, keeping
it straight, into the
infeed
10
of the laminator. Use the
Positioning
aid
9
as a basic orientation.
Summary of Contents for A 4610
Page 62: ...g 63 63 63 65 66 66 67 67 68 69 70 70 71 71 71...
Page 63: ...63 DIN A3 80 250 micron 1 mm g...
Page 64: ...64 g 8...
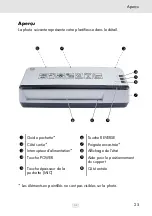
Page 65: ...65 g 1 2 3 4 5 6 7 8 9 10 1 6 REVERSE 2 7 3 8 4 POWER 9 5 MIC 10...
Page 66: ...66 g A 4610 6 10 2 7...
Page 68: ...68 3 3 5 mm 4 10 9 5 2 1 6 POWER 4 10 1 REVERSE 6 g...
Page 69: ...69 2 10 3 REVERSE 6 10 1 2 3 OFF 3 4 1 3 ON 2 POWER 4 3 5 COLD READY g...
Page 70: ...70 4 10 5 6 1 mm 330 mm 80 250 micron 45 s 80 micron 30 1000 mm min 220 240 V AC 50 Hz g...
Page 71: ...71 1200 W 5 C 35 C 25 85 x x 515 x 110 x 200 mm 5 2 kg CE www go europe com g...
Page 72: ...GO Europe GmbH Zum Kraftwerk 1 45527 Hattingen Germany V 1 08 2019 Art No 3150...


