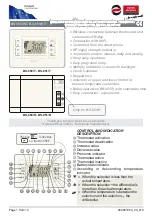


MENU
ENTER
Page
6 from
1
4
or to set the correct time.
Pressing the key will cause the
minutes indicators to blink and with the keys
Which ever key is pressed after this will
show the same message on the screen
.
All other function are executed normally.
To unlock the keypad follow the same
procedure and the screen will show the
message .
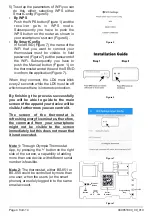
7.
SETTING THE DAILY PROGRAM.
5.
KEYPAD LOCK
(
in any operation state
).
To enter time and date adjustment mode
press the key for 3" as mentioned in
paragraph 1. The backlight will be activated
and the lower section of the screen will flash
the message
(
Set
Time). After that
press briefly the key and the hours
indicators will start to blink. Use the keys
or change to the correct value.
Pressing again the key you can adjust
consecutively the year, month and date.
You can see that the day names are
changed automatically depending on the
year, month and date.
In normal operation
the clock has leap year and daylight
savings time correction.
If immediately after entering the MENU
parameters press the key then the
blinking message (Day) will be shown
on the bottom of the screen and the word
DAY
on the top right.
By pressing the
key
the message
(
Program 1) is
shown in place of the message
.
6. SETTING THE TIME AND DATE
(the
thermostat is in the OFF state).
If the keys and are pressed
simultaneously for 3"
(
first the key and
then the
),
the screen will show the
message and the keypad is locked.
(
the thermostat is in the OFF state
).
In the center of the screen and if
programming is done for the first time you
can see the message . By pressing the
key the hours indicators blink and you
can alter the setting by using the
keys or . By pressing the key
you can alter the minutes and the required
temperature.
With the key you can
return to the initial position with the
8.
ADJUSTING SETTINGS FOR THE
WEEKLY PROGRAM.
(
the thermostat is in
the OFF state
).
If immediately after entering the
ΜΕΝU
press the key for 2 times the
message (7days) will be shown on the
bottom of the screen and the word
WEEK
on the top right
.
On the top left of the screen
there is the message
ΜΟ
(
Monday) that
shows the day that corresponds to the
programming that follows.
By pressing
again the key the screen shows a
blinking that determines the first
program of Monday of the weekly program.
The remaining procedure is as described in
paragraph 7 (setting the daily program).
Finishing the programming of the first day if
you press the key while the program
number is blinking (e.g. ) will show the
blinking message
.
With the key
you can select the day for which you want to
alter the program as described above.
If no
other changes are required then press the
key to save the setting to memory. The
screen will show the message .
It is
stressed that at least one program must be
adjusted for every day else the factory
default temperature of
6
.0 º
C will be used
The start time of the next program must also
be bigger than the start time of the previous
.
If no more changes are required and when
the program indicator is blinking (e.g. )
you can press the key to store all the
changes and the screen will show the
message .
The programs that have not
been adjusted are not taken into account.
blinking .
With consecutive presses of
the key you can select the remaining
programs of the 24 hour cycle (10 in total)
and can set the required time periods and
temperatures as described above.
Please
note that for every program define only the
start time since the end time is the start time
of the next program
.
For example, if you
desire a temperature of
23.0º
C
from
14
:
00
to
18
:00 in program 1 set the start time
14
:00
at
23.0º
C
and the start time of the
second program
18
:00
with the desired
temperature.
The 24 hour time base starts
at
00
:00 and ends at
23
:
59'
.
MENU
ENTER
ESC
ESC
MENU
ENTER
MENU
ENTER
MENU
ENTER
MENU
ENTER
ESC
ESC
MENU
ENTER
940851000_09_010


