STEP 1
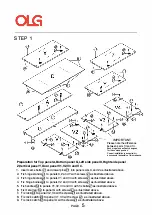
IMPORTANT:
Please note the difference
between parts 13 and 14.
Each hinge is specifically designed
for their unique position.
Correct installation is essential for
a successful assembly of this credenza.
Preparation for Top panel A,Bottom panel G,Left side panel X,Right side panel
Z,Vertical panel Y,Door panel V1,V2,V3 and V4.
1, Insert cams bolts@ and dowel pins@ into panels A,G,X,and Z as illustrated above.
2, Fix hinge stands@ to panels X,Z and Y with screws@as illustrated above.
3, Fix hinge bodies@ to panels V1 and V4 with screws@as illustrated above.
4, Fix hinge bodies@ to panels V2 and V3 with screws@as illustrated above.
5, Fix handles{§)to panels V1 ,V2,V3 and V4 with fix bolts@as illustrated above.
6, Fix metal leg@ to panel G with screws@as illustrated above.
7, Fix lock@to panel V2,V4 with screws� as illustrated above.
8, Fix lock catch@to panel V1 ,V3 with screw
@
as illustrated above .
9, Fix lock catch Oto panel A with screws@ as illustrated above.
PAGE
5
Summary of Contents for AXC18
Page 1: ...TOOLS REQUIRED Powered screwdriver Installation Guide myolgoffice com Bookcase...
Page 2: ...BOOKCASE Installation Guide PARTS PAG...
Page 5: ...ASSEMBLY INSTRUCTION AXIS Cupboard 1800H ITEM No AXC18 PAGE 1...
Page 6: ...Incorrect Correct r The turning direction of attaching The arrow direction front V2 V1 PAGE 2...
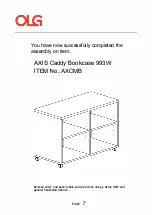
Page 14: ...ASSEMBLY INSTRUCTION AXIS Caddy Bookcase 993W ITEM No AXCMB PAGE 1...
Page 15: ...Incorrect Correct The turning direction of attaching The arrow direction front PAGE 2...
Page 21: ...ASSEMBLY INSTRUCTION AXIS System Tambour Insert Studio ITEM No AXCTI PAGE 1...
Page 22: ...11ie turning direction of attaching X1 C 11ie mTOlr directiCJll i ront Roller door PAGE 2...
Page 27: ...ASSEMBLY INSTRUCTION AXIS Credenza 1800W ITEM No AXCZ18 PAGE 1...
Page 28: ...Incorrect Correct The turning direction of attaching The arrow direction front V4 V3 V1 PAGE 2...
Page 36: ...ASSEMBLY INSTRUCTION Axis Locker Single ITEM No AXLOC1 PAGE 1...
Page 44: ...ASSEMBLY INSTRUCTION Axis Locker Single ITEM No AXLOC2 PAGE 1...
Page 53: ...ASSEMBLY INSTRUCTION AXIS Planter for Tambour Cabinet 750W ITEM No AXPBOX200 PAGE 1...
Page 54: ...The turning direction of attaching Incorrect Correct The arrow direction front PAGE 2...
Page 58: ...STEP 4 6 PCS Transparant plastic sticker I PAGE 6...
Page 60: ...ASSEMBLY INSTRUCTION AXIS Tambour Cabinet 1250H ITEM No AXT12 PAGE 1...
Page 61: ...Incorrect Correct The turning direction of attaching The arrow direction front PAGE 2...
Page 68: ...ASSEMBLY INSTRUCTION AXIS Tambour Cabinet 900H ITEM No AXT9 PAGE 1...
Page 69: ...Incorrect Correct The turning direction of attaching The arrow direction front PAGE 2...
Page 76: ...ASSEMBLY INSTRUCTION AXIS Tambour Mobile ITEM No AXTM PAGE 1...
Page 77: ...Incorrect Correct The turning direction of attaching The arrow direction front PAGE 2...
Page 79: ...STEP 1 Preparation for Tambour Mobile A 1 Assemble castor with screws on bottom panel G PAGE 4...


