background image


34


5.2 Recommended Housing & Bracket 


11 Hi-Power IR LED Illuminator with Die-Cast Aluminum Housing & Bracket


11 Super Power IR LED, 6pc x 25º / 5pc x 45º 


IR Distance up to 395ft / 120m 


IP66 Rating 


User Adjustable IR LED Intensity (VR), 


Factory Default 80% 


Fully-Cable Managed Mounting Bracket 


Uses professional rust-proof stainless steel screws 


Heater & Blower 


24V AC, 60VA, Power Ready Plug for 12V DC Camera 


Summary of Contents for WDEM-7680LPDN-IO

Page 1: ...image without noise even in tunnels an environment with very strong light and can capture vehicle license plate numbers at speed up to 120mi hr 200km hr during the day and 35mi hr 60km hr at night Th...

Page 2: ...recycling of materials will help to conserve natural resources For more detailed information about recycling of this product please contact your local city office your household waste disposal service...

Page 3: ...he following conditions a When the power supply cord or plug is damaged b If liquid has been spilled or objects have fallen into the video product c If the video product has been exposed to rain or wa...

Page 4: ...3 1 OSD Control Buttons 10 3 2 OSD Operation 11 12 4 Configuration 12 31 4 1 Lens 12 4 2 Exposure 13 14 4 3 WDR BLC FOG RE 14 16 4 4 White Balance 17 18 4 5 2DNR 3DNR Dynamic Noise Reduction 19 4 6 Da...

Page 5: ...anual Multi Language OSD Control Fog Reduction High Light Compensation HLC 2D 3D Noise Reduction Digital Image Stabilizer DIS E zoom Function 1 256x Advanced Motion Detection Function Quadrangle Mosai...

Page 6: ...90 1 100 1 110 1 120 1 1990 1 2000 sec 1 Step per 1 10sec Capture Speed Day Up to 120 mi hr 200 km hr Night Up to 35 mi hr 60 km hr Automatic Gain Control 0 200 Levels Adjustable Level Settings White...

Page 7: ...7 2 CAMERA OVERVIEW 2 1 Dimensions 2 2 Parts and Functions...

Page 8: ...ounting the camera Mount Adaptor The adaptor can be attached onto the top or the bottom of the unit Auto Iris Lens Connector 4 pin type The lens connector supplies the auto iris lens not supplied with...

Page 9: ...External Input controlled by external infrared illuminator 4 Day Night Output 5 NC 6 Ground Power Input Indicator Light When the camera is connected to a power supply the indicator light will be on RS...

Page 10: ...ve the cursor downwards to the desired item LEFT Use this button to move the cursor to the left to select or to adjust the parameters of the selected item The parameter decreases when the left button...

Page 11: ...h to the sub menu Items with symbol in the end contain sub menus For further settings of those items select the desired item with the button or and press the ENTER button to bring up the sub menu and...

Page 12: ...push IRIS SWITCH on the control board to DC and the TYPE on the menu will be displayed as DC When the VIDEO LENS is in use push IRIS SWITCH on the control board to VIDEO and the TYPE on the menu will...

Page 13: ...HUTTER MIN SHUT MAX SHUTTER MAX The shutter speed is in direct ratio to the number you set Option of SHUT SHUT MIN Speed 1 50 60 1 2000 S Option of SHUT MAX Speed 1 1000 1 100000 S NOTE Only when SHUT...

Page 14: ...ption x2 x4 x8 x16 x32 x64 x128 x256 x512 and OFF 4 3 WDR BLC FOG RE 1 When the MAIN MENU is displayed on the screen use the UP and DOWN buttons to WDR and press the ENTER button to do further setups...

Page 15: ...the brightness of the bright area Level 000 255 BLC Back Light Compensation Even when there is a massive backlight behind the object bright images of the background and the object can still be capture...

Page 16: ...A BOTTOM 1 3 TOP 2 3 BOTTOM 2 3 LEFT 2 3 and RIGHT 2 3 MANUAL LEVEL HIGH MID and LOW FOG RE Fog Reduction Even when the object is fogged the object can still be captured by selecting the FOG RE mode C...

Page 17: ...m 1800 K to 10500 K e g around fluorescent lights outdoors around sodium vapor lamps or inside tunnels AWB Auto White Balance Select this to allow the camera automatically adjust the white balance und...

Page 18: ...ght surrounded the object or where the light changes all the time MANUAL The manual adjustment mode enables a more precise adjustment Increase and or decrease the red and blue color values according t...

Page 19: ...ise in the low light level decreases automatically 2 Please use the UP and DOWN buttons to 2DNR 3DNR on the MAIN MENU and press the ENTER button to do further setups 3 Please select the desired item a...

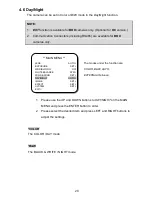
Page 20: ...Please use the UP and DOWN buttons to DAY NIGHT on the MAIN MENU and press the ENTER button to enter 2 Please select the desired item and press LEFT and RIGHT buttons to adjust the settings COLOR The...

Page 21: ...between DAY NIGHT and NIGHT DAY should be more than 5 or the camera will keep switching from DAY NIGHT and NIGHT DAY constantly 2 The infrared illuminator is not recommended to use under AUTO mode Ple...

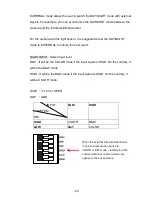
Page 22: ...B W mode please turn the BURST function on NOTE The BURST function is adjustable under B W and EXTERNAL mode NIGHT OUTPUT EXTERNAL OUTPUT DNO SYSTEM GND 5V COLOR 5V GND B W GND 5V Sub Menu under the...

Page 23: ...best result NIGHT INPUT Select input level LOW It will be the COLOR mode if the input signal is HIGH On the contrary it will be the B W mode HIGH It will be the B W mode if the input signal is HIGH O...

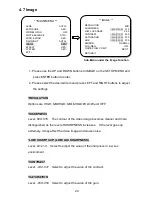
Page 24: ...emely it may affect the video image and cause noise LOW SHARP SUP LOW LUX SHARPNESS Level x0 x1 0 Select to adjust the value of the sharpness in low Lux environment CONTRAST Level 032 031 Select to ad...

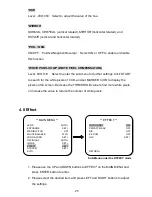
Page 25: ...CCD and set MARKER to ON to display the pixels on the screen Decrease the THRESHOLD value to find more white pixels or increase the value to reduce the number of white pixels 4 8 Effect 1 Please use t...

Page 26: ...ct area MONITOR AREA Press SET to enter the sub menu and set the detect area ALARM OUT Only available to cameras with Communication Connectors Choose ON to output the alarm connect the alarm device to...

Page 27: ...e by dragging the vertices of the quadrilateral Push ENTER to switch the vertices in the sequence of left top right top left bottom and right bottom and push ENTER again to return to PRIVACY MASK subm...

Page 28: ...e E Zoom function will be disabled E ZOOM Select ON and press ENTER button to do further setups Options are RATIO 001 256 zoom in 1 to 256 times PAN 512 511 horizontal zoomed in viewing and TILT 001 2...

Page 29: ...s to SYSTEM on the MAIN MENU 2 Please select the desired item and press LEFT and RIGHT buttons to adjust the settings NOTE The version of FIRMWARE shown on the above is for reference only The actual v...

Page 30: ...Changes made to the CAM ID PROTOCOL and BAUD RATE will only take effect after you exit the COMM page This is to prevent the camera from unexpected disconnecting caused by remote access CAMERA ID 1 102...

Page 31: ...nu for further settings LANGUAGE Use the LEFT RIGHT buttons to select the language preference The options are ENGLISH FIRMWARE Please refer to the actual firmware The figure shown on above is for refe...

Page 32: ...is sufficient The cameras OSD can be used and controlled remotely via RS485 communication port The most important thing is transmission can still stay clear and true 4 11 Exit Select EXIT to automati...

Page 33: ...s LEN0380DCIR J Made in Japan 1 3 Aspherical f3 80mm Vari focal F0 95 Auto Iris Day Night IR corrected LEN2712DCIR J Made in Japan 1 3 Aspherical f2 7 12mm Vari focal F1 2 Auto Iris Day Night IR corre...

Page 34: ...g Bracket 11 Super Power IR LED 6pc x 25 5pc x 45 IR Distance up to 395ft 120m IP66 Rating User Adjustable IR LED Intensity VR Factory Default 80 Fully Cable Managed Mounting Bracket Uses professional...

Page 35: ...35...

Page 36: ...36 www okinausa com MADE IN TAIWAN Copyright 2012 All Rights Reserved L 817 www okinausa com R201212 V27...

Reviews: