background image

- 65 -

Printing on Color Papers


Printing on Color Papers

Usable Color Papers

Use color paper that satisfies the following 

conditions.


z

Pigment or ink used to color the paper heat-

resistant to 230ºC


z

E-photo printer paper with the same paper 

characteristics as plain paper

Printing Using White Toner 

Only

Printing text and illustrations using only white 

toner on color paper.

Memo


z

If you specify [Printing only spot color toner] and lift up all 

the other colors of cartridges, you can print with only spot 

colors, even if one of the black, cyan, magenta, or yellow 

print cartridges has reached the end of its service life.

Summary of Contents for Pro1040

Page 1: ...Pro1040 Pro1050 Windows PS Printer Driver User s Guide...

Page 2: ...ndling due to ignoring this display may cause personal injury Keys Buttons and Symbols This chapter describes the following keys buttons and symbols Inscription Description button key z z Indicates ha...

Page 3: ...10 Unless otherwise specified the examples in the manuals included with the printer show operation using Windows 10 and the Pro 1050 printer Depending on the OS model and version you are using descri...

Page 4: ...Driver to Fine tune the Cut Position 14 2 Printing 17 Preparing Paper 18 Loading Media 20 Calibrating the Sensor 26 Confirming the Sensor Position 26 Unwinder 26 Printer 29 Sensor Calibration 31 Dete...

Page 5: ...eleting a Printer Driver 53 Updating a Printer Driver 54 4 Adjusting the Color 55 Adjusting Color with a Printer Driver 56 Color Matching 56 What Is Color Matching 56 Color Matching Automatic 56 Simpl...

Page 6: ...nts Printing by using applications to specify Spot Color toner PS printer drivers only 69 Using Illustrator 69 Using Photoshop 70 6 Troubleshooting 73 Printer Driver Malfunctions 74 Trouble when setti...

Page 7: ...es in this chapter use Windows WordPad for explanations Depending on the application the screens and operations procedures may differ z z For detailed explanations of the printer driver setup items se...

Page 8: ...label paper Continuous Label Black Mark Paper that is not die cut into a label shape with the entire surface covered with label paper and black marks printed on the back surface Media Type Descriptio...

Page 9: ...n that media is fed it may feed at an angle If this happens print it so there is a continuous length that is longer than 152 mm 6 inches z z When printing on paper that is very narrow 25 4 mm 1 inch i...

Page 10: ...z z Near the inside surface of an external wall z z On a surface that is uneven or curved z z In a location where electrostatic charge is generated z z In a location subjected to very high temperatur...

Page 11: ...as accurately as possible the actual size of the media and then input those values z z If the label length or the black mark interval is less than 4 inches use the following method to measure the medi...

Page 12: ...istered to the device from Sensor settings Memo z z Refer to Calibrating the Sensor P 26 regarding how to adjust the sensor 2 If you want to fine tune the image position enter the position shift amoun...

Page 13: ...is not in the list select New paper and add it See Registering a Desired Paper Size with the Printer Driver P 11 6 In Print position correction set the values for the print start positions vertically...

Page 14: ...ing preferences 4 On the Setup tab click User defined paper 5 Use the Registered user defined paper list to select the paper whose cut position you want to correct Memo z z If the paper you want to us...

Page 15: ...tering a Desired Paper Size with the Printer Driver 8 Click OK or Close as many times as necessary to exit the Printing preferences screen 9 Open the file to be printed 10Specify the paper size and th...

Page 16: ...16 Registering a Desired Paper Size with the Printer Driver...

Page 17: ...35 Note z z The examples in this chapter use Windows WordPad for explanations Depending on the application the screens and operations procedures may differ z z For detailed explanations of the printer...

Page 18: ...ive on it is fed into the equipment the adhesive may stick to the feed path and damage the equipment Cutting off the part of the paper on which there is leftover adhesive 2 Tape is removed 1 Adhesive...

Page 19: ...l paper no black marks 1 2 to 6 5 mm 0 0472 to 0 2559 inches Length of leading liner when paper is loaded z z Die cut label paper with black marks BM BM 1 2 to 4 0 mm 0 0472 to 0 1575 inches Length of...

Page 20: ...risk of injury z z If you drop roll paper it may roll on the floor and cause injury to the people around z z To prevent roll paper from dropping store it horizontally on a desk etc z z Do not use any...

Page 21: ...ds when sliding the roll paper 5 Rotate the Roll Paper Holder Knob to fix the roll paper core in place Note z z Rotate the Roll Paper Holder Knob until it clicks 6 Aligning the Flange with the Roll Pa...

Page 22: ...weight on the top of the Roll Paper Holder shaft Doing so risks causing injury due to the device falling 9 Lower the Unwinder Cover Open Lever to open the Unwinder Cover Open the Unwinder Cover manua...

Page 23: ...Pull up the F0 Roller Release Lever 12Press the Tension Bar Open Lever upwards until it clicks 13Pass paper below the Tension Bar and F0 Roller and align the leading edge of the paper with the Roll P...

Page 24: ...per Note z z Set the Roll Paper Guide correctly If the Roll Paper Guide is not set correctly the width of the paper cannot be detected correctly z z Be careful that the Roll Paper Guide does not press...

Page 25: ...paper Memo z z If even though the roll paper is set correctly the paper separates from the Unwinder Paper Guide during printing rotate the Roll Paper Position Adjustment Dial in the B direction to adj...

Page 26: ...the type of sensor from gap sensor to black mark sensor z z If the sensor position settings do not match paper feed jams may occur you cannot adjust the black mark sensor or the gap sensor and the ske...

Page 27: ...n Black mark on back side of paper If the position of the black mark and the black mark sensor position do not align rotate the Sensor Position Adjustment Dial to adjust the position go to step 3 Blac...

Page 28: ...justments are not necessary If the width of the right edge of the liner is 10 mm or more then adjust the gap sensor using the above positions as a rough estimate If the corners of the label are rounde...

Page 29: ...Maintenance Guide for the procedure to install the print cartridge set and belt unit 3 Confirm the sensor position Sensor Position Adjustment Dial Position During Regular Usage Factory setting is this...

Page 30: ...per Center of black mark 2 Check the gap sensor position Confirm the center of the label on the media and the gap sensor position on the device number on the indicator If the position of the label and...

Page 31: ...llowing conditions are met The Media Form is one of the following Continuous Paper Black Mark Die cut Label Gap Die cut Label Black Mark Continuous Label Black Mark The Ports of the printer driver is...

Page 32: ...printer driver you can specify the number registered in the printer for the adjustment results and whether to apply it when printing By standardizing the registration numbers of the sensor adjustment...

Page 33: ...click Close 6 For Paper settings select the paper settings you registered and then click Paper interval detection Memo z z Paper interval detection is displayed if the following conditions are met Th...

Page 34: ...want to align the cut positions temporarily cancel printing and then send the print data starting from the page you want to reprint Reference z z For detailed explanations of the printer driver setup...

Page 35: ...Canceling a Print Job Use the procedure below to cancel a print job from the printer s control panel 1 On the control panel press the CANCEL button 2 If a verification message appears select Yes and...

Page 36: ...36 Canceling a Print Job...

Page 37: ...Printer Driver 53 Note z z The examples in this chapter use Windows WordPad for explanations Depending on the application the screens and operations procedures may differ z z For detailed explanation...

Page 38: ...mber of print pages and cut positions Paper settings Specifies from among registered paper settings which one should be applied for printing Orientation Specifies the print orientation Copies Specifie...

Page 39: ...labels and register the results as device sensor settings This button is not displayed for media forms that do not require calibration Printer information acquisition Obtains from devices the names of...

Page 40: ...inter Driver Functions Table Extend Tab Item Description Watermarks Sets when implementing stamp printing Drawing position adjustment Specify if you want to adjust the position of image data before pr...

Page 41: ...y without economizing the toner Save Level Low Prints using medium light toner Save Level Middle Prints using light toner Save Level High Prints using considerably light toner z z Toner Saving is enab...

Page 42: ...en the file to be printed 2 Select Print in the File menu 3 Select Pro1050 PS and then click Preferences 4 On the Setup tab change the Quality setting 5 Print Printing Sharper Photos Image Smoothing Y...

Page 43: ...normally ON Memo z z Depending on the application bar code and other intervals will narrow In this case turn OFF the function Windows PS Printer Driver 1 Open the file to be printed 2 Select Print in...

Page 44: ...hey appear on the screen Note z z Print time may be longer Windows PS Printer Driver 1 Open the file to be printed 2 Select Print in the File menu 3 Select Pro1050 PS and then click Preferences 4 On t...

Page 45: ...menu 3 Select Pro1050 PS and then click Preferences 4 On the Setup tab change the Print in reverse order setting Memo z z Clear the Print in reverse order check box to print documents in page order z...

Page 46: ...g 1 2 3 1 2 3 1 2 3 1 2 3 3 2 3 1 1 2 Printing by specifying batches Printing without specifying batches x 2 sets x 2 sets Note z z Not usable with some applications Windows PS Printer Driver 1 Open t...

Page 47: ...vice and overlay for printing Note z z This function cannot be used if the paper length label length or black mark interval for a single sheet is less than 4 inches Memo z z To print an overlay you ne...

Page 48: ...lick OK to close the Information dialog box 7 Click Apply OK to close the Printing Preferences screen 8 From the application print the image you want to register as a form 9 Confirm that the New Form...

Page 49: ...to a file without printing the print data Note z z PC administrator privileges are required Windows PS Printer Driver 1 Click Start and select Control Panel in Windows System 2 Click View devices and...

Page 50: ...hat you saved Save a Setup 1 Click Start and select Control Panel in Windows System 2 Click View devices and printers 3 Right click the Pro1050 PS icon and then select Printing preferences 4 Change th...

Page 51: ...up You can convert printer driver print setup information to a file and then export import the file The file extension for exporting importing is xmn Export a Setup 1 Click Start and select Control Pa...

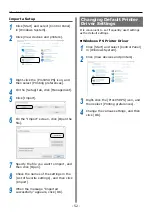
Page 52: ...o import and then click Open 8 Check the names of the settings in the List of favorite settings and then click Import 9 When the message Imported successfully appears click OK Changing Default Printer...

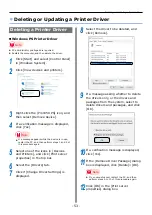
Page 53: ...PC and then perform steps 1 and 2 of this procedure again 5 Select one of the icons in Devices and Printers and click Print server properties in the top bar 6 Select the Drivers tab 7 Click if Change...

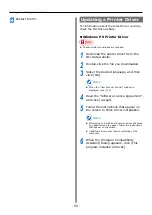
Page 54: ...he desired language and then click OK Memo z z When the User Account Control window is displayed click Yes 4 Read the Software License Agreement and click Accept 5 Follow the instructions that appear...

Page 55: ...55 4 Adjusting the Color Adjusting Color with a Printer Driver 56...

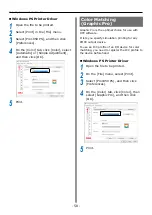
Page 56: ...idual machine characteristics are taken into consideration To maintain color consistency from data creation to output it is necessary to consider the color differences by device when converting colors...

Page 57: ...inted emphasizing compatibility with the monitor color temperature 6500 K Normally use this setting z z Monitor Perceptual During color matching represents the color by the method emphasizing the grad...

Page 58: ...ching Graphic Pro Graphic Pro is the optimal choice for use with DTP software It lets you specify simulation printing for any CMYK output device To use an ICC profile of an I O device for color matchi...

Page 59: ...ccording to the document to be printed This setting can be selected only when the color mode is set to Simple Adjustment This setting cannot be configured on the Graphic Pro z z Composite Black CMYK S...

Page 60: ...olor data is printed using grayscale shades of black and white without touching the print data Note z z If implementing color printing after printing by specifying Monochrome a delay may occur dependi...

Page 61: ...le if printing 100 black text on backgrounds of 50 cyan 50 magenta and 50 yellow the toner layer thickness is 50 50 50 100 250 which exceeds 240 Windows PS Printer Driver 1 Open the file to be printed...

Page 62: ...le Adjustment or Graphic Pro Windows PS Printer Driver 1 Open the file to be printed 2 Select Print in the File menu 3 Select Pro1050 PS and then click Preferences 4 On the Color tab select Graphic Pr...

Page 63: ...ote z z The examples in this chapter use Windows WordPad for explanations Depending on the application the screens and operations procedures may differ z z Spot color printing is supported by the Pro1...

Page 64: ...page being printed Data portion Excluding white Uses white toner for all data parts that do not include white parts Data portion Including white Uses white toner for all data parts that include white...

Page 65: ...printer paper with the same paper characteristics as plain paper Printing Using White Toner Only Printing text and illustrations using only white toner on color paper Memo z z If you specify Printing...

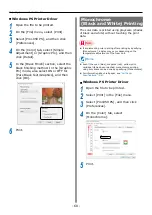
Page 66: ...hen click OK 6 Print Printing White Under Color When printing on color paper print a base with white toner and then print in color on top of that Windows PS Printer Driver 1 Open the file to be printe...

Page 67: ...r and create this at the top 3 Open the swatch window and click the New Swatch button Enter SpotColor_White as its name and select Spot Color for the color type Note z z Please enter the name as given...

Page 68: ...Papers 7 Select File Print 8 Go to Printer and select Pro1050 PS 9 Go to Advanced Overprints and select Simulate 10Click Setup 11 Click Preferences 12On the Color tab select Application specification...

Page 69: ...ple Adding Swatches If using Spot Color white specify the swatches added for the objects to be Spot Color printed 1 Open the swatch panel and select new swatch 2 Enter SpotColor_White in Swatch Name 3...

Page 70: ...and then click OK 3 Print Using Photoshop This explanation uses Photoshop CC as an example Adding Spot Color Channels If using Spot Color white specify the Spot Color channels added for the objects to...

Page 71: ...rint dialog box 3 Click Advanced 4 Select Color from the menu on the left of the Preferences dialog box and select Simulate overprint If using Adobe Reader click Advanced and then select Simulate over...

Page 72: ...72 Printing by using applications to specify Spot Color toner PS printer drivers only...

Page 73: ...73 6 Troubleshooting Printer Driver Malfunctions 74...

Page 74: ...rom the client side while doing shared printing This printer driver does not support shared printing in a client server environment To use this function connect the printer directly to the computer wi...

Page 75: ...n the warning display to re specify Copies and then do the print operation again z z When paper is selected that has a setting shorter than 101 6 mm 4 inches for paper length label length or black mar...

Page 76: ...Oki Data Corporation 4 11 22 Shibaura Minato ku Tokyo 108 8551 Japan https www oki com printing August 2019 47309602EE Rev1...

Reviews: