MFP overview > 12
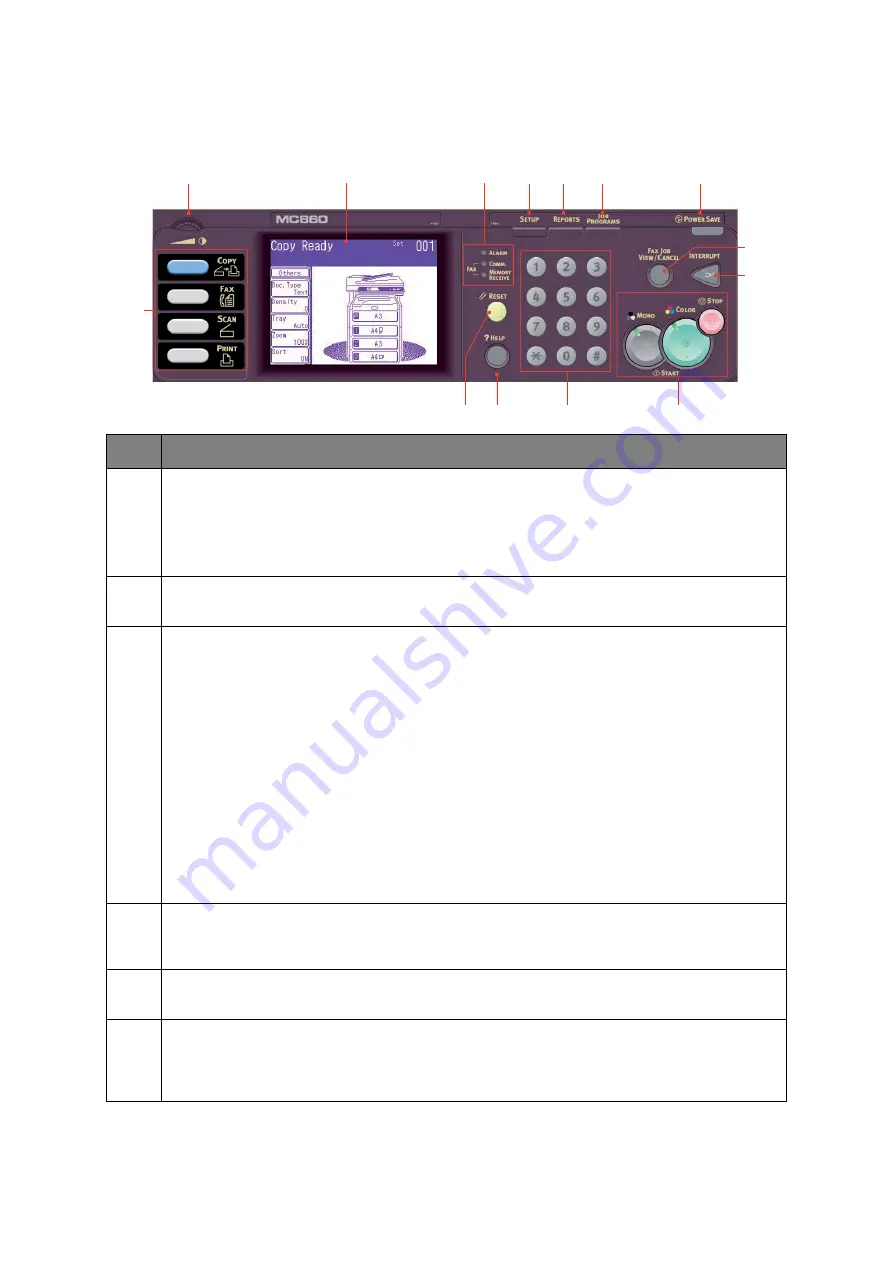
Control Panel
REF.
DESCRIPTION
1
Touch screen display
Enables you to make selections associated with the copying, faxing and scanning
functions by touching the screen to press selected buttons.
Caution! Be careful not to scratch the display with sharp or pointed objects e.g.
a ballpoint pen as this may damage the display.
2
Contrast Dial
Allows you to adjust the screen contrast as required.
3
Main function buttons
COPY
: Pressing this button selects copy mode on the touch screen. This allows you to
control the copying process whereby documents to be copied are scanned in the scanner
unit (document glass or ADF) and the copies are automatically printed in the printer unit.
FAX
: Pressing this button selects fax send mode on the touch screen. This allows you to
control the process whereby a document is scanned and then the scanned data is sent as
a fax.
SCAN
: Pressing this button gives access to several send modes on the touch screen.
These allow you to select and control the process whereby a document is scanned and
the scanned data is sent: by email as an attachment, to a local PC, to a network PC, to a
USB memory stick. It also allows you to arrange for a document to be scanned from a
remote PC.
: Pressing this button selects print mode on the touch screen. This allows you to
select and print out a stored job or an encrypted print job. It also allows you to print out
a job list of all recent prints, or switch the machine to an “offline” state.
4
RESET button
Pressing this button returns all settings of a selected function to their default values, but
does not stop any jobs that are already in progress.
5
HELP button
Pressing this button when it is flashing displays help information on the touch screen.
6
Keypad
Use the numeric buttons to enter, for example, number of copies or a fax number. The
*
and
#
buttons are used to navigate menus in touch-tone systems such as voice mail (if
you have a telephone handset connected), or in vertical service codes.
5
4
6
7
12
13
14
11
10
2
1
3
8
9


