Version 1.1
24
2011-06-28
14.
Maintenance of quick couplings on H-cylinders
The quick couplings for connecting an attachment to the excavator are subject to wear and aging.
When they are no longer tight, they must be repaired or replaced. If there is a leak while you are using an
attachment, the seal is probably defective and has to be replaced (see instructions for 14.1).
Leaks that occur both when attachments are connected and disconnected mean the female connector is
probably damaged inside and needs to be replaced. The connector can be mounted in two different ways,
either with circlips (see 14.2) or nose nuts (see 14.3).
14.1
Replacing the nose seal in the female quick coupling
1.
Remove the defective seal using a screwdriver.
2.
Clean the coupling seat thoroughly.
3.
Fit the new seal with the special tool (pusher).
4.
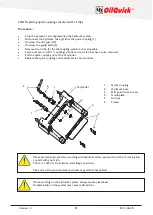
Insert the O-ring and support ring into the pusher (see Fig. a) below).
For 1/4” quick coupling, see section 5b).
a)
b)
c)
d)
Pusher piston
Support ring
(black side facing up)
O-ring
Pusher tube
5a
Quick couplings size 1/2”, 3/4” and 1”: Push the seal down to the bottom of the pusher pipe by placing
the pusher on a table or other flat surface and pressing the seal into position with the help of the
pusher plunger (see Fig. b).
5b
When loading the pusher with nose seals for 1/4” quick couplings, the support ring and O
-ring have to
be inserted from the other end of the pusher tube (bottom end) compared to as shown in Fig. a).
N.B! The support ring is to be inserted first (black side facing up towards the pusher), followed by the
O-ring. Place the pusher on a table or other flat surface and press the seal into position with the help of
the pusher plunger (see Fig. b).
6.
Position the pusher on the female connector and insert the seal by pressing the pusher plunger down
firmly (see Fig. c).
7.
Check whether the seal is correctly mounted (see Fig. d).
8.
Finished.
Wear protective gloves when working with hydraulic oils to prevent the oil from coming into
contact with your skin.
There is a risk of skin irritation and allergic reactions.
Note: first insert the O-
ring and then the support ring (not valid for 1/4” quick coupling!).
The black side of the support ring must face the pusher plunger.
Summary of Contents for OQ 70/55
Page 4: ......
Page 30: ...Version 1 1 30 2011 06 28 Notes...


