background image

EN-26 


RANGER

®


 7000 SCALES 


4.4.4 

Application Setup 


The Application can be customized for various user preferences. 
 

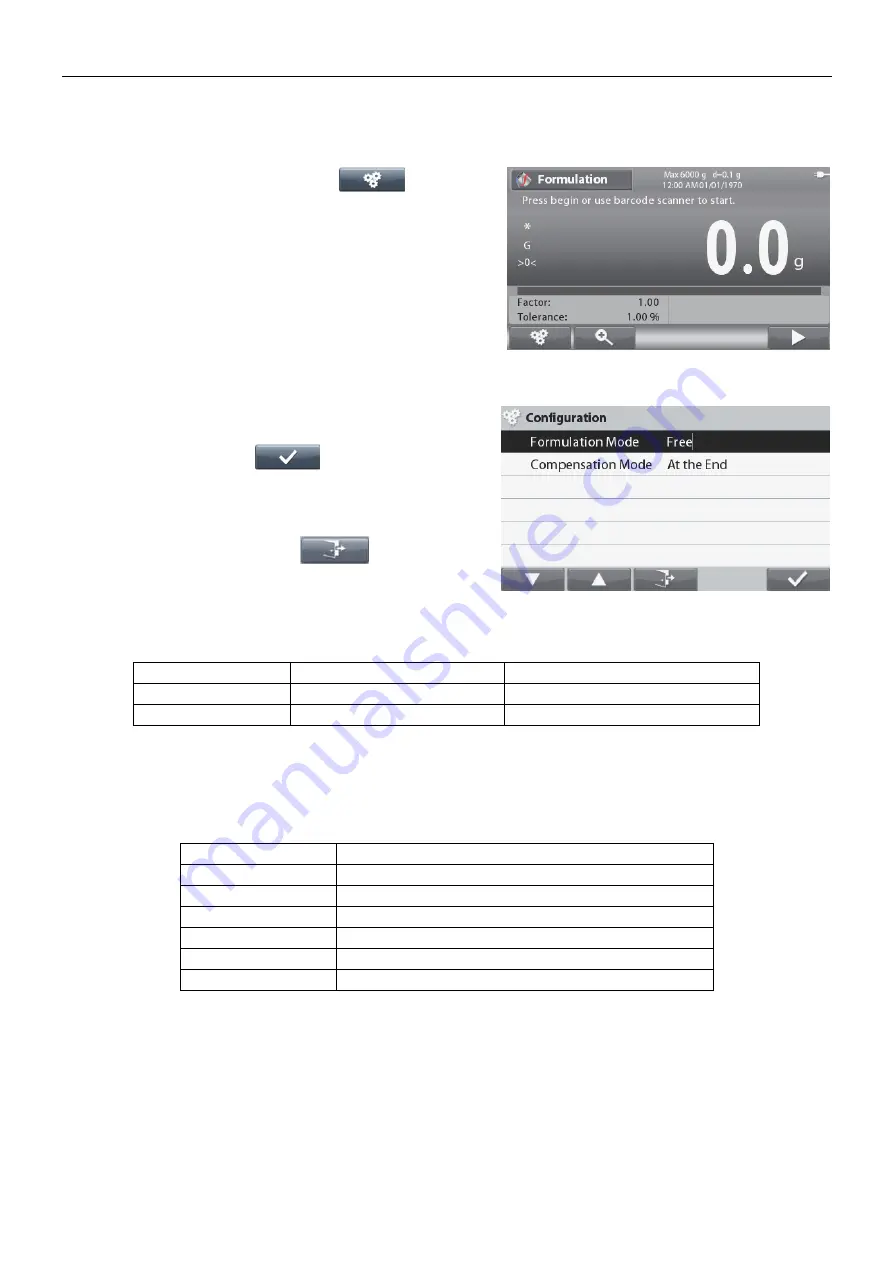
Press the button corresponding to the 


icon to enter 

Configuration

.


The 

Configuration Menu

 is now displayed. 

Select the list item and press the button 

corresponding to 

,

to change the setting 

as desired. 


To return to the Application home screen, press the 

button corresponding to 

.


The Formulation Configurations are defined below 

(defaults in

 Bold

).


Item 

Available Settings 

Comments 

Formulation Mode 

Free, 

Recipe 

To set Mode 

Compensation Mode 

At the End

, Off, Immediately 

To set compensation mode 


4.4.5 

Input/Output (I/O) Setup 


The I/O’s can be customized for various user preferences. 
 
The I/O’s are defined below


(defaults in

 Bold). 


Item 

Available Settings 

Discrete Input 1 

Off, 

Zero, Tare, Clear Tare, Quit, Next Item, Last Item 

Discrete Input 2 

Off, 

Zero, Tare, Clear Tare, Quit, Next Item, Last Item 

Discrete Output 1 

Off, 

Overload, Underload 

Discrete Output 2 

Off, 

Overload, Underload 

Discrete Output 3 

Off, 

Overload, Underload 

Discrete Output 4 

Off, 

Overload, Underload 


Note: 

The I/O’s will only work when the I/O Option Board have been installed. See the Accessory list in section 9.4 

for information.


The option I/O board provides two isolated inputs and four dry-contact normally open relay outputs 

which can be used for simple process weighing.


Summary of Contents for Ranger7000

Page 1: ...Ranger 7000 Scales Instruction Manual Manual_Ranger_7000_V1...

Page 2: ......

Page 3: ...4 1 Weighing 12 4 1 1 Application Setup 12 4 1 2 Accumulation 13 4 1 3 Input Output I O Setup 14 4 2 Parts Counting 15 4 2 1 Set the Average Piece Weight APW 15 4 2 2 Application Setup 16 4 2 3 Accum...

Page 4: ...t up Sub menu 43 5 4 2 Reset 43 5 4 3 Language 43 5 4 4 Power On Unit 43 5 4 5 Key Beep 43 5 4 6 X10Display 43 5 4 7 Barcode Rule 44 5 5 Read Out 45 5 5 1 Reset 45 5 5 2 Stability 45 5 5 3 Zero Range...

Page 5: ...cting to a Serial Printer 55 6 3 The USB Interface 56 6 3 1 System Requirements 56 6 3 2 USB Connections 56 6 3 3 Virtual Port Software Installation 57 6 4 USB Host 57 6 5 Printout Format 57 6 6 Print...

Page 6: ...of data or injuries if not avoided Attention For important information about the product Note For useful information about the product Warning Symbols General Hazard Electrical Shock Hazard Alternati...

Page 7: ...on the scale model see table below Save the packaging to ensure safe storage and transport Included Component Photo R71MHD3 R71MHD6 R71MD3 R71MD6 R71MHD15 R71MHD35 R71MD15 R71MD35 Terminal X X X X We...

Page 8: ...nd Ring Weighing Platform 1 Place the Wind Ring in position R71MHD3 R71MHD6 2 Place the platform onto the spider 2 3 Selecting the Location Avoid excessive vibrations heat sources air current or rapid...

Page 9: ...led precisely horizontally provide accurate weighing results The certified scales have a spirit level to simplify alignment Turn the adjustable feet of the scale until the spirit level s air bubble is...

Page 10: ...nal Mounting If desired the Terminal may be mounted to a wall or table using fasteners not supplied that are appropriate for the type of mounting surface 2 10 Initial Calibration When the Scale is fir...

Page 11: ...put 2 9 To Enter A press 2 times For lower case Z press 5 times Short Press Input 0 Long Press Go to User Login screen Short Press Input 1 Long Press Switch platform between scale 1 and scale 2 Short...

Page 12: ...elect to view calibration options Setup Select to view user preferences Read Out Select to view scale settings Application Modes Select to view application modes Weighing Units Select to view weighing...

Page 13: ...RANGER 7000 SCALES EN 11 3 3 Overview of Parts and Features Level Indicator Terminal Weighing platform Power ON OFF Button Base User adjustable leveling feet...

Page 14: ...n leveled and calibrated 4 1 Weighing Use this application to determine the weight of items in the selected unit of measure Press the button until Weighing is displayed in the upper left portion of th...

Page 15: ...on To start Accumulate weighing data place the item on the pan and press the button corresponding to the icon The top accumulation icon will start blinking The load to be accumulated has to be 5d and...

Page 16: ...Input 2 Off Zero Tare Clear Tare Print Unit Accumulate Discrete Output 1 Off Overload Underload Discrete Output 2 Off Overload Underload Discrete Output 3 Off Overload Underload Discrete Output 4 Off...

Page 17: ...on 9 5 or press the button for button icon explanation 4 2 1 Set the Average Piece Weight APW Note It is recommended that the APW is larger than 1d If APW is between 0 05d and 1d a warning screen will...

Page 18: ...e icon The display returns to the Home screen 3 Entering a Known APW Key in the Piece Weight using the alphanumerical keypad and press the button corresponding to the icon to confirm and store the APW...

Page 19: ...4 1 2 for details about the Accumulation feature 4 2 4 Input Output I O Setup The I O s can be customized for various user preferences The I O s are defined below defaults in Bold Item Available Setti...

Page 20: ...different methods to enter the check limits Over and Under Nominal Weight Tolerance or Nominal Percent Tolerance Setup check limits according to section 4 3 1 or 4 3 2 Place object on the pan to check...

Page 21: ...set the value and go back to previous screen Alternatively the limits can be set by Target Weight Tolerance To set the tolerance press the button corresponding to the icon to enter the Tolerance setup...

Page 22: ...te It is recommended that the APW is larger than 1d If APW is between 0 05d and 1d a warning screen will be displayed and the information line will show Low APW If APW is less than 0 05d an error scre...

Page 23: ...Display Bar Block To set Graph Display Type Note Only available in Check Counting mode Positive Check Positive check is used to determine when the material added to the scale is within the target rang...

Page 24: ...Over Accept Under Over Note The I O s will only work when the I O Option Board have been installed See the Accessory list in section 9 4 for information The option I O board provides two isolated inp...

Page 25: ...or press the button for button icon explanation Press the button corresponding to the icon to enter the Enter Component screen Select the list item and press the button corresponding to the icon to c...

Page 26: ...ish the formulation press the button corresponding to the icon and add the last component Then the formulation will finish and a Formulation Result screen is displayed To print the formulation result...

Page 27: ...ponent added is outside the tolerance the scale will do compensation for next items In this case the value displayed is not actual weight and the capacity bar will turn red When all the components of...

Page 28: ...ediately To set compensation mode 4 4 5 Input Output I O Setup The I O s can be customized for various user preferences The I O s are defined below defaults in Bold Item Available Settings Discrete In...

Page 29: ...con to change the setting as desired 4 5 Percent Weighing Use Percent Weighing to measure the weight of a sample displayed as a percentage of a pre established Reference Weight Press the button until...

Page 30: ...d value using the alphanumerical keypad and then press the button corresponding to the icon to save and return to the Application home screen 3 Place the reference weight on the pan and press the butt...

Page 31: ...on the pan to begin The FILLING Home screen Main Display Line Reference Fields Functions Application Icon Note Refer section 9 5 or press the button for button icon explanation 4 6 1 Target Weight and...

Page 32: ...efaults in Bold Item Available Settings Comments Auto Tare On Off To enable Automatic Tare Chain Tare On Off To enable Chain Tare Continuous Tare Accumulate Off Manual To enable Accumulation Totalizat...

Page 33: ...by pressing the button corresponding to the icon In the Application Mode menu enter the Filling sub menu The Filling sub menu is now displayed Select the list item and press the button corresponding...

Page 34: ...on Setup The Configuration Menu is now displayed Select the list item and press the button corresponding to to change the setting as desired To return to the Application home screen press the button c...

Page 35: ...elow defaults in Bold Item Available Settings Discrete Input 1 Off Zero Tare Clear Tare Print Start Reset Accumulate Discrete Input 2 Off Zero Tare Clear Tare Print Start Reset Accumulate Discrete Out...

Page 36: ...he button until Density is displayed in the upper left portion of the home screen Before making density measurements establish the Application Settings Press the button corresponding to the icon to st...

Page 37: ...screen press the button corresponding to The Density Determination Configurations are defined below defaults in Bold Item Available Settings Comments Liquid Type Water Other To set the Liquid type Te...

Page 38: ...iquid density by using the alphanumerical keypad and press the button corresponding to the icon to save the value and return to the previous screen 4 9 Differential Weighing Differential weighing stor...

Page 39: ...Bold Item Available Settings Comments Auto Tare Off On To set the Automatic Tare Chain Tare On Off To set the Chain Tare 4 9 2 Differential Operation To start differential please follow the instructio...

Page 40: ...nents 4 10 1 Creating a Library Record To create a Library record press the Library button The requested data records will appear according to the active application mode see section 4 10 above In thi...

Page 41: ...a Stored Library Record above Press the button corresponding to the icon A new screen will be displayed asking for confirmation Press the button corresponding to the icon to delete the record or press...

Page 42: ...ton corresponding to the icon Press the button corresponding to the icon to display the Sub menu items Select the Sub Menu Item Scroll to the desired Sub menu Item using the button corresponding to th...

Page 43: ...3 1 Calibration sub menu R71MD models Zero Calibration Span Calibration Linearity Calibration GEO R71MHD models Zero Calibration Span Calibration Linearity Calibration Internal Calibration Automatic C...

Page 44: ...ovided the scale has warmed up to operating temperature and is level With the Scale turned ON and no load on the pan select Internal Calibration The Scale begins to calibrate The display shows the sta...

Page 45: ...Language Set the language displayed for menus and displayed messages English Spanish German French Italian Chinese 5 4 4 Power On Unit Set the unit that will be displayed at Power On Auto Kilogram Po...

Page 46: ...t any barcode that is 8 characters long will be accepted by the scale regardless of what the individual characters are Example 2 In this example the barcode rule is set to 55 This means that any barco...

Page 47: ...Division 0 5 graduations 1 Division 1 graduation 2 Division 2 graduations 5 Division 5 graduations Note The setting is forced and locked to 1 Division when the Security Switch is set to the locked po...

Page 48: ...minutes 5 5 8 Auto Sleep minutes Set whether the display enters sleep mode after x seconds minutes OFF disabled 1 100 minutes 5 6 Application Mode Enter this sub menu to enable or disable the desired...

Page 49: ...hen press the button corresponding to the icon and then choose either On or Off The current menu item status is shown OFF disabled ON enabled 5 8 GLP and GMP Data Enter this menu to set the Good Labor...

Page 50: ...rings up another menu level RS232 shown Configuration Print Setup Choosing an item brings up yet another menu level the device settings are dependent on the COM chosen RS232 shown Configuration Menu R...

Page 51: ...hown 5 9 7 Reset Resets the settings to factory default settings Reset the settings to factory default settings 5 9 8 Stable Weight Only Set the printing criteria OFF values are printed immediately re...

Page 52: ...left side can be switched On Off The right side will show all the enabled items The content for the templates includes Header 5 header lines User ID Project ID Scale No Date Time PN Result Gross Net T...

Page 53: ...ns in Control Panel Select the General tab in Accessibility Options Check Use Serial Keys and click the Settings button Select the Serial Port and set the Baud rate to 9600 After selecting click OK to...

Page 54: ...created login as Administrator Administrator Account Only the Administrator user can create delete and edit other users and itself If an administrator user is deleted all the power users will also be...

Page 55: ...mory hardware option has been installed Alibi memory is used to store the weight history for reference Each Alibi record contains a Record ID Net Weight value Tare value and Date Time Enter the Check...

Page 56: ...u settings are changed Zero Range Stable Range Auto Zero Tracking AZT Units kg g oz lb or lb oz or Stable Only The calibration event counter CAL will index by 1 when exiting the menu if a Span Calibra...

Page 57: ...e x print template number 1 to 5 y line number 1 to 2 text footer text up to 40 alphanumeric characters EscR Global reset to reset all menu settings to the original factory defaults SNS x Switch the p...

Page 58: ...r to the scale the application program sends a command to the virtual port as if it were an RS232 port The computer then directs the command from the virtual port to the computers USB connector where...

Page 59: ...a delimiting space used to separate the other fields The Weight field is 9 right justified characters If the value is negative the character is printed at the immediate left of the most significant di...

Page 60: ...ss Signature___________ Net Verified by_________ Tare Mode Unit Information Accumulate Library ID Library Name Alibi Record Footer 1 Footer 2 Filling Description Enabled Company Name Header 1 Address...

Page 61: ...001 PN 1234 Name Egg Formu Wt 100 00 g Actual Wt 99 60 g Item 002 PN 1235 Name Water Formu Wt 500 00 g Actual Wt 497 95 g Item 003 PN 1236 Name Sugar Formu Wt 120 00 g Actual Wt 124 10 g Item 004 PN 1...

Page 62: ...he Security Switch to the locked position 7 2 Verification A weights and measures official or authorized service agent must perform the verification procedure 7 3 Sealing After the scale has been veri...

Page 63: ...x x x x Counting x x x x Percent x x x x Check x x x x Dynamic x x x x Filling x x x x Formulation x x x Differential x x x Density x x x Menu Others x Press the button to enter the Information area...

Page 64: ...after switching to another unit the tare value exceeds the maximum Display Overflow Display Overflow Weight exceeds 6 digits No Calibration Calibration data error Calibration data does not exist Busy...

Page 65: ...ev 0 01 g 0 02 g 0 1 g 0 1 g Linearity 0 02 g 0 04 g 0 2 g 0 2 g Weighing units gram kilogram ounce pound pound ounce tonne Applications Weighing Parts Counting Percent Weighing Check Weighing Dynamic...

Page 66: ...Display size 4 3 inch Backlight White LED Communication RS 232 USB Power supply Power Input 100 240 V 0 5 A 50 60 Hz Platform size 280 x 280 mm 377 x 311 mm 11 x 11 inch 14 8 x 12 2 inch Terminal Hous...

Page 67: ...9 37 50 38 58 15 14 14 13 13 12 12 11 11 10 10 38 58 40 05 15 15 14 14 13 13 12 12 11 11 10 40 05 41 12 16 15 15 14 14 13 13 12 12 11 11 41 12 42 19 16 16 15 15 14 14 13 13 12 12 11 42 19 43 26 17 16...

Page 68: ...HiCap R71 30041295 Accessory Tower Kit R71 30095408 Accessory RS232 Kit R31 RC31 V71 R71 30037448 Accessory 2 nd Platform Kit R71 30097590 Accessory Discrete I O R71 30097591 Accessory Ethernet Kit R...

Page 69: ...Average Piece Weight by number of samples Delete selected record used in Library Enter APW Average Piece Weight value directly Recall selected record used in Library Manual Accumulation Edit selected...

Page 70: ...e configurations Switch the Setpoints input method Set input value or current weight on the pan as target Quit Used in Library Set Target Setpoint1 and Setpoint2 value Add a record Used in Library Sto...

Page 71: ...lation Set reference weight FORMULATION APPLICATION ICON FUNCTION ICON FUNCTION Setup Formulation mode configurations Print formulation result Set factor View selected record Used in Library Start Edi...

Page 72: ...EN 70 RANGER 7000 SCALES TABLE 9 5 BUTTON ICONS Continued ICON FUNCTION ICON FUNCTION Guest Print Range Login Locate Alibi record...

Page 73: ...out at the manufacturer s work It comprises all tests according to the adopted European standard EN45501 1992 paragraph 8 2 2 If national regulations limit the validity period of the verification the...

Page 74: ...e has been designed for safe removal of the batteries at end of life by a waste treatment facility Please dispose of this product in accordance with local regulations at the collecting point specified...

Page 75: ...been damaged by accident or misuse exposed to radioactive or corrosive materials has foreign material penetrating to the inside of the product or as a result of service or modification by other than...

Page 76: ......

Page 77: ...indows and Excel are either registered trademarks or trademarks of Microsoft Corporation in the United States and or other countries Ohaus Corporation 7 Campus Drive Suite 310 Parsippany NJ 07054 USA...

Reviews: