4
EN
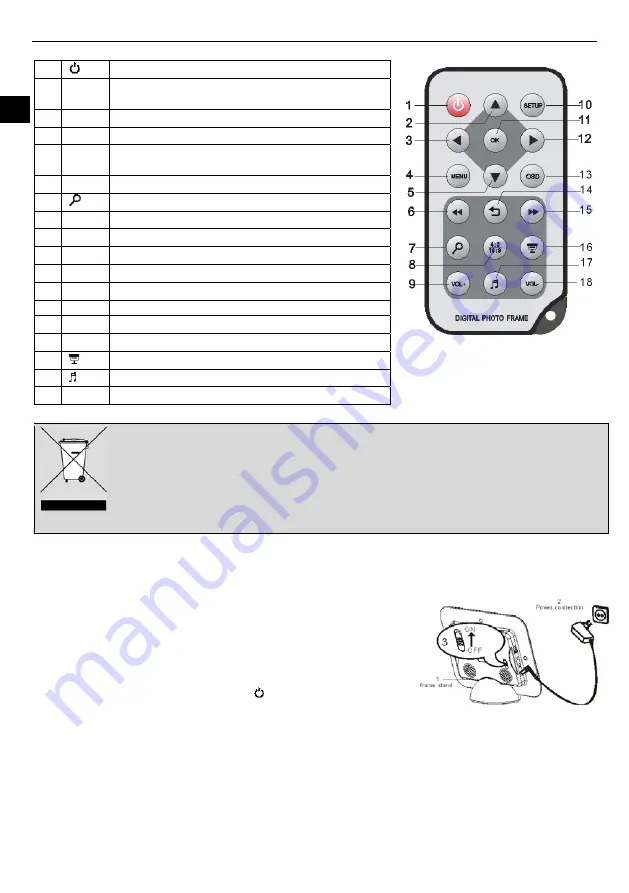
Remote Control
1
Press to turn the player on or to standby mode.
2
a
Press to move the cursor upward or select previous
picture/music/movie.
3
_
Press to move the cursor leftward or rotate the picture.
4
MENU
Press to return to the main menu.
5
b
Press to move the cursor downward or select next
picture/music/movie.
6
Press to search backward quickly during music or movie playback.
7
Press to zoom in the picture.
8
4:3/16:9
Press to select aspect ratio of 4:3 or 16:9.
9
VOL+
Press to increase the volume.
10
SETUP
Press to go to the setup menu.
11
OK
Press to confirm the selection or start or pause playback.
12
`
Press to move the cursor rightwards or rotate the picture.
13
OSD
Press to open or exit the OSD bar display.
14
2
Press to return to the previous menu.
15
Press to search forward quickly during music or movie playback.
16
Press to starts slide show with music on the background.
17
Press to stop or start music playback during slideshow.
18
VOL-
Press to decrease the volume.
Battery Recycling
In order to ensure the environmently friendly disposal of batteries, please do
NOT
dispose of used
batteries through normal household waste. Please take the batteries to your local retail or community
collection point for recycling.
The following may be an indication of a discharged battery: The device cannot be switched on. The
device switches off automatically and "Battery Empty" is shown in the display. The device and or battery do
not function properly.
Getting Started
Connecting the power cable
1.
Fix the Photo Frame on the slot of Frame Base, and place the frame on a stable and flat
surface.
2.
Use the supplied power adapter to connect the digital photo frame to an electrical outlet.
3.
Slide the power switch on the back of the photo frame from OFF to ON.
Note:
y
You can leave the power switch on, and use the [ ] button on the remote control to turn
the frame on or to standby mode.
y
To turn off the power of the Digital Photo Frame completely, slide the power switch from
ON to OFF.


