Operators Guide
14
6. Engage the platform release lever by rotating it towards the platform until the red safety
catch engages.
7. Install the remainder of the payload (lens, zoom and focus controls, viewfinder, prompter
etc.).
Stability
Use the mid-level or floor spreader to ensure that the tripod legs are spread sufficiently so that
the center of gravity of the tilted payload remains within the footprint of the tripod.
Balancing the Head
Make sure that the head is level before balancing. Check the bubble level to verify that the head
itself is level and make sure that the platform is also level.
Balancing the 2575D head achieves two objectives. First, when a head is correctly balanced the
operator will need a minimum amount of effort to move the camera. Second, once balanced, the
head and its payload can be set to any tilt position and the head will maintain this position with
'hands off'.
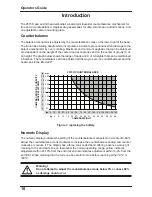
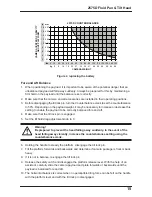
The chart below shows the range of load and C of G heights that can be maintained in balance.
The area under the balance curve (colored white) corresponds to load/C of G combinations that
can be balanced over the full tilt range of ±90°. The area above the balance curve (shaded grey)
corresponds to load/C of G combinations that exceed the capacity of the head.
Warning!
When mounting the head on a tripod, it is possible to set the tripod legs so
that the center of gravity of the tilted payload falls outside the footprint of the
tripod, leading to instability.
NOTE: It is important that the handle(s) and all camera accessories (lens, zoom and
focus controls, viewfinder, prompter etc.) are fitted in their operational position
before balancing the head. Any equipment fitted or adjusted later can
unbalance the head.


