background image

91

3

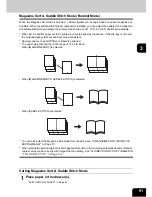
Magazine Sort & Saddle Stitch Mode (Booklet Mode)

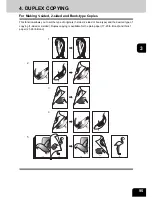
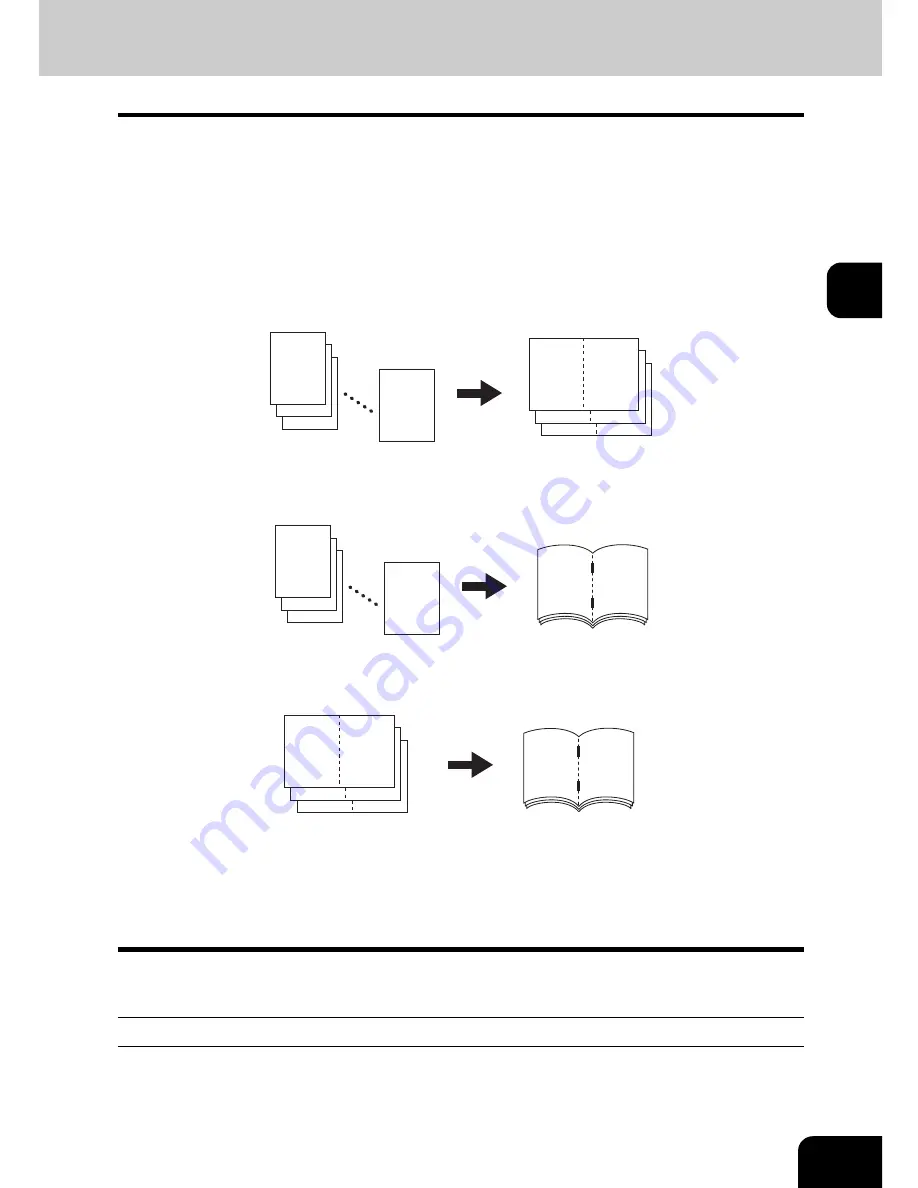
When the Magazine Sort mode is selected, 1-sided originals can be copied and bound like magazines or 
booklets. When the saddle-stitch finisher (optional) is installed, you can select the saddle stitch mode that 
will automatically fold and staple the center of the document. LD, LT-R, A3, A4-R and B4 are available.

* When LD, A3 and B4 paper are to be printed, pull out the sub-tray in advance. If the sub-tray is not used, 

the outputted paper falls out and becomes inconsistent.

* Special paper such as OHP films or labels is excluded.
* The paper weight should be in the range of 17-20 lb. Bond
- When [MAGAZINE SORT] is selected

- When [MAGAZINE SORT & SADDLE STITCH] is selected

- When [SADDLE STITCH] is selected

* You can also select the Magazine Sort mode from the edit menu. "6.MAGAZINE SORT (FROM THE 

EDITING MENU)" 


 Page 117

* When placing the portrait original in short edge feed direction in the reversing automatic document feeder, 

copies can be made correctly with Image Direction setting. See "14.DIRECTION OF COPY IMAGES IN 
“1 TO 2” AND “2 TO 1”" 


 Page 135.

Setting Magazine Sort & Saddle Stitch Mode

1

Place paper in the drawer(s).

- "5.SETTING COPY PAPER" 


 Page 36

12

3

2

1

11

2

9

4

7

6

7

6

12

3

2

1

5

8

3

10

1

12

7

6

Summary of Contents for im2330

Page 1: ...For Oc and Imagistics Models Oc Operator s Manual for Basic Functions im2330 im2830...

Page 2: ...ION 4O ORDER SUPPLIES CALL THE C 3UPPLY INE 53 5 3HOULD YOUR SYSTEM DEVELOP A PROBLEM THAT CANNOT BE REMEDIED BY USING THE MAINTENANCE OR TROUBLESHOOTING PROCEDURES OUTLINED IN THIS MANUAL PLEASE CONT...

Page 3: ...Save Default Time The default time for the Automatic Energy Save is 15 minutes Sleep Mode The copier consumes less than 15 watts im2330 im2830 in the Sleep Mode Sleep Mode Default Time The default tim...

Page 4: ......

Page 5: ...ng Paper 38 Changing the Paper Size of the Drawer Setting the Drawer for Special Uses 39 2 HOW TO MAKE COPIES 47 1 GENERAL COPYING PROCEDURES 48 2 SETTING ORIGINALS 51 Acceptable Original Types and Si...

Page 6: ...DITING 119 Trimming Masking 119 Mirror Image 121 Negative Positive Reversal 122 8 X Y ZOOM 123 9 COVER COPYING 124 10 SHEET INSERTION MODE 127 11 TIME DATE STAMP 129 12 PAGE NUMBERING 130 13 JOB BUILD...

Page 7: ...ATE 238 2 RECALLING TEMPLATE 239 3 REGISTERING TEMPLATE 242 4 CHANGING INPUT DATA 248 5 DELETING TEMPLATE 253 12 WHEN THE GRAPHIC SYMBOLS BLINK ON THE TOUCH PANEL 257 1 DESCRIPTION OF THE BLINKING GRA...

Page 8: ...4...

Page 9: ...ser s authority to operate the equipment This Class A digital apparatus complies with Canadian ICES 003 Cet appareil num rique de la classe A est conforme la norme NMB 003 du Canada User Safety This O...

Page 10: ...6 NOTICE TO USERS Cont 1 Identification Label 2 Certification Label 3 Explanatory Label 4 Warning Label 1 3 2 4...

Page 11: ...7 Oc Supplies im2330 im2830 Toner Cartridges It is recommended that genuine Oc supplies and parts be used to obtain optimum results...

Page 12: ...to ensure that your Oc copiers will continually generate sharp high quality images Cost Advantage Genuine Oc toner provides value Only the proper amount of toner is used during the reproduction proces...

Page 13: ...precautions according to the following three levels of warning Before reading this Operator s Manual you should fully understand the meaning and importance of these signal words Warning Indicates a p...

Page 14: ...be stored in the e Filing without printing them Optional FAX board is required Scanned originals can be sent via Fax and E mail simultaneously To send them via Fax optional FAX board is required To s...

Page 15: ...ire or give you an electric shock If the power cord is damaged contact your service representative When removing the plug from the outlet DO NOT PULL the power cord ALWAYS hold the plug when removing...

Page 16: ...afety stoppers in front at the bottom of the paper feed pedestal and the large capacity feeder After moving and installing the equipment be sure to turn the adjusters clockwise to fix them firmly on t...

Page 17: ...hind refer to the illustration below Adverse environmental conditions may affect the safe operation and performance of the multifunctional digital systems and the multifunctional digital systems could...

Page 18: ...not press on it with force Breaking the glass could cause personal injury DO NOT place heavy objects 8 82 lb or more on the multifunctional digital systems If the objects fall off this could cause inj...

Page 19: ...ch panel gently and never hit it Breaking the surface could cause malfunctions DO NOT turn the power OFF with jammed paper left inside the multifunctional digital systems This could cause malfunctions...

Page 20: ...ou an electric shock due to the heat released by electric leakage DO NOT let liquids such as water and oil get into the system when cleaning the floor This could cause a fire and give you an electric...

Page 21: ...Supplies Caution NEVER attempt to incinerate toner cartridges This could cause an explosion DO NOT dispose of used toner cartridges Your service technician will collect them 2 REPLACE TONER CARTRIDGE...

Page 22: ...the reasonable control of Oc North America Corporate Printing Division including without limitation acts of God war riot civil commotion malicious or deliberate damage fire flood or storm natural cal...

Page 23: ...2 TURNING ON THE POWER SWITCH 31 Turning on off the Power 31 Controlling the Use of the Copier with Department Codes 33 3 SWITCHING TO THE ENERGY SAVING MODE 34 4 DATA OVERWRITE KIT OPTIONAL 35 5 SET...

Page 24: ...9 Inner tray 3 Drawer im2330 im2830 10 Control panel 11 Touch panel 4 Operator s Manual Pocket back side 12 Touch panel contrast adjustment volume 5 Power switch 13 Toner 6 Automatic duplexer 1 Paper...

Page 25: ...fset tray Enables copied and printed sets to be collated or stacked in groups with each set being offset 4 Job separator Enables Faxes copies and prints to be output onto separate paper trays 5 Large...

Page 26: ...n 10 Single staple finisher Enables the sort group mode and stapling Requires the Bridge unit IM23300010 sold separately for the installation 11 Hole punch unit Makes punching holes on output pages 12...

Page 27: ...utton Use this button to store and recall the various settings that are frequently used for copy scan and Fax functions 4 EXTENSION button This is the button to extend functions in the future It is in...

Page 28: ...ed all selected functions are cleared and returned to the default settings 1 GENERAL COPYING PROCEDURES Page 48 Automatic Function Clear Even if you do not press the FUNCTION CLEAR button within the s...

Page 29: ...let your hands be caught in the gap between the equipment and the control panel This could injure you When Fixing the Angle of the Control Panel When you want to fix the angle of the control panel at...

Page 30: ...Slightly shift the stopper to the right and then pull it out 2 Fit the latches of the stopper in the hole of the position 2 and insert them turning the stopper itself 3 Shift the stopper to the left...

Page 31: ...elected drawer size 9 Index buttons 5 Remaining paper level Message Display The following information is shown on the touch panel Equipment status operational instructions cautionary messages reproduc...

Page 32: ...H COMPONENT Cont 1 SETTINGS setting functions confirmation button This button allows you to confirm the functions that have been set An example is shown below The icons displayed on the screen are as...

Page 33: ...fter outputting is finished or after the last button is pressed in a procedure the automatic function clear mode will work to clear all settings and the basic screen of the copy function will be displ...

Page 34: ...r letters CapsLock Press this button to switch capital letters and small letters B Space Press this button to delete the letter before the cursor Space Press this button to enter a space Press these b...

Page 35: ...upper right of the screen To clear it press the FUNCTION CLEAR button twice The job in progress at the time of the power failure is deleted Turning off the Power Shutting down When turning off the pow...

Page 36: ...press the SHUTDOWN button 3 Processing job will be deleted Are you sure you want to shutdown appears on the screen Press the YES button To cancel the shutdown operation press the NO button 4 Shutdown...

Page 37: ...he ACCESS button is pressed or the automatic function clear mode is activated 2 Key in a registered department code 5 digit The copier will be ready for copying If Enter Department Code remains the de...

Page 38: ...is mode the display and lighted button on the control panel are turned off and the ENERGY SAVER button lights in green To start the equipment again press the ENERGY SAVER button or COPY SCAN FAX e FIL...

Page 39: ...this equipment are overwritten with the data that cannot be extracted to erase the data The following screen is displayed during the data erasing Precautions When the optional printer kit and scanner...

Page 40: ...heets 20 lb Bond Thick 1 28 lb Bond 2 000 sheets 28 lb Bond Height approx 5 4 Bypass Tray Plain paper 1 17 20 lb Bond 1 13 17 lb is available for single feed Standard Size LT format LD LG LT LT R ST R...

Page 41: ...t Paper between 24 lb Bond and 110 lb Index can be copied if the thick mode is used The values shown in the parenthesis are rounded off below a decimal point Abbreviations for paper sizes LT Letter LD...

Page 42: ...ing double copying on the same side of paper this may cause a malfunction Do not use paper with creases wrinkles curled paper paper prone to curling smooth paper or tough paper this may cause paper mi...

Page 43: ...paper 1 Fax and special sheets Changing the Paper Size of the Drawer 1 Pull out the drawer carefully until it comes to a stop 2 Push the lower part of the width guide in the direction of the arrow to...

Page 44: ...Manual depending on the production timing perform the following in reference to the illustration on the right While pushing the size selection lever to the right set the side guide to the desired pap...

Page 45: ...t into the copier until it comes to a stop Be sure to push the drawer fully in Be careful not to let your fingers be caught when closing the drawer This could injure you 8 Change the size mark plate t...

Page 46: ...paper size Setting the Drawer for Special Uses You can set the drawer for various uses cover sheet sheet insertion thick paper Fax paper special sheets Acceptable copy paper Acceptable Copy Paper Typ...

Page 47: ...43 1 2 Press the USER FUNCTIONS button on the control panel 3 Press the USER button to enter the user menu and then press the GENERAL button 4 Press the DRAWER button...

Page 48: ...for the COVER or INSERT is set in the other drawer including the optional large capacity feeder Press THICK 1 depending on the paper weight of the cover sheet sheet insertion and special sheet In the...

Page 49: ...ERT button Clearing the Drawer for Special Uses 1 Press the drawer button corresponding to the one which is set for the special use then press the corresponding button thick insert cover etc on the bo...

Page 50: ...little by little alternately in the tray A and B Be sure that the center lever is not open Refer to the labels attached in the large capacity feeder Do not add paper above the line indicated on the gu...

Page 51: ...on the Glass 52 When Using the Reversing Automatic Document Feeder optional 54 3 AUTO JOB START JOB PRESET 57 4 INTERRUPT COPYING 59 5 STOPPING THE COPY OPERATION 60 6 BYPASS COPYING 61 Bypass Copying...

Page 52: ...n be changed See the User Functions Guide for details Copying Procedure 1 Place paper in the drawer s Changing the Paper Size of the Drawer Page 39 Acceptable Copy Paper Types and Sizes Page 36 When t...

Page 53: ...is selected place the original s after the copy mode is set 3 Select the copy modes as required Copy modes cannot be changed after the START button is pressed including the case when originals are div...

Page 54: ...s with its copied side down When Coming Across the Situations below To make multiple sets of copies Key in the copy quantity To correct the input copy quantity press the CLEAR button Raise the stopper...

Page 55: ...is deleted by pressing the NO button Setting place Types of originals Maximum size Sizes capable of automatic detection Glass 1 1 Do not place any heavy object 9 lb or over on the glass Sheets 3 dime...

Page 56: ...the glass Raise it 60 degrees or more for detecting the original A Original 2 Align the original against the left rear corner of the glass 3 Lower the original cover or the reversing automatic documen...

Page 57: ...Dual Page 4 DUAL PAGE Page 113 function center the book original on the yellow indicator line 2 Lower the original cover or the reversing automatic document feeder optional slowly Do not try to force...

Page 58: ...oles or tears 6 Damp originals 7 OHP film originals Do not use tracing paper permeable paper and coating paper coating with wax etc Also the following type 8 and 9 of originals should be handled caref...

Page 59: ...Maximum number of sheets all sizes that can be set in the reversing automatic document feeder 100 sheets 13 3 20 lb or less than 0 6 in height To set the mixed sized originals see Setting the MIXED O...

Page 60: ...the Single feed Mode See Single feed Mode Page 139 1 Align the slides to the desired original size 2 Insert the original with its face up and straight along the slides it will be pulled in automatica...

Page 61: ...e copy mode 3 Press the START button Up to 6 jobs can be stored in the memory Place the originals of the 6th job on the original glass or the reversing automatic document feeder optional and press the...

Page 62: ...iting to be copied Press the JOB STATUS button on the control panel to display the job list for confirming and canceling the data See 1 JOB STATUS Page 188 for canceling the job Canceling auto job sta...

Page 63: ...ying is in progress When Auto Start is displayed you cannot make interrupt copying 2 Replace the original with a new one 2 SETTING ORIGINALS Page 51 z Select other copy modes as required 3 Press the S...

Page 64: ...P button is used 1 Press the STOP button on the operational panel during the scanning or multi copying 2 When the menu on the right is displayed press the MEMORY CLEAR button During scanning the data...

Page 65: ...n these cases the setting procedures of the following 2 sizes of paper are different Bypass copying on standard size paper Bypass Copying on Standard Size Paper Page 62 Bypass copying on non standard...

Page 66: ...side to be copied facing down If you put several sheets on the bypass tray at a time fan the paper well before placing it Place the paper so as not to exceed the line indicated on the guides Do not p...

Page 67: ...d ST R is set press the OTHER SIZE button See Setting the OTHER SIZE button Page 77 5 Press the paper size button corresponding to the paper that has been set 6 Press the OTHER button 7 Press the MEDI...

Page 68: ...corresponding to the paper that has been set it may cause a problem such as a paper jam significant image deterioration etc z Select other copy modes as required 9 Press the START button When copying...

Page 69: ...8 17 1 Follow steps 1 to 2 on Bypass Copying Page 61 2 Press the NON STANDARD button 3 Key in each dimension length and width or recall the data stored in MEMORY and then press the ENTER button When...

Page 70: ...rized in the MEMORY 1 appears The non standard size frequently used can be stored in the memory Press the MEMORY 1 or MEMORY 2 MEMORY 3 MEMORY 4 button which you want to store key in the size of lengt...

Page 71: ...mm the selected Memory Number button is vacant When the paper size is displayed a non standard size is already stored in the selected Memory Number To delete the settings follow step 4 New settings wi...

Page 72: ...2 Extremely thick or thin envelopes 3 Wet or damp envelopes 4 Torn envelopes 5 Envelopes which include the contents 6 Non standard size envelopes ones with a special shape 7 Envelopes with eyelets or...

Page 73: ...surface and press them with your hands in the direction of the arrow to expel any air Correct any bent corners on the envelopes Press them well to prevent the flap from rolling upward 3 Place the env...

Page 74: ...S 6 BYPASS COPYING Cont 2 4 Place the original on the original glass 5 Press the OTHER SIZE button 6 Press the envelope size button corresponding to the envelope placed on the bypass tray 7 Press the...

Page 75: ...ia type in step 8 make sure that they correspond to the specifications of the envelope used If not it may cause a paper jam or soil the copied paper or the inside of the equipment 9 Press the START bu...

Page 76: ...2 72 2 HOW TO MAKE COPIES...

Page 77: ...IZE 78 2 REDUCTION AND ENLARGEMENT COPYING 80 3 SELECTING FINISHING MODES 84 Finishing Modes and Finishers Optional 84 Sort Group Copying 87 Rotate Sort Mode 88 Staple Sorting 89 Magazine Sort Saddle...

Page 78: ...Manual Paper Selection Page 76 This mode can only be used for actual size 100 copying Original sizes available for automatic detection Acceptable Original Types and Sizes Maximum Number of Sheets that...

Page 79: ...e copier rotates the original data by 90o and makes a copy which is the same size as the original even if those directions differ e g an LT size original is set while the same size paper is set in R d...

Page 80: ...ize of the drawer Changing the Paper Size of the Drawer Setting the Drawer for Special Uses Page 39 or use the bypass copying Bypass Copying Page 61 1 Place paper in the drawer s 5 SETTING COPY PAPER...

Page 81: ...ze This function allows the OTHER button to recognize the size you use The initial setting for this button is COMP 1 Press the ZOOM button to enter the setting menu of the original or paper size and t...

Page 82: ...ination of the original size When copying mixed sized originals with the Automatic Paper Selection APS make sure that the papers that are the same size as each original are set in the drawers 1 Place...

Page 83: ...AMS Page 80 To make duplex copying select the automatic magnification mode You cannot enlarge the copy size from LT horizontal to LD vertical LG Vertical When using AMS with Mixed Original Sizes a Ch...

Page 84: ...dark borders or irregular sized originals such as newspapers and magazines For these types of originals use the other reduction enlargement modes Original sizes available for Automatic Magnification...

Page 85: ...cified paper size respectively If Change direction of original appear proceed as directed z Select other copy modes as required 5 Press the START button Specifying Both Original Size and Copy Size 1 P...

Page 86: ...n Setting the OTHER SIZE button Page 77 z Select other copy modes as required 5 Press the START button Using the Reduction Enlargement Zoom Buttons or One touch Zoom Buttons 1 Place paper in the drawe...

Page 87: ...lding down the button changes it continuously You can select the reproduction ratio by pressing the 400 200 100 50 or 25 button directly When placing the originals on the reversing automatic document...

Page 88: ...ng Mode 9256 Saddle stitch finisher 9284 Single staple finisher IM2300030 Job separator IM2300040 Offset tray IM2300020 Hole punch unit Confirm the finishing mode type of your equipment with the follo...

Page 89: ...ray is not used the outputted paper falls out and becomes inconsistent When the finisher trays reach their maximum loading capacity 2 SPECIFICATIONS OF OPTIONS Page 303 Remove paper from the finisher...

Page 90: ...Inner Finisher Optional 1 Trays 2 Paper stopper When the finisher trays reach their maximum loading capacity 2 SPECIFICATIONS OF OPTIONS Page 303 Remove paper from the finisher appears Remove the cop...

Page 91: ...l s 2 SETTING ORIGINALS Page 51 3 Press the Finisher button on the basic menu as shown in the illustration on the right highlighted When originals are placed in the reversing automatic document feeder...

Page 92: ...Feeder Bypass is required LT LT R A4 A4 R B5 B5 R paper is available in this mode This mode cannot be used in the Automatic Paper Selection mode 1 Place paper in the drawer s 5 SETTING COPY PAPER Pag...

Page 93: ...ple finisher optional Special paper such as OHP films or labels is excluded Stapling will not work when copied paper of different widths are mixed Example of selecting the FRONT STAPLE 1 button Settin...

Page 94: ...r quantity exceeds the maximum number of sheets that can be stapled the finisher automatically enters the sort mode Maximum Number of Sheets that can be Stapled Saddle stitch finisher Single staple fi...

Page 95: ...ent Special paper such as OHP films or labels is excluded The paper weight should be in the range of 17 20 lb Bond When MAGAZINE SORT is selected When MAGAZINE SORT SADDLE STITCH is selected When SADD...

Page 96: ...em on the glass place the first page of the originals first if the MAGAZINE SORT or the MAGAZINE SORT SADDLE STITCH is selected If the SADDLE STITCH is selected set them in the order of pages 12 1 2 1...

Page 97: ...y for saddle stitch When paper of different weights is loaded the maximum number of sheets that can be stapled is that of the paper with the highest weight Paper size Paper weight Maximum capacity for...

Page 98: ...er button on the basic menu as shown in the illustration on the right highlighted 4 Press the HOLE PUNCH button z Select other copy modes as required 5 Press the START button Available paper sizes for...

Page 99: ...ies This function allows you to set the type of originals 1 sided 2 sided or book type and the desired type of copying 1 sided or 2 sided Duplex copying is available for the plain paper 17 20 lb Bond...

Page 100: ...n the menu on the right and then press the 1 1 SIMPLEX button on the next screen z Select other copy modes as required 4 Press the START button 2 1 Sided Originals to 2 Sided Copies The use of Image D...

Page 101: ...on the glass follow step 5 to 6 on page Copying Procedure Page 48 continuously 3 2 Sided Originals to 2 Sided Copies 1 Place paper in the drawer s 5 SETTING COPY PAPER Page 36 When using this mode in...

Page 102: ...tation of the output is alternating between pages when using landscape originals See 14 DIRECTION OF COPY IMAGES IN 1 TO 2 AND 2 TO 1 Page 135 for details 1 Place paper in the drawer s 5 SETTING COPY...

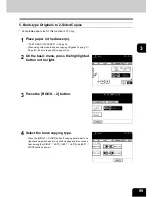
Page 103: ...bypass copying Bypass Copying Page 61 be sure to specify the paper size 2 On the basic menu press the highlighted button on the right 3 Press the BOOK 2 button 4 Select the book copying type Press th...

Page 104: ...iginals from the first page the copies will not be arranged in the same order as the original Center the book on the yellow indicator line with its bottom toward you Book type Originals Page 53 8 Turn...

Page 105: ...original s 2 SETTING ORIGINALS Page 51 3 On the basic menu press the highlighted button on the right 4 According to the type of your original choose the most suitable image type mode by pressing one...

Page 106: ...Automatic Copy Density Modes 1 Place paper in the drawer s 5 SETTING COPY PAPER Page 36 2 Place the original s 2 SETTING ORIGINALS Page 51 3 Press the AUTO button z Select other copy modes as require...

Page 107: ...103 4 4 IMAGE EDITING AND IMAGE ADJUSTMENT 1 BACKGROUND ADJUSTMENT 104 2 SHARPNESS ADJUSTMENT 105...

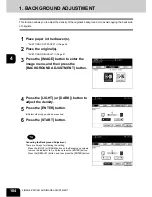
Page 108: ...e 51 3 Press the IMAGE button to enter the image menu and then press the BACKGROUND ADJUSTMENT button 4 Press the LIGHT or DARK button to adjust the density 5 Press the ENTER button z Select other cop...

Page 109: ...ss the SOFT or SHARP button Pressing the SOFT button suppresses the moire fringe while pressing the SHARP button emphasizes the letters and sharpens the fine lines 5 Press the ENTER button z Select ot...

Page 110: ...4 106 4 IMAGE EDITING AND IMAGE ADJUSTMENT...

Page 111: ...ENU 117 7 IMAGE EDITING 119 Trimming Masking 119 Mirror Image 121 Negative Positive Reversal 122 8 X Y ZOOM 123 9 COVER COPYING 124 10 SHEET INSERTION MODE 127 11 TIME DATE STAMP 129 12 PAGE NUMBERING...

Page 112: ...opies see 5 Book type Originals to 2 Sided Copies Page 99 Creating a Right or Left Margin 1 Place paper in the drawer s 5 SETTING COPY PAPER Page 36 When using this mode in bypass copying Bypass Copyi...

Page 113: ...on the other side of those in the front 4 DUPLEX COPYING Page 95 z Select other copy modes as required 6 Press the START button Creating a Bookbinding Margin When Book Margin is selected use it in co...

Page 114: ...Adjust the width of the margin and then press the ENTER button The default width of the margin is 7 mm 0 276 Book binding margin is 14 mm 0 551 To adjust the width press the 2 mm or 30 mm button to s...

Page 115: ...Y PAPER Page 36 When using this mode in bypass copying Bypass Copying Page 61 be sure to specify the paper size 2 Place the original s 2 SETTING ORIGINALS Page 51 3 Press the EDIT button to enter the...

Page 116: ...be sure to specify the paper size 2 Place the original s 2 SETTING ORIGINALS Page 51 3 Press the EDIT button to enter the edit menu and then press the BOOK CENTER ERASE button 4 Adjust the width of th...

Page 117: ...re LT A4 and B5 only 1 Place paper in the drawer s 5 SETTING COPY PAPER Page 36 When using this mode in bypass copying Bypass Copying Page 61 be sure to specify the paper size 2 Press the EDIT button...

Page 118: ...ginals from the first page the copies will not be arranged in the same order as the original Center the book on the yellow indicator line with the bottom toward you Book type Originals Page 53 7 Turn...

Page 119: ...ex 2 IN 1 4 IN 1 modes are available where four eight originals can be copied to 2 sides of a single sheet of paper This mode cannot be used in combination with reduction enlargement copying 2 IN 1 4...

Page 120: ...and then press the desired paper size and the AMS button 2 Place the original s 2 SETTING ORIGINALS Page 51 3 Press the EDIT button to enter the edit menu and then press the 2 IN 1 4 IN 1 button 4 Se...

Page 121: ...e Sort Saddle Stitch Mode Booklet Mode Page 91 When placing the portrait original in short edge feed direction in the reversing automatic document feeder copies can be made correctly with Image Direct...

Page 122: ...or 30 mm button to select the desired number then press the ENTER button If the optional finisher equipped with the saddle stitch is installed copied paper can be automatically stapled along their ce...

Page 123: ...g is only available with standard sized originals If the settings of the original and copy sizes are not made appropriately the image may not be copied completely 1 Trimming 2 Masking 1 Place paper in...

Page 124: ...from the top left to the upper edge of the specified area Y2 Distance from the top left to the lower edge of the specified area 4 rectangular areas can be specified on an original 6 Enter the distanc...

Page 125: ...PER Page 36 When using this mode in bypass copying Bypass Copying Page 61 be sure to specify the paper size 2 Place the original s 2 SETTING ORIGINALS Page 51 3 Press the EDIT button to enter the edit...

Page 126: ...a 1 Place paper in the drawer s 5 SETTING COPY PAPER Page 36 When using this mode in bypass copying Bypass Copying Page 61 be sure to specify the paper size 2 Place the original s 2 SETTING ORIGINALS...

Page 127: ...ce paper in the drawer s 5 SETTING COPY PAPER Page 36 2 Place the original s 2 SETTING ORIGINALS Page 51 3 Press the EDIT button to enter the edit menu and then press the XY ZOOM button 4 Set the repr...

Page 128: ...pied cover 3 Adding a blank cover and a blank back cover 4 Adding a copied cover and blank back cover When using the cover feature make sure all paper sources have the same orientation and size The co...

Page 129: ...2 Place paper other than cover paper in the drawer s Setting the Drawer for Special Uses Page 42 Place the paper of the same size and the same direction as that of cover 3 Place the original s 2 SETTI...

Page 130: ...odes as required 7 Press the START button When using the automatic document feeder optional The original is scanned and copying starts When using the original glass Perform the following procedure Whe...

Page 131: ...2 or 3 drawers the large capacity feeder can also be used to the same paper size and orientation 1 or 2 for special insertion sheets and the other for normal sheets of copy paper 1 Place sheets of pap...

Page 132: ...t sheet will be inserted is shown The example on the right shows the first sheet inserted at or before page 10 To specify the next and subsequent pages repeat step 6 Up to 15 pages can be specified To...

Page 133: ...SETTING COPY PAPER Page 36 2 Place the original s 2 SETTING ORIGINALS Page 51 3 Press the EDIT button to enter the edit menu and then press the TIME STAMP button 4 Select the orientation Short edge or...

Page 134: ...ge number printed at the top right on the landscape copy 1 Place paper in the drawer s 5 SETTING COPY PAPER Page 36 2 Place the original s 2 SETTING ORIGINALS Page 51 3 Press the EDIT button to enter...

Page 135: ...131 5 5 Key in the starting page number If the start page number is 1 just press the ENTER button z Select other copy modes as required 6 Press the START button...

Page 136: ...on Book to 2 Image editing X Y zoom Cover copying Magazine Sort 2IN1 4IN1 and Sheet insertion mode cannot be selected 1 Place the originals of the 1st job When an original is placed on the original gl...

Page 137: ...electable for mixed sized originals image shift book center erase time date stamp page numbering image direction in 2 sided copying book tablet e filing file function cannot be changed for each job fr...

Page 138: ...rom the 2nd job Press the SETTING button to confirm the settings To change the settings press the FC button and then start the procedure again from step 1 Be aware that copying will be performed in th...

Page 139: ...ion is not necessary for copying in the direction of vertical opening 1 Set 2 Non set 1 Place paper in the drawer s 5 SETTING COPY PAPER Page 36 2 Place the original s 2 SETTING ORIGINALS Page 51 3 Se...

Page 140: ...136 5 USING THE EDITING FUNCTIONS 14 DIRECTION OF COPY IMAGES IN 1 TO 2 AND 2 TO 1 Cont 5 5 Press the ENTER button z Select other copy modes as required 6 Press the START button...

Page 141: ...let and the opposite condition is available 1 Place paper in the drawer s 5 SETTING COPY PAPER Page 36 2 Place the original s 2 SETTING ORIGINALS Page 51 3 Press the 2 2 DUPLEX in the basic menu 4 DUP...

Page 142: ...Place the original s on the reversing automatic document feeder optional When Using the Reversing Automatic Document Feeder optional Page 54 3 Press the EDIT button to enter the edit menu and then pr...

Page 143: ...ton z Select other copy modes as required 4 Place the original on the reversing automatic document feeder optional Inside the Single feed Mode Page 56 The original is automatically pulled in and the s...

Page 144: ...5 140 5 USING THE EDITING FUNCTIONS...

Page 145: ...141 6 6 STORING ORIGINALS 1 STORE TO e FILING 142 2 COPY FILE 145...

Page 146: ...TING UP BOX Page 223 and 7 PRINTING STORED DOCUMENT Page 232 It is recommended to back up the data on the equipment s hard disk to prevent loss of data You can back it up with the client PC using the...

Page 147: ...When you want to store the original s in an existing folder select the folder and press the OPEN FOLDER button If you have no folder to be selected press the ENTER button If you want to store the data...

Page 148: ...printing press the NO button 10Press the START button Storing the original starts 11 NEXT ORIGINAL appears If you have the other originals to be stored press the YES button If not press the FINISHED b...

Page 149: ...Network Administrator s Guide It is recommended to back up the data stored in the Share folder of the hard disk with the client PC via network To use COPY FILE function optional Printer kit and optio...

Page 150: ...tored in the hard disk of user s PC The administrator has to make settings to select REMOTE 1 or REMOTE 2 For details see the Network Administrator s Guide 6 Select the desired file format The SCAN fo...

Page 151: ...the other originals to be stored press the YES button If not press the FINISHED button This screen is displayed when the scanning is performed from the original glass It is not displayed from the rev...

Page 152: ...6 148 6 STORING ORIGINALS...

Page 153: ...149 7 7 SCANNING THE IMAGES 1 SCAN SETTING IN THE TOUCH PANEL 150 2 SCAN TO e FILING 152 3 SCAN TO FILE 156 4 SCAN TO E MAIL 160...

Page 154: ...nning Procedure 1 Place the original s 2 SETTING ORIGINALS Page 51 Originals acceptable to be set 2 SETTING ORIGINALS Page 51 When placing an original on the glass When Placing an Original on the Glas...

Page 155: ...And press the Scan appears If you want to continue scanning press the SCAN button If you want to finish scanning press the JOB FINISH button When the original is set on the reversing automatic docume...

Page 156: ...G UP BOX Page 223 and 7 PRINTING STORED DOCUMENT Page 232 It is recommended to back up the data on the equipment s hard disk to prevent loss of data You can back it up with the client PC using the Fil...

Page 157: ...r setting the user box 2 SETTING UP BOX Page 223 6 The document list in the selected box is displayed When you want to store the original s in an existing folder select the folder and press the OPEN F...

Page 158: ...e 30 is displayed A document name can contain up to 64 letters Press the ENTER button on the letter entry menu 8 Press the EDIT button to set the original type and size and the scanning conditions Pre...

Page 159: ...If you want to finish scanning press the JOB FINISH button If you want to continue scanning press the SCAN button When the original is set on the reversing automatic document feeder optional to be sc...

Page 160: ...ee the Network Administrator s Guide It is recommended to back up the data stored in the Share folder of the hard disk with the client PC via network To use SCAN TO FILE function optional Printer kit...

Page 161: ...dministrator has to make settings to select REMOTE 1 or REMOTE 2 using the Printer Utility For details see the Network Administrator s Guide You can select 2 locations to store the data from MFP LOCAL...

Page 162: ...essed to make the setting before pressing the SCAN button the specified 2 jobs can be performed simultaneously 10 To continue place document on glass And press Scan appears If you want to finish scann...

Page 163: ...159 7 You can change the original size type and scanning conditions by pressing the EDIT button for the next scanning If you want to cancel the storage of the scanned data press the JOB CANCEL button...

Page 164: ...an E mail see 3 RECEIVING INTERNET FAX Page 185 To use SCAN TO E MAIL function optional Printer kit and optional Scanner upgrade kit or optional Printer Scanner kit is required 1 Place the original s...

Page 165: ...ess you want to send to after pressing the KNOWN ID button See steps 5 to 7 in Searching by ID Number Page 175 for details Select the address you want to send to after pressing the SEARCH ADDRESS butt...

Page 166: ...E mail A subject can contain up to 128 letters Setting Letters Page 30 7 Press the BODY button and enter the text body etc A body can contain up to 1 000 letters 8 Press the FILE NAME button and name...

Page 167: ...the mail server capacity of both the sender and the receiver If the software for E mail is not able to divide the data properly resend it after setting smaller fragment message size If the data size...

Page 168: ...MAGES 4 SCAN TO E MAIL Cont 7 13Press the SCAN button If the SCAN TO E FILING or the SCAN TO FILE button is pressed to make the setting before pressing the SCAN button the specified 2 jobs can be perf...

Page 169: ...165 8 8 INTERNET FAX 1 INTERNET FAX 166 2 SENDING INTERNET FAX 168 Setting the Transmission Conditions 168 Specifying the Recipients 171 Advanced Function 182 3 RECEIVING INTERNET FAX 185...

Page 170: ...the same as E mail transmissions Before you start to use the Internet Fax function it is recommended that you read this section and understand the precautions for Internet transmission The Internet F...

Page 171: ...omputers can send an E mail to the equipment as well The client computer receives TIFF S images when the equipment sends a document using the Internet Fax function The equipment can only print out tex...

Page 172: ...omatic exposure mode the copier automatically judges the contrast of the original and selects the optimum contrast In the manual exposure mode you can adjust the contrast manually in 11 steps Original...

Page 173: ...169 8 1 Press the FAX button on the control panel 2 Press the ADDRESS button to display the address menu and then press the OPTION button...

Page 174: ...2 SENDING INTERNET FAX Cont 8 3 After selecting each transmission condition press the ENTER button Press the Prev or Next button to switch the menu The buttons shaded in the menu on the right are the...

Page 175: ...mission The same original can be sent to 2 or more recipients in a single operation Direct Entry 1 Press the FAX button on the control panel 2 Place the original s 2 SETTING ORIGINALS Page 51 3 Press...

Page 176: ...Conditions Page 168 4 Set the advanced function as required Advanced Function Page 182 5 Press the ADDRESS to display the address menu 1 screen can show 8 destinations To view the destinations not dis...

Page 177: ...INALS Page 51 3 Press the OPTION button and set the transmission conditions Setting the Transmission Conditions Page 168 4 Set the advanced function as required Advanced Function Page 182 5 Press the...

Page 178: ...group you want to send to To check the specified group member press the CONTENTS button You can search for the recipient by ID number or group Searching by ID Number Searching by ID Number Page 175 Se...

Page 179: ...el 2 Place the original s 2 SETTING ORIGINALS Page 51 3 Press the OPTION button and set the transmission conditions Setting the Transmission Conditions Page 168 4 Set the advanced function as required...

Page 180: ...e START button Searching by Address When selecting the recipient entered in the address and group pressing a letter button displays the recipient whose names start with the letter on the screen which...

Page 181: ...nation and then press the ENTER button 1 screen can show 8 destinations To view the destinations not displayed on the screen press the Prev or Next button to scroll through the screens To continue sea...

Page 182: ...ster the directory search name using Printer Utility via network beforehand You can also set the default LDAP server that you want to select Ask your network administrator for details 1 Press the FAX...

Page 183: ...combining direct address book and group entry The following show the number of destinations that can be entered according to how the recipient is specified By direct entry only 400 destinations By add...

Page 184: ...d by the address or the group press the highlighted button again To cancel all specified recipient press the ALL CLEAR button To cancel the other party specified by the direct entry press the DESTINAT...

Page 185: ...181 8 2 Select the destination that you want to delete and then press the DELETE button...

Page 186: ...utomatically return to the default setting To send the 2 sided originals the reversing automatic document feeder optional needs to be installed in this equipment Setting originals when sending LT A4 2...

Page 187: ...ss the START button Priority Transmission Priority TX allows you to execute a transmission prior to the other reserved transmissions You can use Direct Entry and Address Dialing to specify the recipie...

Page 188: ...INTERNET FAX Cont 8 4 Press the ADVANCED button to display the advanced menu and then press the PRIORITY RESERVE button 5 Press the ENTER button 6 Specify the recipient Specifying the Recipients Page...

Page 189: ...Mail Transfer Protocol is a server protocol to transfer the E mail message between servers Most E mail system uses SMTP to transfer the E mail messages over the Internet For how to set the receiving...

Page 190: ...pears on the screen upper right for 2 seconds Receiving from SMTP Server Once an E mail is sent to this equipment or an E mail is delivered through the Internet this equipment will automatically retri...

Page 191: ...PRIVATE PRINT JOB 194 5 WHEN USING THE DEPARTMENT CODES 196 6 CONFIRMING THE STATUS OF FAX INTERNET FAX JOB 198 7 CONFIRMING THE STATUS OF SCAN 199 8 LOG LIST 200 9 ADDRESS REGISTRATION FROM LOG LISTS...

Page 192: ...able when optional Fax board is installed Jobs concerning scan Internet Fax or E mail are available when optional Printer kit and optional Scanner upgrade kit or optional Printer Scanner kit is instal...

Page 193: ...pause movement and print of the jobs Press the Next button to display the 5th job or later and press the Prev button to display the previous page Deleting a Job 1 Press the JOB STATUS button on the co...

Page 194: ...INT JOB LIST Cont 9 4 Delete OK appears Press the DELETE button to delete the job Pause Resume 1 Press the user name on the list you want to interrupt 2 Press the PAUSE button 3 To resume the job pres...

Page 195: ...191 9 Moving a Print Job 1 Press the user name on the list you want to move 2 Press the MOVE button 3 Specify the position of the order Ex Press the 1st user name to move the target job to the 2nd...

Page 196: ...int job is performed as the normal print job In addition before performing as the normal print job changing the number of sets and deleting a job are available For the Proof print see the Print Guide...

Page 197: ...change the number of sets And then press the RELEASE button to continue the normal print job Deleting a Job 1 Press the PROOF button 2 Proof print job list is displayed Press the user name on the lis...

Page 198: ...print see the Print Guide Private Print 1 Press the PRIVATE button to display the private print job list 2 Press the user name on the list you want to start with If the relevant job is not displayed p...

Page 199: ...rivate Print 1 Press the PRIVATE button to display the private print job list 2 Press the user name on the list you want to delete 3 Press the DELETE button 4 Delete OK appears Press the DELETE button...

Page 200: ...will appear in the Invalid Queue of Job status To Restore the Invalid Code print error to the Normal Print 1 Press the INVALID button to display the list 2 Press the user name on the list you want to...

Page 201: ...ing a Job from the List 1 Press the INVALID button to display the list 2 Press the user name on the list you want to delete 3 Press the DELETE button 4 Delete OK appears Press the DELETE button to del...

Page 202: ...f list File No Number of accepted job order To Recipient Date Time Date and time at the time of registration Pages Number of pages to be sent Status Status of jobs Buttons Delete The job is deleted wh...

Page 203: ...to display the previous page For the SCAN function see the SCANNING THE IMAGES 1 SCAN SETTING IN THE TOUCH PANEL Page 150 Items of list To The name of the file created or the e mail address of the rec...

Page 204: ...sent received Internet Fax and scan 1 log to the address book Fax Internet Fax E mail and scan functions are optional 1 E mail address used in the E mail transmission Print Log When pressing the PRIN...

Page 205: ...ress Date Time Date and time at the time of sending or receiving Fax or Internet Fax or receiving E mail Pages Number of pages of sent or received Fax or Internet Fax or receiving E mail Status Status...

Page 206: ...CAN TO E MAIL by scanning optional Items of list To The storing location of the scanned data or E mail address of the recipient Agent Scanned job in the scan menu Date Time Date and time at the time o...

Page 207: ...G list by selecting the recipient or sender and pressing the ENTRY button For the address book see the User Functions Guide 1 Press the LOG button and then press the SEND or RECEIVE or SCAN button 2 S...

Page 208: ...ber of the contact 2ND FAX Enter the second fax number of the contact E MAIL Enter the E mail address of the contact CORP Enter the company name of the contact DEPT Enter the department name of the co...

Page 209: ...LOG are available to print in the SEND RECEIVE LOG list of Fax Either 40 logs 1 page or 120 logs 3 pages can be set to print the log list See the User Functions Guide for details 1 Press the LOG butto...

Page 210: ...asing the Print Error When the drawer for the specified size paper is not prepared the print job error occurs and the JOB STATUS button blinks To release the error follow the procedure below 1 Press t...

Page 211: ...207 9 4 Press the paper size button you set by pressing the paper size button on the screen 5 Press the START button...

Page 212: ...rity Code system password and your setup 00B0 00B5 00C0 00C4 00D0 00D2 Signal Error or Line Condition Error Retry communications Frequent failures may indicate a phone line problem If possible move th...

Page 213: ...reation failure Check if the access privilege to the storage directory is writable Check if the server or local disk has a sufficient space in disk capacity 1C31 File creation failure Check if the acc...

Page 214: ...ain If the error still occurs contact your service representative 1C68 NIC access error Turn the power OFF and then back ON Perform the job in error again If the error still occurs contact your servic...

Page 215: ...sender to resend the E mail or change the Partial Wait time setting 3A40 Invalid partial E mail received Ask the sender to resend the partial E mail in the RFC2046 format 3A50 3A52 HDD full error Ask...

Page 216: ...ipment 3C50 3C52 Offramp transmission error Ask the sender to specify the correct fax numbers and resend the E mail 3C60 3C62 Offramp security error Confirm the fax numbers that are specified in the r...

Page 217: ...xceeded limit or maximum size You are sending too many documents at a time Send your documents separately 2C30 Failed to create directory Make sure that the access privilege to the storage directory i...

Page 218: ...ed 2C80 Failed to process received E mail job Ask your administrator to confirm whether the Received Internet Fax Forward is set 2C81 Failed to process received Fax job Ask your administrator to confi...

Page 219: ...roperly 2D63 Specified network path is invalid Check destination path Make sure you specify correct network folder and retry the scan 2D64 Logon to file server failed Check username and password Make...

Page 220: ...he error still occurs contact your service representative 2B60 Duplicate error Changed folder name automatically There is the same named folder in the selected box The system automatically renames the...

Page 221: ...and then back ON to print again 2BF0 ERRCD_SCAN_BOX_MAX_PAGE Reduce the pages to be inserted and print them 2BF1 ERRCD_SCAN_BOX_MAX_DOCUMEN T Backup the document in the Box or the folder to PC or del...

Page 222: ...mail server is operating properly Turn the power OFF and then back ON Perform the job in error again If the error still occurs Contact your service representative 2504 HOST NAME error Check if the ma...

Page 223: ...219 10 10 e FILING 1 e FILING FUNCTIONS 220 2 SETTING UP BOX 223 3 CHANGING INPUT DATA 225 4 DELETING BOX 227 5 DELETING FOLDER 228 6 DELETING DOCUMENT 230 7 PRINTING STORED DOCUMENT 232...

Page 224: ...a client PC using the File Downloader See the e Filing Guide for details It is recommended to back up the data on the equipment s hard disk to prevent loss of data You can back it up with the client P...

Page 225: ...l data by copying or scanning 1 STORE TO e FILING Page 142 2 SCAN TO e FILING Page 152 The documents stored in the e Filing can be printed by specifying some pages or All Pages after adding changing p...

Page 226: ...stered as a password protected user box by setting the password Before storing documents in e Filing prepare the user boxes to manage documents efficiently Up to 100 folders per one box can be created...

Page 227: ...n the e Filing we recommend you to prepare user boxes and folders can only be set in the network to manage documents efficiently See the e Filing Guide for details 1 Press the e FILING button on the c...

Page 228: ...224 10 e FILING 2 SETTING UP BOX Cont 10 4 Press the ENTER button A box is newly set...

Page 229: ...ble menu using the Prev or the Next button To display the applicable menu immediately key in the number of the desired box you want to change 3 Key in the Password 5 digits for the selected box and th...

Page 230: ...226 10 e FILING 3 CHANGING INPUT DATA Cont 10 5 Press the ENTER button The box settings are updated...

Page 231: ...he e FILING button on the control panel 2 Select the box you want to delete and then press the DELETE button Switch to the applicable menu using the Prev or the Next button To display the applicable m...

Page 232: ...G button on the control panel 2 Select the box in which the folder you want to delete is stored and then press the ENTER button 3 Key in the Password 5 digits for the selected box and then press the E...

Page 233: ...229 10 5 Are you sure you want to delete this folder appears Press the YES button to delete the folder The selected folder is deleted...

Page 234: ...Press the e FILING button on the control panel 2 Select the box in which the document you want to delete is stored and then press the ENTER button 3 Key in the Password 5 digits for the selected box a...

Page 235: ...ent in the folder select the folder in which the document you want to delete is stored and then press the OPEN FOLDER button And select the document you want to delete and then press the DELETE button...

Page 236: ...ton on the control panel 2 Select the box which has the desired printing document stored and then press the ENTER button Switch to the applicable menu using the Prev or the Next button To display the...

Page 237: ...JOB STATUS Deleting a Job Page 189 7 CONFIRMING THE STATUS OF SCAN Page 199 Execute Test Printing A part can be printed from a document that consists of several pages 1 Perform steps 1 to 4 of the Pri...

Page 238: ...s The following settings can be added or changed to the stored document in the filing box 1 Setting the feeding source Press the cassette area of the feeding source 2 Setting the number of printing Ke...

Page 239: ...ton in the menu and press the ENTER button 4 Press the PRINT button Printing starts When you want to stop the print of the stored document during the operation select the job you want to stop from the...

Page 240: ...10 236 10 e FILING...

Page 241: ...237 11 11 TEMPLATE 1 TEMPLATE 238 2 RECALLING TEMPLATE 239 3 REGISTERING TEMPLATE 242 4 CHANGING INPUT DATA 248 5 DELETING TEMPLATE 253...

Page 242: ...registered in either PUBLIC TEMPLATE GROUP or USER GROUP Up to 200 groups are available in the menu of template Up to 60 combinations can be registered in 1 group To use scan functions optional Printe...

Page 243: ...button with the icon if ENABLE is selected for AUTOMATIC START when registering the template Before recalling templates you need to register them See 3 REGISTERING TEMPLATE Page 242 When Recalling Te...

Page 244: ...mode as required 7 Press the START button When Recalling Template in the User Group 1 Place paper in the drawer s 5 SETTING COPY PAPER Page 36 2 Place the original s 2 SETTING ORIGINALS Page 51 3 Pre...

Page 245: ...plate button with the icon is pressed the operation of the registered setting functions is automatically started 7 Key in the Password 5 digits of the selected template and then press the ENTER button...

Page 246: ...ict the use by entering the password USER GROUP Each department section or person controls one user group and registers it as a template It is easier to control it if you set the password for group re...

Page 247: ...ASSWORD are entered as required When pressing the NAME 1 button the menu of entering letters Setting Letters Page 30 is displayed so enter the name with up to 11 letters Enter the name with up to 11 l...

Page 248: ...ss the ENTER button Press the ENTER button after entering the password 10Press the SAVE button The menu returns to step 1 the menu before pressing the TEMPLATE button on the control panel Registering...

Page 249: ...must be entered the USER NAME and the PASSWORD are entered as required When pressing the NAME button the menu of entering letters Setting Letters Page 30 is displayed so enter the name with up to 20...

Page 250: ...nd with up to 30 letters for USER NAME as the above manner 9 Select whether to enable AUTOMATIC START or not for recalling the template Press the ENABLE or DISABLE button If ENABLE is selected the ico...

Page 251: ...247 11 11Press the SAVE button The menu returns to step 1 which is the menu seen before pressing the TEMPLATE button on the control panel...

Page 252: ...to change and then press the ENTER button Switch to the applicable menu using the Prev or the Next button To display the applicable menu immediately key in the number of desired user group 4 When sel...

Page 253: ...step 7 7 Press the button of NAME 1 NAME 2 and or USER NAME When pressing the NAME 1 button the menu of entering letters Setting Letters Page 30 is displayed so enter the name with up to 11 letters En...

Page 254: ...identical number in both Password and Retype Password then press the ENTER button Press the ENTER button after entering the password Not to change the password skip step 8 9 Press the ENTER button The...

Page 255: ...gistration skip to step 5 5 Press the NAME button and or the USER NAME button When pressing the NAME button the menu of entering letters Setting Letters Page 30 is displayed so enter the name with up...

Page 256: ...252 11 TEMPLATE 4 CHANGING INPUT DATA Cont 11 7 Press the ENTER button The data of user group are changed...

Page 257: ...on Switch to the applicable menu using the Prev or the Next button To display the applicable menu immediately key in the number of desired user group 4 When selecting the PUBLIC TEMPLATE GROUP button...

Page 258: ...want to delete then press the DELETE button 6 Key in the Password 5 digits for the selected template and then press the ENTER button If the password has not been set at the user group registration ski...

Page 259: ...ete and then press the DELETE button Switch to the applicable menu using the Prev or the Next button To display the applicable menu immediately key in the number of desired user group 4 Key in the Pas...

Page 260: ...256 11 TEMPLATE 5 DELETING TEMPLATE Cont 11 5 Press the DELETE button The selected user group is deleted...

Page 261: ...OF THE BLINKING GRAPHIC SYMBOLS 258 2 REPLACE TONER CARTRIDGE SYMBOL 260 3 CLEAR PAPER SYMBOL 265 4 ADDING STAPLES OPTIONAL 280 5 REMOVING JAMMED STAPLES OPTIONAL 285 6 DISPOSING OF THE PUNCHED PAPER...

Page 262: ...Blinks when a misfeed occurs in the jam releasing unit 2 Jam Releasing Unit Misfeed Page 268 4 DRAWER MISFEED symbol Blinks when paper fed from one of the drawers is misfed 3 Drawer Misfeed Page 269...

Page 263: ...finisher optional or hole punch unit optional 11 Paper Misfeed in the Hole Punch Unit optional Page 276 11 SADDLE STITCHING UNIT MISFEED symbol Blinks when a paper misfeed occurs inside the saddle st...

Page 264: ...CARTRIDGE SYMBOL When the toner in the cartridge runs out the REPLACE TONER CARTRIDGE symbol blinks and Install new toner cartridge appears Replacing the Toner Cartridge 1 Open the front cover 2 Pres...

Page 265: ...261 12 3 Pull out the toner cartridge 4 Shake the new toner cartridge well to loosen the toner inside 5 Pull out the seal in the direction of the arrow 6 Insert the toner cartridge until it clicks...

Page 266: ...er cover to take out the transfer charger cleaner from the front pocket 10Wipe the transfer charger wire properly with the transfer charger cleaner Insert the transfer charger cleaner into the edge of...

Page 267: ...63 12 11Return the transfer charger cleaner to the front pocket and then close the transfer cover 12Return the automatic duplexer and the bypass tray to their original position 13Close the front cover...

Page 268: ...f copies 2 Size and density of originals 3 The existence of solid black when making copies when a book is copied and the original cover is partially open 4 Temperature and humidity in the room when ma...

Page 269: ...fed paper using the following procedure referring to the illustration below See 1 DESCRIPTION OF THE BLINKING GRAPHIC SYMBOLS Page 258 for details 1 Paper Misfeed in the Reversing Automatic Document F...

Page 270: ...still remains rotate the green knob to the opposite direction against the step 2 Then remove it 4 Lift the green handle Remove any misfed originals 5 Rotate the green knob on your side in the directio...

Page 271: ...267 12 7 Lower the original feeding tray move the green knob toward the front and open the cover 8 Remove any misfed paper 9 Close the upper and lower cover...

Page 272: ...eleasing Unit Misfeed 1 Open the bypass tray 2 Open the automatic duplexer 3 Open the transfer cover 4 Rotate the green knob as indicated by the arrow toward the inside and remove any misfed paper 5 R...

Page 273: ...269 12 3 Drawer Misfeed 1 Open the cover 2 Remove any misfed paper 3 Close the cover...

Page 274: ...CLEAR PAPER SYMBOL Cont 12 4 Paper Misfeed in the Large Capacity Feeder optional 1 Open the cover 2 Remove any misfed paper Paper Misfeed in the Paper Feed Pedestal optional Open the cover as shown o...

Page 275: ...er Be careful not to let your fingers be caught between the equipment and the automatic duplexer This could injure you Do not touch the metal portion of a guide board as it could burn you 2 Lift the p...

Page 276: ...Fuser Unit 1 Make sure that the bypass tray and the automatic duplexer are opened and then open the transfer cover 2 Open the exit cover Press it down completely 3 Remove any misfed paper 4 Close the...

Page 277: ...and the automatic duplexer are open then open the transfer cover DO NOT touch the fuser unit and the metal area around it Since they are very hot you could be burned or the shock could cause an injury...

Page 278: ...rding to the position of the misfed paper pull it out upward or downward upward downward 5 Close the offset tray cover or job separator cover Close the fuser unit cover and the transfer cover Return t...

Page 279: ...isfed paper from the fuser unit side if it is easier 3 Close the relay unit cover 10 Paper Misfeed in the Finisher optional 1 Remove any misfed paper in the paper exit area 2 Open the upper cover of t...

Page 280: ...nal 1 Pressing the release lever of the finisher move the finisher carefully away from the copier 2 Rotate the green knob of the hole punch unit to locate the arrow within the shadow area in the right...

Page 281: ...inisher carefully away from the copier 2 Lift the green lever and remove any misfed paper 3 Remove any misfed paper in the paper exit area 4 Install the finisher to the equipment Be careful not to let...

Page 282: ...NEL 3 CLEAR PAPER SYMBOL Cont 12 13 Paper Misfeed in the Saddle stitch Finisher optional 1 Pressing the release lever of the finisher move the finisher carefully away from the copier 2 Open the exit c...

Page 283: ...and the front cover and then return the finisher to the original position 14 Paper Misfeed in the Staple Unit 1 Open the front cover of the finisher 2 Rotate the green knob in the middle clockwise Wh...

Page 284: ...rtridge appears Add staples to the cartridge according to the procedure below Saddle stitch Finisher optional 1 Open the front cover of the finisher 2 Hold the green handle to pull out the staple unit...

Page 285: ...ple cartridge take out the cartridge 4 Take out the empty staple case Push the buttons marked PUSH from both sides to release the lock Take out the empty staple case from the staple cartridge 5 Push t...

Page 286: ...LINK ON THE TOUCH PANEL 4 ADDING STAPLES OPTIONAL Cont 12 6 Pull out the seal holding the staples 7 Return the staple cartridge to the original position 8 Return the staple unit to the original positi...

Page 287: ...y from the equipment 2 Take out the staple cartridge 3 Remove the empty staple case from the staple cartridge 4 Set the new staple case Push a new staple case into the staple cartridge until it clicks...

Page 288: ...e staple cartridge to its original position Insert the cartridge until it is caught by the latch and fixed with a click sound If Check staple cartridge remains repeat the above procedure from step 1 t...

Page 289: ...shows that staples are jammed Remove them as described below Saddle stitch Finisher optional 1 Open the front cover of the finisher 2 Hold the green handle to pull out the staple unit Turn the upper...

Page 290: ...n area of the staple cartridge take out the cartridge 4 Holding the knob on which the blue seal attaches raise the staple cover 5 Remove any jammed staples 6 Holding the handle lower the staple cover...

Page 291: ...the lever and move the finisher away carefully from the equipment 2 Take out the staple cartridge 3 Lower the staple cover while holding the knob A stapler Do not touch the stapling area The stapler c...

Page 292: ...original position while holding the knob 6 Return the staple cartridge to its original position Insert the cartridge until it is caught by the latch and fixed with a click sound 7 Install the finisher...

Page 293: ...PUNCH DUST BIN IS FULL appears Dispose of the paper bits as described below 1 Pressing the release lever of the finisher move the finisher carefully away from the copier 2 Pull out the case which con...

Page 294: ...e both are held down Please provide the error code when you ask for service Since heaters are used to fix toner images to the paper a heat sensing safety circuit is incorporated in this equipment Afte...

Page 295: ...291 13 13 MAINTENANCE 1 DAILY INSPECTION 292 2 SIMPLE TROUBLESHOOTING 294...

Page 296: ...ea To scan the original in good condition we recommend that you clean the following items weekly 1 Scanning area DO NOT use solvents such as alcohol Clean the surface with a dried cloth or cloth moist...

Page 297: ...pen the front cover To turn the power OFF see Turning off the Power Shutting down Page 31 1 Open the front cover 2 Clean the charger Hold the cleaning knob pull it out slowly and fully to the front an...

Page 298: ...it comes to a stop Is the front cover firmly closed Close the cover properly 1 DESCRIPTION OF EACH COMPONENT Page 20 Item to be checked Countermeasure Reference page Is the copier in the energy saving...

Page 299: ...t lighter than is standard Use the manual density buttons or the background adjustment function to adjust the image density properly Manual Copy Density Mode Page 102 1 BACKGROUND ADJUSTMENT Page 104...

Page 300: ...with the AUTO button or manual density buttons 6 COPY DENSITY ADJUSTMENT Page 102 Are 2 sided originals used As the other side of the originals can be seen adjust the image density properly lighter wi...

Page 301: ...the reproduction ratio suitable for the paper size 1 PAPER SELECTION Page 74 2 REDUCTION AND ENLARGEMENT COPYING Page 80 Is the margin on the copy set properly Adjust the image shift value 1 IMAGE SHI...

Page 302: ...13 298 13 MAINTENANCE...

Page 303: ...14 SPECIFICATIONS OPTIONS 1 im2330 im2830 SPECIFICATIONS 300 2 SPECIFICATIONS OF OPTIONS 303 3 PACKING LIST 310 4 COPYING FUNCTION COMBINATION MATRIX 311 Combination Matrix 1 2 311 Combination Matrix...

Page 304: ...e Max LD Acceptable Copy Paper Size Drawer LD LG LT LT R ST R COMP 13 LG 8 5 SQ A3 A4 A4 R A5 R B4 B5 B5 R FOLIO 8K 16K 16K R Bypass Paper size within 3 9 11 7 Length 5 8 17 Width Acceptable Copy Pape...

Page 305: ...Humidity 20 85 No Condensation Power Requirements 115 V 10 12 A 50 60 Hz Power Consumption At least 1 5 kW including optional equipments Dimensions equipment only 25 08 W x 28 31 D x 29 09 H Weight A...

Page 306: ...Type Paper size Feeder im2330 im2830 Plain Paper LT ST R A4 A5 R B5 Drawer 23 28 Bypass 23 28 LT R A4 R B5 R Drawer 21 21 Bypass 21 21 LG COMP B4 FOLIO Drawer 18 18 Bypass 18 18 LD A3 Drawer 16 16 Byp...

Page 307: ...Model Name MD 0102 Acceptable Copy Paper Size LD LG LT R ST R COMP 13 LG 8 5 SQ A3 A4 A4 R A5 R B4 B5 B5 R FOLIO 8K 16K 16K R Acceptable Copy Paper Weight 17 28 Ib Bond Dimensions 3 9 W x 20 1 D x 16...

Page 308: ...ECIFICATIONS OPTIONS 2 SPECIFICATIONS OF OPTIONS Cont 14 Paper Weight 17 28 lb Maximum Capacity 550 sheets 20 lb Bond Dimensions 24 5 W x 25 9 D x 12 6 H Weight Approx 47 4 lb Paper Feed Pedestal 1 dr...

Page 309: ...ST R COMP A3 A4 A4 R A5 R B4 B5 B5 R FOLIO Acceptable Paper Weight 13 lb Bond 110 lb Index Number of Copies Stapled at a time Including 2 covers 110 140 lb Index Paper Size 17 20 lb LT LT R A4 A4 R B...

Page 310: ...heets 9256 with mixed paper not loaded Mode Non Sort Sort Group Staples loaded Tray No 1 1 1 LT LT R ST R A4 A4 R A5 R B5 B5 R 6 3 1000 6 3 960 6 3 1000 sheets or 30 sets 1 1 The value reached earlier...

Page 311: ...O 15 sheets Stapling Position Rear Power Source Supplied from the copier Dimensions 17 76 W x 21 22 D x 23 23 H Weight Approx 37 5 lb Power Consumption 40 W max 9284 with mixed paper not loaded Mode N...

Page 312: ...and A4 0 59 100 1 92 350 0 59 100 1 92 350 80 sheets or 15 sets 1 300 sheets or 15 sets 1 B4 and B5 0 59 100 1 92 350 0 59 100 1 92 350 110 sheets or 15 sets 1 400 sheets or 15 sets 1 Bridge Unit Mod...

Page 313: ...0 lb Bond sheets Shift Amount Approx 1 2 Power Source Supplied from the multifunctional digital systems Dimensions 19 7 W x 16 3 D x 6 7 H Weight Approx 7 7 lb Hole Punch Unit Model Name IM2300020N Ac...

Page 314: ...310 14 SPECIFICATIONS OPTIONS 14 3 PACKING LIST Packing List Operator s Manual Pocket Unpacking Instructions Operator s Manual Setup Report Warranty Sheet...

Page 315: ...YES YES NO YES YES YES YES NO NO YES NO YES NO YES YES YES YES YES YES NO NO YES NO YES YES YES YES YES NO YES 2 YES YES YES YES YES YES NO NO YES NO YES YES YES YES YES NO YES 2 YES YES YES YES YES Y...

Page 316: ...NO YES YES YES YES YES YES YES NO YES NO YES YES 3 NO NO NO NO NO NO NO NO NO NO YES YES YES YES YES NO YES NO YES NO NO YES YES YES YES YES YES YES NO YES YES NO YES NO NO NO NO YES YES YES YES YES Y...

Page 317: ...ble Conditions for Saddle Stitch 93 Available paper size 94 Available paper sizes for the hole punch 94 B BACKGROUND ADJUSTMENT 104 basic screen 24 27 Before copying on an envelope 68 BLINKING GRAPHIC...

Page 318: ...MAGES IN 1 TO 2 AND 2 TO 1 135 DIRECTION OF DUPLEX COPY IMAGES IN 2 TO 2 137 DISCLAIMER NOTICE 18 DISPOSING OF THE PUNCHED PAPER BITS OPTIONAL 289 drawer feeding 92 117 Drawer for cover sheet 42 125 1...

Page 319: ...leasing Unit Misfeed 268 JOB BUILD 132 JOB STATUS 187 188 JOB STATUS button 24 50 58 L LOG LIST 200 M Machine Balance 8 MAGAZINE SORT 117 Magazine Sort 91 117 MAGAZINE SORT SADDLE STITCH button 91 92...

Page 320: ...int 194 PRIVATE PRINT JOB 194 PROOF PRINT JOB 192 R RECALLING TEMPLATE 239 Receiving from POP3 Server 186 Receiving from SMTP Server 186 RECEIVING INTERNET FAX 185 Receiving Modes 185 Recommended pape...

Page 321: ...48 The recommended paper 38 Thick 1 36 38 44 302 Thick 2 36 38 Thick 3 36 38 TIME DATE STAMP 129 Tip 9 To Restore the Invalid Code print error to the Normal Print 196 Toner 8 20 TOP COPIED button 125...

Page 322: ...318 X X Y ZOOM 123...

Page 323: ...Printed in China im2330 2830...

Page 324: ......

Reviews: