Scanner maintenance
33
3
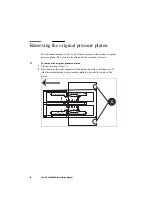
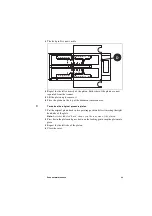
The lock pin D is now visible.
4
Repeat for the left extremity of the platen. Both sides of the platen are now
separated from the scanner.
5
Lift the platen up to remove it.
6
Place the platen on the top of the document insertion area.
▼
To replace the original pressure platen
1
Put the original platen back in its operating position by first inserting the right
hand side of the plate.
Note:
A sticker labeled ‘back’ shows you the rear side of the platen.
2
Press down the platen and press down on the locking pin to snap the platen into
place.
3
Repeat for the left side of the platen.
4
Close the cover.
E
T
E
N
D
E
D
E
T
E
N
D
E
D
N
O
R
M
A
L
N
O
R
M
A
L
E
I
T
E
I
T
mm
Inches
16
14
12
10
8
6
4
2
D
Summary of Contents for CS 4050
Page 1: ...Oc CS 4040 4050 Installation Manual...
Page 37: ...37 Oc CS 4040 4050 Installation Manual Appendix A Technical references...
Page 39: ...39 Oc CS 4040 4050 Installation Manual Appendix B Safety information...
Page 44: ...44 Oc CS 4040 4050 Installation Manual...
Page 45: ...45 Oc CS 4040 4050 Installation Manual Appendix C Miscellaneous...

