background image

often.  Instead, a pump cycle will provide for  several minutes of routine water use before pressure
diminishes and the pump starts again.

In the event a pump should fail, turn the two valves on each pump so the spare pump is

selected, and switch the selector switch to the spare pump.  

Be sure to notify Northwest Explorations

that you have done this so they can repair the defect!

It is a good idea to turn off the fresh water pump breaker whenever leaving
the boat for any extended period, lest a dripping faucet or broken hose
cause the pump to run and waste your precious drinking water.

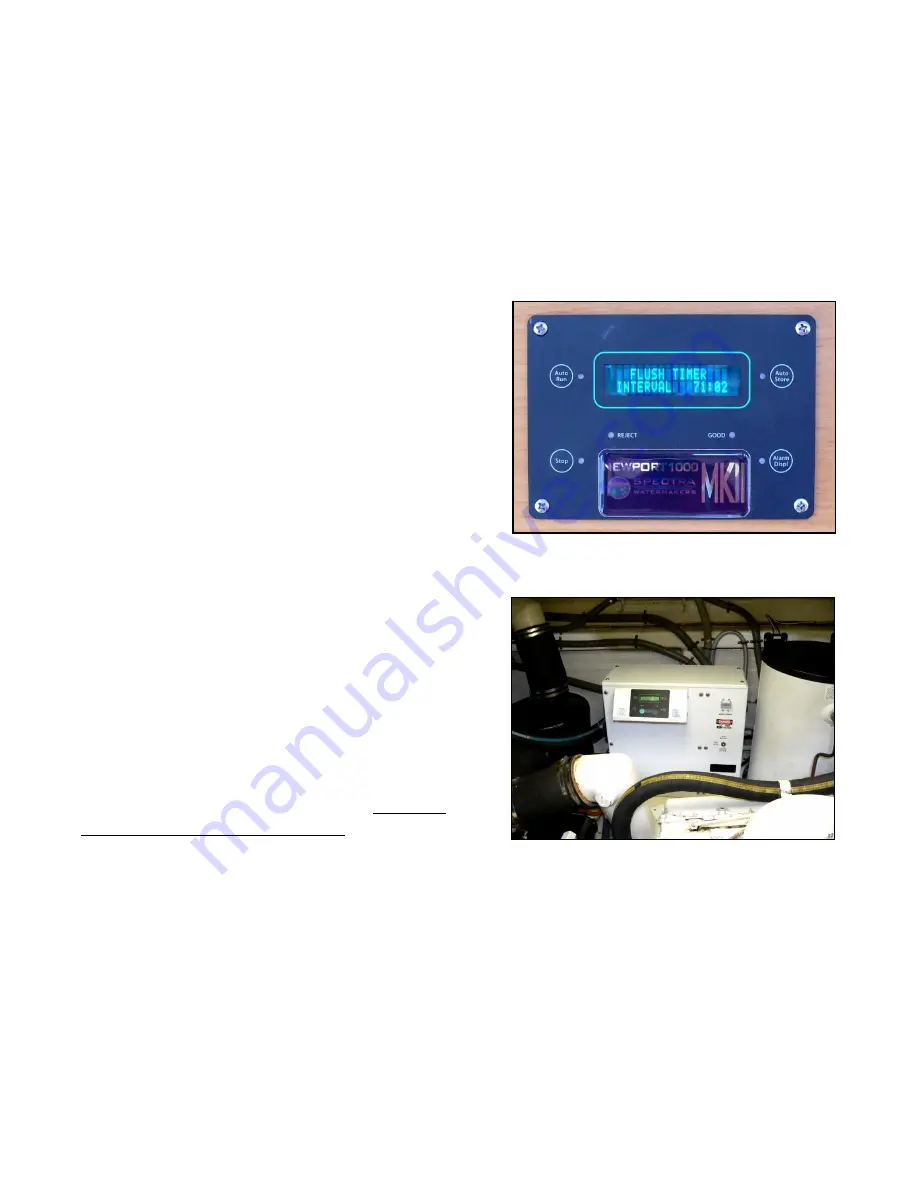
4K4:  Fresh Watermaker

The boat carries a Spectra Watermaker.  This

great system (which requires AC & DC power to
operate) has the following features:

!

It automatically flushes itself on a regular
basis to keep the filtration membranes
clean and in service;

!

It has automatic controls that run it for
specific periods so that you need not
worry about overfilling tanks and wasting
water;

!

It assures you that there will always be
plenty of water, however it will take
several hours to top off the tank under
normal use.

!

Note that you can use city water without
filling the tanks. Simply connect the hose
to the pressure water inlet fitting outside
the cockpit swim door and leave the hose
“on” as long as you are at the dock; this
will then go directly to the boat’s faucets
as needed, but not into the tanks.

Operation is entirely automatic.  

If you are

authorized to use the watermaker, 

Simply push the

AUTO/RUN button to add water to the tanks, following
these provisos:

!

Do not run the watermaker while in the harbor: You will shorten the time that the
filters can be in service;

!

Leave the watermaker on at all times so it can monitor its own operations;

!

Always leave the fresh water pump breaker on so that the purge system can
operate properly;

!

Each depression of the AUTO/RUN button will run the watermaker for one hour,
making 20 gallons of water.

(Above) Watermaker Control Panel. 

(Below) Left center: Watermaker electronics cabinet

(Below) Right: Water Heater

Section 4K: Fresh, Sea & Waste Water Systems  4.27

Summary of Contents for Patos

Page 1: ...ighted See notice next page Section Contents 1 Introduction General Description 2 Specifications Capacities Important Numbers 3 Operating Checklists Maneuvering Suggestions 4 Specific Discussion of Boat Systems 5 What to Do for each Boat System Concern 6 EMERGENCY PROCEDURES 7 Index ...

Page 2: ...tsoever If you do not feel competent to undertake any or all operations detailed herein do not undertake it them get help from a competent person I thank you and my lawyer thanks you Joseph D Coons Copyright 2013 Joseph D Coons NW Explorations LLC This manual was originally written for this boat s owner and it s charter company by Joseph D Coons 1220 Birch Falls Drive Bellingham WA 98229 tel 360 6...

Page 3: ...for details you might make a list of questions as you read the manual saving them all up to ask at one time 1A2 How the Manual is Organized The manual is divided into six sections numbered 1 to 6 plus an index Section 7 Within each section are subsections lettered A to Z as required In section 4 which deals with the specific information about the vessel s equipment and systems the manual is organi...

Page 4: ... side and fore decks Forward on the bow deck is the anchor windlass with foot switches allowing chain movement both up and down electrically The anchor is retracted into the bow pulpit which hangs out over the bow to give better chain clearance from the hull than otherwise possible this pulpit is strong and braced easily supporting not only the anchor during hauling but also an attending crew memb...

Page 5: ...he ship s canvas covers and a space for flybridge electronics Within the storage compartments beneath the seats you will find a complement of life jackets on the starboard side and the propane tank for the ship s stove to port Looking down at the sundeck dinghy and barbeque in the blue cover to right from the flybridge The spacious flybridge the fitted cushions for the settees are not shown The co...

Page 6: ...oard door is a professional quality helm station with electric switch panels adjacent and electronics panel above holding the inverter control the stereo autopilot control alarm and windshield wiper switch panel and the speed log and depth sounder on the helm itself are the ship s radar a depth sounder and GPS plotter In the helm cabinet is storage for manuals tide tables navigation tools and char...

Page 7: ...tor freezer under the counter and a microwave There is extensive storage under and over the counters and storage holds for galley use in the forward stateroom and head compartment floors The stove burners have a push button igniter to light them the oven requires manual pilot lighting a propane match igniter is in the galley In the port aft salon corner is the TV and book racks these chairs double...

Page 8: ...rage in the vanity cabinet Guest Cabin The port guest cabin down the steps and just forward from the galley has a double berth to port with a dresser by the berth with a fire extinguisher above and a hanging locker at the berth s foot There are drawers beneath the berth as well Windows provide light and ventilation in this spacious room The forward stateroom has a V berth with an insert to make it...

Page 9: ...res a queen sized island berth beneath which are drawers including a spacious and efficient chart drawer To each side of the berth are tables with cabinets beneath as well as storage lining the vessel s exterior walls on each side A vanity is aft to port beneath the emergency exit hatch Master Stateroom Head Shower Compartments Forward to port in this stateroom is a head compartment with toilet si...

Page 10: ...eacock and sea strainer In the center of the engine room aft is the sea strainer for the generator the fuel manifold with Racor filters for each engine and behind it the generator in its sound shield cabinet with a water tank beneath the other is under the galley Just port of the generator is its Racor and the watermaker system s reverse osmosis treatment unit To port of the port engine from forwa...

Page 11: ...nt The boat has mooring lines a stern shore line at least 200 long an appropriate all purpose anchor over 250 of all chain rode plus an emergency anchor with chain and rope rode fenders bumpers four deck chairs an ice chest a crab pot or ring with line float and bait rigging a hose for fresh water tank filling and boat washing and a boat hook Section 1B3 Gen l Desc Dinghy Deck Eq 1 9 ...

Page 12: ... plus a fixed automatic system in the engine room First Aid Kit It is in the Master Stateroom Head vanity cabinet Flares Flares are in the drawer at the aft end of the salon settee Life Preservers PFD s There are two wearable vests in each stateroom s hanging locker and there are standard vests under the starboard seat on the flybridge A heaving line and life ring are in a hanger on the aft railin...

Page 13: ... Length on deck 47 feet 1 inches Beam 14 Feet 9 Inches Draft 4 Feet 5 inches Displacement 39 000 Pounds Fluids Motor Fuel 2 Diesel Motor Oil mains 15W 40 Chevron Delo Multigrade Transmission Oil 30 weight Chevron Delo Engine Coolant 50 50 mix ethylene glycol water corrosion inhibitor added Operating Parameters Estimated RPM Speed Fuel Consumption Naut Miles Gallon 1600 8 0 5 5 GPH 1 45 2000 9 5 8 ...

Page 14: ... Intentionally left blank Sect 2 Important Vessel Numbers 2 2 ...

Page 15: ...ngines do not turn over see What to Do If Leaving Dock Only 3 4 minute engine warmup required 9 Stabilizers Center 9 Shore power switch Off 9 Shore power cord removed stowed on board 9 Step stool aboard if used 9 Lines removed as appropriate 9 Fenders hauled aboard and stowed 9 Lines and other deck gear secure stowed 9 Doors and hatches closed and secured as appropriate Underway 9 Helmsperson on w...

Page 16: ... Running Q Anchor is lowered from pulpit while boat is backed up slowly away from anchor Q When desired chain length out 4 1 or 5 1 scope windlass is stopped Q Engines reversed for count of five until chain pulls up virtually straight Note The boat is not held in reverse against a taught anchor chain 9 When engines are shut down Stabilizer Breaker Off Generator Starting Stopping 9 Starting Be sure...

Page 17: ... 3B2 Maneuvering in a Harbor With its twin screws you ll do best if you center the rudder and steer with the engines only The props are so large that the boat will respond well except in high winds just with use of the propellers in forward and or reverse Take your time and keep the boat running dead slow so that you can plan each approach You shouldn t need to use the throttles at all Filling the...

Page 18: ...ttach their bows to the mooring buoys or in a few cases anchor and then their sterns are secured to rings provided in the steep cliffs overlooking the bay Boats are thus perhaps only 15 20 apart side to side Third boats often will raft side by side in busy marinas although this is not very common Fourth courteous boaters will call vessels coming into busy bays and offer to let them raft to the sam...

Page 19: ...t of water if you re at the top of a 15 foot tide To get to the shore you will need to have a dinghy down and then have your mate keep the boat s stern toward shore with short bursts of reverse gear Sometimes a helpful boater already anchored will help you by taking your line to shore for you with his dinghy a neat good deed that you might reciprocate We ve met some nice boaters this way The shore...

Page 20: ... Intentionally Left Blank Section 3B Shore Line Suggestions 3 6 ...

Page 21: ... noise transmitted to the occupants of the forward cabin It allows the anchor rode to have a lower angle relative to the sea bottom thus increasing the anchor s holding power To use the bridle Lower the anchor normally see page 4 2 then after it is set Hook the bridle on the chain just in front of the anchor pulpit bow roller Then secure the bridle rope ends through the side coaming hawse pipes to...

Page 22: ...len over or shifted The chain cannot be tangled so that you will ever need to disconnect it One easy way to free the chain is while wearing gloves grasp the chain on the aft side of the windlass and while lifting it above the wildcat manually rapidly yank it up and down This will usually free it If on the other hand this yanking technique fails go below and open the chain locker to allow manually ...

Page 23: ...ndlass itself has failed Remove the back cover from the windlass and with a voltmeter check to see if while a switch is depressed there is DC voltage on it s terminals if not check the actual wires themselves where they connect to the windlass The windlass uses so much current that sometime the connection though it appears tight may have failed If there is voltage on the wires tighten the nuts fir...

Page 24: ...ircuit breaker always left On and a toggle mode switch in the 12 Volt DC panel by the lower helm See illustration page 4 15 explanatory text on page 4 16 Each mode switch is labeled Auto Off and Manual and these switches should be left in the Auto position When in Auto the pump is controlled by its float switch When set to Off the pump will not run this position is used in case the float switch wi...

Page 25: ...nghy until bow rail is just under flybridge overhang rotate the dinghy and swing over the starboard side with bow pointing aft 5 Lower dingy until afloat and bring it back to the aft swim step 6 Release the three dinghy bridle snap hooks from the dinghy 7 Secure boom with its bridle to Patos so it will not swing around if Patos rolls To re stow the dinghy 8 Reverse above procedure being sure to re...

Page 26: ...lling the dinghy a little more ashore as each person off loads Don t forget to raise the outboard 4E3 Outboard Motor The outboard motor for the dinghy is a four stroke Honda 15 hp electric start outboard It uses plain fuel oil should not be mixed with the gasoline To check the oil remove the cover by operating the latch at the back of the motor The dipstick is on the starboard side while the fill ...

Page 27: ...cumulated substantial debris while the generator was run for extended periods particularly at anchor Starting the Generator 1 Be sure the Generator breaker shown in the illustration to right is On 2 Hold down the Heater switch in the AC control panel by the helm for 15 seconds this energizes glow plugs to warm the engine s cylinders 3 Release Heater Press the Start switch and hold until you hear t...

Page 28: ...d to provide AC to the boat when there is no shore power It is wonderful for example to use the inverter to make a pot of coffee when the engine is running and you are underway or to watch TV in a quiet anchorage or use a hair dryer for a few minutes in the morning But for long period use of AC by large appliances the engine or generator must be running or you must have shore power available Now t...

Page 29: ... the inverter s status Each of the inverter s functions charging and inverting is controlled by the small buttons on the lower left of its panel The charging and inverting functions should be ON all the time unless you do not want the inverting function to use your batteries such as during winter layover or moorage where power may be off for more than a day and batteries could thus be depleted You...

Page 30: ...r B Unused Start Heater Stop MS Generator Controls Outlets ER Helm FB B To Outlets Water Heater On WL Indicates W Htr Power On Icemaker B To Icemaker Switch AC Supply On WL Indicates there is AC Pwr Deck Lights 2 S Turns on Deck Lights Reverse Polarity WL Indicates connection hazard Seawater Pump B To pump s pressure switch Push to Check MS Checks Rev Polarity bulb 4F4 AC Metering To the right of ...

Page 31: ...er advising him her of the problem Do not risk shock or system damage 4F6 AC Shore Power Disconnecting Connecting The large AC selector switch on the bottom of the AC panel is used to determine the source of AC power for the boat The switch has four positions Off Gen Fwd Shore and Aft Shore The Shore positions represent the bow and stern shore power connectors for the shore cable This switch shoul...

Page 32: ...lectrical gadget on or off It is with this concern that we can cite a reality If we need more electricity than the batteries alone must provide and if the propulsion engine isn t running we will need to get our electrical power from an alternative source That s the most important reason why we plug the boat in to shore power or use the generator To keep from running down the batteries For by using...

Page 33: ...ere is shore power or the generator is running by the inverter if it is on when the port engine is running by the port engine s alternator through the battery combiner or if on the battery charger If necessary but only in emergencies you can switch the battery switch in the forward engine room panel to parallel so that both starting and house banks are connected together This way we can be virtual...

Page 34: ...tery switch is just aft of the port engine on the rear engine room bulkhead The DC House Battery main switch is at the bottom of the DC Breaker panel See page 4 15 4G5 DC Battery Combiner The vessel has a battery combiner that works automatically to keep the house and starting batteries charged all the time If this electronic device sees any charging voltage on any battery such as from a charger o...

Page 35: ... head compartment to operate it But some of the other breakers also serve as the switch for the item An example of this would be the navigation light breaker or the macerator pump breaker The Battery Switch on this panel should always be left in the House position In addition NEVER switch this to off with the engines running except in a dire electrical emergency See the next page for a full descri...

Page 36: ...h above range Power Stbd S Turns on stbd engine power Gas Stove B To propane switch in galley Blower Port S Turns on port engine room fan Fridge B To Refrigerator Thermostat Blower Stbd S Turns on stbd engine room fan Head Vent B To vent switches in heads Port Stbd Start MS Starts the engines Electric Head B To vacuum pumps both heads Port Stbd Stop MS Stop the engines Instrument Lights S Turns on...

Page 37: ...olts mode Unit displays the house battery voltage The volts mode with 12 8 fully charged nothing running 14 2 or more bulk charging 13 2 13 8 float charging less than 10 0 volts discharged A Amps mode Unit displays the rate of charge or discharge of the house batteries a sign appears when the battery is discharging no sign when charging Ah Amp Hours mode Unit is like a fuel gauge in reverse Batter...

Page 38: ...age should be about 12 6 12 8 approximately fully charged After you wake up check the voltages before you start using more DC energy You may want to charge your batteries by going for a boat ride or using the generator if you were at anchor and the reading is 12 2 volts or less If you take readings frequently for the first day or two of your cruise you ll get an idea of normal system operation and...

Page 39: ... simple RED BUTTON A Turns the system on It will immediately go into Standby mode B To engage hold for 3 seconds C To take control of any station press and hold the left and right white arrow buttons simultaneously The system will beep when you have control AUTO Engages the autopilot to hold the heading that existed when pressed When engaged A Autopilot appears in upper left of display NAV This fu...

Page 40: ...sometimes very deep the depth sounder will not display or will stay on a high depth reading when the water s depth is beyond its capacity Remember when backing up or crossing a tide line that turbulent water from the tides boat s screws or another boat can interrupt the sounding information received by the unit Be careful It is turned on by the breaker in the DC power panel Using the DISP key step...

Page 41: ...u ll need primarily The Blue Button turns the unit on and sets the brilliance of the display you will need to wait about 90 seconds for full startup and the warning message to appear After the message appears turn and press the Rotokey knob just to the right of the display screen to select the display you wish Read the manual Warning Do not spend so much head down time looking down at these units ...

Page 42: ...the mike just underneath it The radios is designed for easy access to Channel 16 which is the hailing and emergency channel in the Northwest Detailed instructions are in its manual 4H10 Electronics VHF Radio Flybridge There is a conventional Standard Horizon VHF radio on the flybridge The radio is designed for easy access to Channel 16 which is the hailing and emergency channel in the Northwest De...

Page 43: ...each engine port and starboard at each helm Each cluster has engine oil pressure engine temperature tachometer battery amperage and engine hours 4J2 Checking the Engines The engines require a regular daily check since once underway you will probably not check them while in use tucked away as they are in the engine room Please perform this check each morning when the engine room is cool Check the O...

Page 44: ... until the coolant overflow tank is no more than one quarter full Visually Inspect the Engine Room Whenever you re in the engine room ask yourself Does everything look right Look at the pads under the engines and transmissions while some drips are normal there shouldn t ever be substantial accumulations of any fluids Check the Sea Strainers Weekly or immediately if an engine runs hot The engine st...

Page 45: ...erratically with the dipstick on the starboard side of each transmission It is unlikely that any oil will need to be added Be sure to check under the transmission for leaks Low transmission oil is a serious matter With the engine idling and in neutral remove the transmission dipstick Wipe it with a towel reinsert it and take a reading If the level is below the add mark stop the engine add a half p...

Page 46: ... AC from shore power or generator if available and the water heaters 110 volt AC breaker is on The heater is insulated well enough to keep hot water overnight without power provided you haven t wasted a lot Note that it can take considerable time to heat water from a cold start 4K3 Fresh Water Pumps The water line from the tanks leads to the boat s fresh water pumps in the engine room port side fo...

Page 47: ...lling tanks and wasting water It assures you that there will always be plenty of water however it will take several hours to top off the tank under normal use Note that you can use city water without filling the tanks Simply connect the hose to the pressure water inlet fitting outside the cockpit swim door and leave the hose on as long as you are at the dock this will then go directly to the boat ...

Page 48: ...r fish cleaning etc with a faucet at the cockpit It is operated by 110 volts AC in the AC Breaker Panel For safety his switch should be off except when the pump is in use 4K7 Waste Water Waste water from the sinks and showers but not from the toilets is dumped overboard in accordance with U S and Canadian law From sink basins the water simply flows by gravity overboard Since the floor of the showe...

Page 49: ... like those on auto gas pumps Listen carefully as soon as you hear the fuel getting near the top slow dow and fill slowly until the fuel just starts to come up the fill pipes Fill both the tanks completely but do not spill fuel 4L3 Fuel Fill Pipe Locations Take the hose around the cockpit to reach the fill caps on the side decks under the salon windows approximately midships These are labeled Dies...

Page 50: ...rossfeed Stbd Tank Supply Stbd Tank Return Normal Operation To Port Engine To Port Engine Closed Closed To Stbd Engine To Stbd Engine Use Port Tank Only To Port Engine To Port Engfine Open Open Closed Closed Use Stbd Tank Only Closed Closed Open Open To Stbd Engine To Stbd Engine 4L6 Fuel Measurement Because of the great capacity of the tanks you have considerable fuel Most short charters one or t...

Page 51: ... this furnace system is very flexible and a great addition to the boat As long as the batteries can support the modest DC power requirement of the fans and furnace blower you will have plenty of quiet heat In fact this use of the house batteries energy for air circulation is a good reason to limit use of the furnace to times when passengers are awake unless the boat has shore power available Furna...

Page 52: ...re is no way from there for it to be redirected into the boat for all openings into the salon are sealed otherwise they d leak in a rainstorm There is of course a manual gas valve on the propane tank This valve is used only when exchanging filling tanks it should be fully opened There is also a second valve a solenoid valve in the flybridge seat propane line immediately after the manual valve This...

Page 53: ...he stove several times until the burner lights Sometimes you may need to turn the knob a little further toward high or if the tank has been changed keep trying for a few seconds before fuel reaches the stove after purging air from the pipe 4 After the burner lights continue to hold the knob in for a few seconds while the thermocouple heats up before adjusting the flame to the desired intensity To ...

Page 54: ...r will not immediately light For safety reasons the control has a slight time delay and the oven s main burner will light after about 20 or 30 seconds following control setting In this way the burner does not puff on and off as you adjust the control 5 Until you are completely done with the oven for this cooking session you may leave the control in the light position between cooking your dishes so...

Page 55: ...itting at the inside base of the Portuguese bridge starboard side 4P2 Head Operation The premium heads are easy to use odor free and reliable They work with separate macerator pumps built in to the head itself The head uses about a half pint of fresh water from the ship s supply with each flush The head is operated by control on the nearby vanity cabinet 1 Be sure the Electric Head switch in the D...

Page 56: ...it until the tank reaches the mid position 4P7 Head Holding Tank Pumpout If dumped overboard from this tank the effluent passes through a through hull valve which is normally in the correct position To dump the tank use a shore side pump out station connecting to the Waste deck fitting on the side deck 4P6 Head Waste Overboard Pump If not in U S waters or a no discharge zone you can dump the tank ...

Page 57: ...0 knots or so When using the engines the Stabilizers breaker on the small panel to the right of the lower helm near the salon floor should be On With the breaker on press the buttons to control the stabilizers as follows Center This button should have been pressed when not underway or when backing This is important Active Press to engage stabilizers when underway GPS Speed Signal Bypass Turns off ...

Page 58: ...EDIATELY SHUT DOWN THE ENGINES A control on the helm to starboard of the wheel near the windlass breaker can then be operated to silence the alarm 4R2 Safety Safety Panel This panel in the pilothouse will alert you for several anomalies in the boat s systems or if you have left some lights on that could run down your batteries LED s indicate the cause if an engine alarm is sounding if the DC engin...

Page 59: ...d 2 Turn the longer valve lever so it is perpendicular to the sea strainer parallel to the hull 3 Tighten the T handle the weeping will stop 4 Using the same spanner you use for the fuel and water tank deck caps unscrew the top of the sea strainer Then remove the strainer by pulling it out the top of the assembly Rinse the strainer thoroughly and if necessary remove any debris from the glass housi...

Page 60: ...shield wipers are controlled by the three knobs on the safety panel above the helm to starboard Turning the knob turns on the wiper the further you turn it clockwise the faster it runs Pressing a knob will activate the washers for all three windshields Intentionally Left Blank Wiper controls are on the right Section 4T Warning Lights Alarms Wipers 4 40 ...

Page 61: ...anchor free 5C ANCHOR WINDLASS WON T TURN If the motor isn t running is the circuit breaker by the lower helm on If the motor is running is the clutch tight Use the anchor windlass handle Windlasses are equipped with a shear pin to protect them if you sheared the pin you will have to haul the anchor by hand using the emergency handle 5D BATTERIES HOUSE KEEP RUNNING DOWN Have you run the engines or...

Page 62: ...board Get assistance from the fisherman You are responsible for damage you cause to a net 5L HIT A LOG OR ROCK See EMERGENCY PROCEDURES next chapter 5M PROPELLER FOULED OR DAMAGED Best thing have the prop checked by a diver or dive it yourself if able Check for vibration Try turning shaft by hand in engine room both should be turn able with engine in neutral Is shaft noisy or does it load engine D...

Page 63: ...oat and crew is someone s responsibility while you sort out the boat s problem For example delegate your mate to keep a watch for hazards or to operate the boat on course slowly while you deal with the difficulty Here is a checklist for solving the problem A Isolate it B Get the manuals C Get parts D If necessary call vendors for help Over the years most problems with boats are caused by misuse Ho...

Page 64: ...are after putting the engine into idle and or neutral if necessary If you did hole the boat go immediately to the If an Emergency on the preceding pages If no hole and still idling is the boat vibrating If yes put the engine into neutral try accelerating it If there is vibration or any unusual noise grinding or squealing shut down one main engine and use the other engine Proceed to the closest saf...

Page 65: ...0 4 12 4 15 4 17 4 18 4 23 4 31 5 1 Battery Charger 4 8 4 10 4 13 Battery Combiner 4 13 4 14 Bell 1 10 Berth 1 6 1 7 4 28 4 32 Bilge Pump 1 10 4 6 4 15 4 16 Canvas 1 3 CD 4 9 4 19 4 21 Chain locker 4 2 5 1 Chart 1 7 3 4 Checklist 3 2 6 1 Circuit Breakers 4 15 Cleaning 1 3 4 28 4 39 Coast Guard 1 2 6 1 Cockpit 1 2 1 3 4 19 4 27 4 29 Coolant 2 1 3 1 4 7 4 8 4 24 Davit 1 1 1 2 1 9 4 1 4 5 DC 1 2 1 1 ...

Page 66: ...ht 4 24 Flybridge 1 2 1 3 1 10 4 4 4 5 4 20 4 22 4 32 FM 1 2 4 21 Freezer 1 5 1 6 4 16 4 32 Fresh Water 1 8 1 9 2 1 4 16 4 26 4 28 4 35 Fuel 1 2 1 8 1 9 2 1 3 1 3 3 4 1 4 6 4 24 4 25 4 29 4 31 4 33 4 36 4 39 5 1 6 1 Fuel fill 4 29 Fuel filters 4 29 Fuel tank 1 8 1 9 3 1 4 29 4 36 Furnace 1 8 4 1 4 7 4 31 Galley 1 5 1 6 1 8 4 1 4 16 4 32 4 33 Generator 1 8 3 1 3 2 4 7 4 10 4 12 4 14 4 18 4 26 4 28 ...

Page 67: ...4 23 4 25 4 30 Oil Leak 4 24 Oil Pressure 4 8 4 23 Outboard 1 3 1 8 1 9 4 1 4 5 4 6 4 13 4 14 5 2 Owner 1 2 1 1 4 37 Plotter 1 4 4 16 4 21 4 22 Polarity 4 10 4 11 Power Monitor 4 17 Prime 4 20 4 29 5 2 Propane 1 3 1 5 4 4 4 8 4 16 4 32 4 33 Propeller 5 2 Pump 1 2 1 8 1 10 4 4 4 6 4 10 4 15 4 16 4 24 4 30 4 35 4 38 5 1 5 2 Radar 1 4 4 16 4 19 4 21 4 22 Radio 4 13 4 22 6 1 Refrigerator 1 5 4 16 4 32...

Page 68: ...4 4 5 4 32 Table 1 4 1 5 Temperature 4 20 4 23 4 31 4 33 4 34 4 37 Throttles 3 1 3 3 Tools 1 4 Transmission Oil 2 1 4 25 TV 1 5 4 8 4 11 4 22 Vacuum 4 16 VHF 1 10 4 16 4 19 4 22 6 1 Voltage 4 3 4 9 4 10 4 13 4 14 4 17 4 18 4 31 Voltmeter 4 3 4 7 4 11 Wake 3 1 4 18 4 31 Washdown 1 2 4 28 Washer 4 7 4 40 Water Fill 4 26 Water Heater 1 8 3 2 4 8 4 10 4 11 4 26 4 27 Watermaker 1 8 4 26 4 27 Windlass 1...

Reviews: