


Device Management
DVR User Manual
100
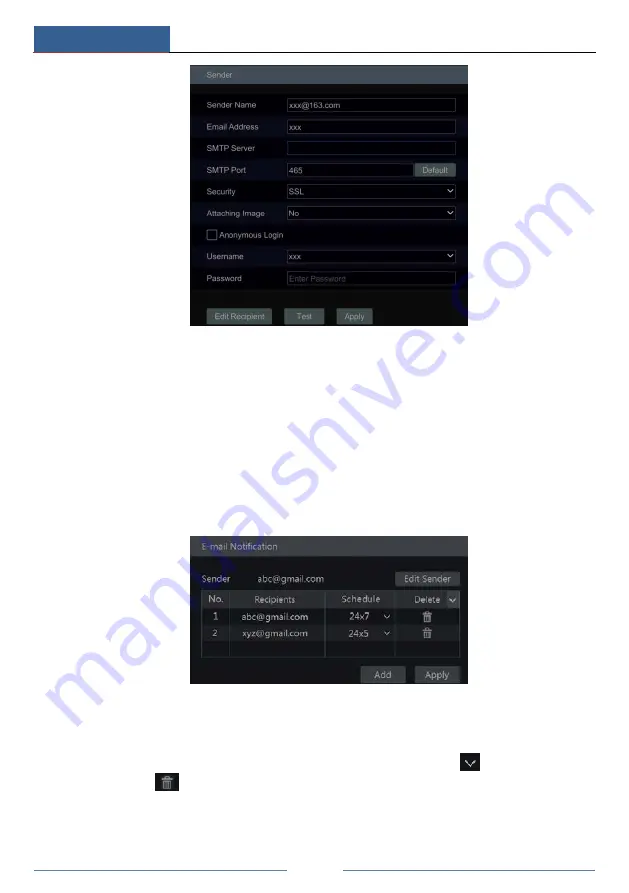
Enter the sender’s name, e-mail address, SMTP server and SMTP port (you can click “Default”
to reset the SMTP port to the default value) and then enable or disable the SSL and attaching
image. Select the username (the username list will be updated automatically according to the
email address you enter) and enter the password of the sender and then click “Apply” to save
the settings (you don’t have to enter the username and password if “Anonymous Login” is
enabled). Click “Test” to pop up a window. Enter the e-mail address of the recipient in the
window and then click the “OK” button. The e-mail address of the sender will send an e-mail
to the recipient. If the e-mail is sent successfully, it indicates that the e-mail address of the
sender is configured correctly.
Click “Edit Recipient” to go to the following interface.
Click “Add” and then enter the recipient’s e-mail address and select the schedule (if a schedule
is selected, the system will send the alarm email and the recipient will receive it only in the
selected schedule time) in the popup window. Click “Add” in the window to add the recipient.
You can also change the recipient’s receiving schedule by clicking
in the “Schedule”
column. Click
to delete the recipient in the list. Click “Apply” to save the settings. Click
“Edit Sender” to go to the e-mail configuration interface of the sender.
Summary of Contents for Xcel TD-L400
Page 1: ...D L400 D R USER MANUAL 1 3 3...
Page 67: ...Record Disk Management DVR User Manual 60...
Page 127: ...FAQ DVR User Manual 120 Fig 9 2...
Page 130: ...TD LA4...