background image

17

16

PIPA lite series instructions

PIPA lite series instructions

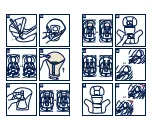
Shoulder harness position
1

 -   Tighten harness to fit snugly on child’s shoulders. It 

is snug if you cannot pinch a fold in the strap. 

(23)

2

 -  Harness straps must be at or just below 

shoulders. 

(24)

3

 -  To adjust shoulder harness height, remove child 

and loosen harness by pressing the harness 

adjustment button 

(25)-1

 while pulling on the 

harness strap 

(25)-2

 The harness adjustment 

button is located inside the slot on the seat pad. 

Shoulder harness

straps height adjustment

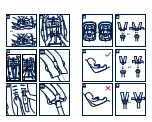
Use extreme care in threading the Shoulder Harness 

Straps according to the figure. If the Shoulder Harness 

Straps are not secure, they will not protect your baby.
The ends of the Shoulder Harness Straps must hang in 

front of the junction plate.
Ensure that the shoulder harness straps are not twisted 

before reassembling the ends onto the junction plate.

1

 -   Press the adjustment button at the front of the seat 

and pull on the shoulder harnesses to loosen them. 

(25)

2

 -  At the back of the seat, take the harness ends off  

the junction plate. 

(26)-2

3

 -  Pull the harnesses through the slots in the seat. 

Insert them into the appropriate set of slots. 

(27)

4 - 

Reassemble the harness ends onto the junction 

plate. 

(28)

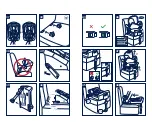
The ends of the Shoulder Harness Straps have two


loops.
For a smaller baby, use the upper shoulder harness 

loops. 

(29)

For a larger baby, use the end shoulder harness 

loops. 

(30)


DO NOT

 allow harness to pass over bars. Repeat 

process for second shoulder harness strap.

Product Use

Securing Child in Child Restraint
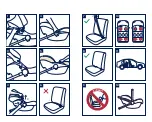
1

 -   Place buckle tongues into both sides of the seat 

in the buckle holders to make placing baby more 

convenient. 

(31)

2

-   Place child in Child Restraint in seated position. 

(32)

3

 -  The child should be seated against both the back 

and bottom of the seat with no gap behind the 

child. 

DO NOT

 allow child to slouch. 

(33)


Gently guide child’s arms through harness loops.

4

 -  Place the child into the infant child restraint and 

lock the buckle. 

(34)(35)(36)

5

 -  Tighten harness by pulling on the adjuster strap. 

Pull any excess harness webbing through the 

buckle towards the child’s shoulder and pull on 

the adjuster strap. This may need to be repeated 

several times for proper fit. 

(37)

Summary of Contents for PIPA lite

Page 1: ...Designed around your life...

Page 2: ...AIRBAG 1 2 4 5 7 8 9 10 11 3 1 2 6 1 2 1 3 2 12...

Page 3: ...2 3 4 5 6 15 16 17 18 19 20 21 22 23 13 14 or or or or or 1 2 24 or...

Page 4: ...2 25 3 32 4 33 5 34 6 35 1 36 2 2 2 1 1 1 26 27 28 29 30 31 or or or or or...

Page 5: ...2 1 3 45 6 47 2 1 5 46 43 42 48 2 44 1 5 40 6 41 3 38 4 39 2 37 or...

Page 6: ...3 57 2 1 4 58 4 60 5 59 2 56 3 2 55 1 4 6 54 5 53 1 2 4 52 2 50 1 2 2 3 51 1 49 1 2...

Page 7: ...4 61...

Page 8: ...CE READ CAREFULLY Contents Product Information 2 Product Registration 2 Warranty 2 Contact 2 Child Usage Requirements 3 For use with base 4 Warnings 5 Infant Child Restraint Parts List 8 Base Parts Li...

Page 9: ...both your child and your family Because we stand by our product our gear is covered by a custom warranty per product starting from the day it was purchased Please have the proof of purchase model num...

Page 10: ...occur Any straps holding the restraint to the vehicle should be tight that any straps restraining the child should be adjusted to the child s body and that straps should not be twisted After your chil...

Page 11: ...d or missing parts DO NOT have your child in large oversized clothes because this may prevent your child from being properly and securely fastened by the shoulder harness straps and the harnesses betw...

Page 12: ...equired for assembly 1 Canopy 2 Seat Pad 3 Body Support x2 4 Buckle and Crotch Pad 5 Harness Adjustment Button 6 Harness Adjustment Strap 7 Handle Adjustment Button 8 Stroller Release Button A 9 Canop...

Page 13: ...r information No tools are required for assembly 1 Vehicle Belt Lock Off 2 ISOFIX Connector lower attachments 3 Primary ISOFIX Connector Release Button 4 Secondary ISOFIX Connector Release Button 5 IS...

Page 14: ...r rearward with respect to the moving direction of the vehicle 10 It is recommended to install this infant child restraint on the rear vehicle seat 11 DO NOT install this infant child restraint on veh...

Page 15: ...Keep the tab at the end of the crotch pad strap flat against the strap and then route the crotch pad strap through the front of the buckle 16 3 Pull the crotch pad off the buckle 17 Head and Body Sup...

Page 16: ...the back of the seat take the harness ends off the junction plate 26 2 3 Pull the harnesses through the slots in the seat Insert them into the appropriate set of slots 27 4 Reassemble the harness end...

Page 17: ...be pinched and should not allow any slack Installation WarningSerious injury or death can occur The seat alone cannot be installed in the vehicle It must be installed with the base 38 Base Installatio...

Page 18: ...Base 1 After child is properly secured in infant carrier press child restraint on base and listen for a click Pull on child restraint to verify installation 46 DO NOT allow child restraint to contact...

Page 19: ...r a click Pull on Child Restraint to verify installation 56 DO NOT allow Child Restraint to contact the vehicle door or seat in front of it 6 To release the Child Restraint pull the infant carrier up...

Page 20: ...e rinse using warm water DO NOT use any soaps solvents or lubricants Using anything other than water can cause the buckle to malfunction Air dry Remove the infant child restraint from the vehicle seat...

Page 21: ...27 26 PIPA lite PIPA lite 28 28 28 29 29 30 31 34 36 38 43 44 49...

Page 22: ...____________________________________ ____________________________________________ Nuna nunababy eu Nuna www nunababy eu warranty Nuna info nunababy eu www nunababy eu 431 2 02 27973000 52603333 59 10...

Page 23: ...31 30 PIPA lite PIPA lite 3 3 CNS 3972 ECE R16 3 ISOFIX ISOFIX CNS 11497 ECE R44 ISOFIX ISOFIX ISOFIX ISOFIX ISOFIX C D...

Page 24: ...33 32 PIPA lite PIPA lite ISOFIX 100 13kg 10...

Page 25: ...35 34 PIPA lite PIPA lite Nuna 1 2 3 x2 4 5 6 7 8 A 9 10 11 x2 12 13 B 14 15 16 17 18 T 19 4 3 5 7 2 12 1 10 8 9 11 6 11 3 13 16 17 14 15 19 18...

Page 26: ...37 36 PIPA lite PIPA lite 1 2 3 4 5 6 7 8 9 10 11 Nuna 1 2 ISOFIX 3 4 5 ISOFIX 6 7 8 9 10 11 ISOFIX...

Page 27: ...39 38 PIPA lite PIPA lite 6 7 ISOFIX 8 9 10 11 1 1 2 3 1 2 4 3 1 3 2 1 4 2 3 5...

Page 28: ...41 40 PIPA lite PIPA lite 1 3 12 2 13 1 13 2 14 1 15 2 16 3 17 1 18 2 19 3 20 4 0 6 21 5 22 1 23 2 24 3 25 1 25 2...

Page 29: ...43 42 PIPA lite PIPA lite T T 1 25 1 25 2 2 T 26 2 3 27 4 T 28 29 30 1 31 2 32 3 33 4 34 35 36 5 37...

Page 30: ...44 PIPA lite PIPA lite 1 38 ISOFIX 1 39 2 ISOFIX ISOFIX 40 ISOFIX ISOFIX 3 ISOFIX 180 ISOFIX 41 4 ISOFIX ISOFIX ISOFIX ISOFIX 42 ISOFIX ISOFIX ISOFIX 43 ISOFIX ISOFIX 5 44 44 45 ISOFIX ISOFIX 45 1 45...

Page 31: ...47 46 PIPA lite PIPA lite 1 46 2 47 1 47 2 3 48 4 ISOFIX 49 1 49 2 5 ISOFIX ISOFIX 50 3 1 51 2 52 3 53 2 53 1 4 54 55 55 1 55 2 55 3 55 4 5 56 6 57 1 57 2 7 58 8 59...

Page 32: ...49 48 PIPA lite PIPA lite PIPA lite lx 1 60 2 61 NUNA nunababy eu Nuna 2018 Nuna International B V Nuna...

Page 33: ...51 50 PIPA lite PIPA lite 52 52 52 53 53 54 55 58 60 62 67 68 73...

Page 34: ...____________________________ Nuna nunababy eu Nuna www nunababy eu warranty Nuna info nunababy eu www nunababy eu NUNA International B V Van der Valk Boumanweg 178 C 2352JD Leiderdorp The Netherlands...

Page 35: ...55 54 PIPA lite PIPA lite 3 3 GB 14166 ECE R16 3 ISOFIX ISOFIX GB 27887 2011 ECE R44 ISOFIX ISOFIX ISOFIX C D...

Page 36: ...57 56 PIPA lite PIPA lite ISOFIX 100 13kg 10...

Page 37: ...59 58 PIPA lite PIPA lite Nuna 1 2 3 x2 4 5 6 7 8 A 9 10 11 x2 12 13 B 14 15 16 17 4 3 5 7 2 12 1 10 8 9 11 6 11 3 13 16 14 15 17...

Page 38: ...61 60 PIPA lite PIPA lite 1 2 3 4 5 6 7 8 9 10 11 Nuna 1 2 ISOFIX 3 4 5 ISOFIX 6 7 8 9 10 11 ISOFIX...

Page 39: ...63 62 PIPA lite PIPA lite 6 7 ISOFIX 8 9 10 11 1 1 2 3 1 2 4 3 1 3 2 1 4 2 3 5...

Page 40: ...65 64 PIPA lite PIPA lite 1 3 12 2 13 1 13 2 14 1 15 2 16 3 17 1 18 2 19 3 20 4 0 6 21 5 22 1 23 2 24 3 25 1 25 2...

Page 41: ...67 66 PIPA lite PIPA lite 1 25 1 25 2 2 26 1 1 31 2 32 3 33 4 34 35 36 5 37...

Page 42: ...68 PIPA lite PIPA lite 1 38 ISOFIX 1 39 2 ISOFIX ISOFIX 40 ISOFIX ISOFIX 3 ISOFIX 180 ISOFIX 41 4 ISOFIX ISOFIX ISOFIX ISOFIX 42 ISOFIX ISOFIX ISOFIX 43 ISOFIX ISOFIX 5 44 44 45 ISOFIX ISOFIX 45 1 45...

Page 43: ...71 70 PIPA lite PIPA lite 1 46 2 47 1 47 2 3 48 4 ISOFIX 49 1 49 2 5 ISOFIX ISOFIX 50 3 1 51 2 52 3 53 2 53 1 4 54 55 55 1 55 2 55 3 55 4 5 56 6 57 1 57 2 7 58 8 59...

Page 44: ...73 72 PIPA lite PIPA lite PIPA lite lx 1 60 2 61 NUNA nunababy eu Nuna 2018 Nuna International B V Nuna...

Page 45: ......
Reviews: