Keep drills, drivers and other cutters sharp and in good condition. This
will improve cutting and reduce the load on the machine ensuring a
longer life of the cutting tools and the machine.
Use only drill bits and drivers recommended by the manufacturer.
Do not attempt to modify the machine or its accessories in any way.
Do not force the machine, let the machine do the work. This will
reduce the wear on the machine and bit and increase its efficiency
and operating life.
Use approved safety glasses or goggles, face mask and ear defenders
when used for prolonged periods.
When using the machine above head height wear an approved
safety helmet as well as approved safety glasses or goggles and an
approved face mask.
Be aware of the high torque reaction when drilling especially when
drilling masonry.
When drilling masonry do not force the drill into the work piece, let the
drill and hammer action do the work.
Do not try and change any of the selector switches while the motor is
running. Doing so could damage the machine.
Do not use this product with any attachment designed for mixing Mortar,
Concrete, or plaster. Or for any other type of mixing operation.
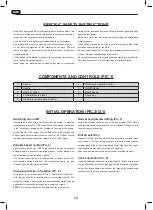
SPECIFIC SAFETY INSTRUCTIONS
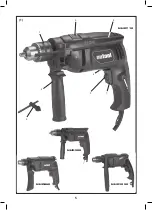
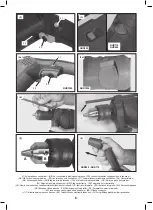
COMPONENTS AND CONTROLS (PIC 1)
1
Chuck
6
Continuous operation button
2
Handle
7
On/Off trigger
3
Hammer action
8
Depth gauge
4
Forward/Reverse lever
9
Chuck key
5
Electronic variable speed control
INITIAL OPERATION (PIC.2)(2.1)
Switching on and off
This machine is fitted with a “continuous running switch”. To start the
machine squeeze the ON / OFF switch. When the machine starts press
in the “continuous running switch” located on the side of the handle,
release the ON / OFF trigger. The machine will now run continuously
without the need to maintain pressure on the ON / OFF trigger. To stop
the machine briefly squeeze then release the ON / OFF trigger.
Variable speed control (Pic. 2)
Light pressure on the ON / OFF switch results in low speed, allowing
drilling to begin in a smooth, controlled manner. Further pressure on
the switch results in an increase in speed.
The desired speed can be pre-selected with the thumb wheel (2.2)
(also possible during operation). The rotational speed to be used
depends upon the material being drilled.
Changing direction of rotation (Pic. 2)
Set the direction of rotation lever (2.3) to F (Forward) or R (Reverse).
Note that the direction of rotation lever is locked when the On / Off
switch is activated. The reversing or anti-clockwise operation enables
application for tasks such as loosening or removing screws.
NOTE:
Do not change the direction of rotation when the drill is running.
Normal and hammer drilling (Pic. 3)
Locate the selector switch on top of the drill housing (Pic.3) Simply
slide the selector switch to align the Drill or Hammer Drill symbol with
the arrow on the drill casing.
Drill bit selection
Tungsten carbide drill bits are required for drilling concrete, stone
and masonry. The best drilling progress is achieved using tungsten
carbide tipped drill bits. Only High Speed Steel (HSS) drill bits in good
condition should be used for drilling metal or wood.
Spade bits and brad point bits are only used for drilling wood etc.
Chuck operation (Pic. 5)
Insert the selected drill/driver bit into the chuck (A). Make sure that it is
central and rotate the chuck outer ring until the drill/driver is gripped.
Using even torque tighten the chuck at the three hole positions using
the chuck key (B). Do not use excessive force.
14
GB
Summary of Contents for NHD1050
Page 5: ...5 1 8 2 3 4 5 7 1 9 6 NHD710 NHD1050 NHD860 NHD500 ...
Page 100: ...100 ...
Page 101: ...101 ...
Page 102: ...102 ...
Page 103: ...103 ...


