Numark TT-1650 Operating Instructions Manual Download Page 5

PAGE 4

CONTROLS

CONTROLS

continued

Tone Arm Parts

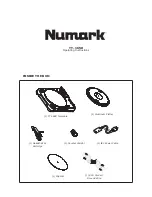
7. Counter Weight and Scale Ring
The Counterweight is used to balance the head shell and 
cartridge assembly so that the proper amount of stylus 
pressure is applied to the record.

8. Anti-Skate Adjustment
This knob is used to compensate for inward tracking forces. 
See Tonearm Setup for more details.

9. Tonearm Cue System
This cueing system allows the tone arm to be positioned at 
a certain point above the record and slowly engaged. When 
the lift lever is in the up position the tone arm should rest 
on the armrest. When the lift lever is lowered, the tone arm 
is slowly lowered until the stylus is resting on the record.

10. Arm Clip
This specially designed arm clip secures the tone arm while 
it is being transported or not in use. The arm clip has been 
designed to remain in the up position while unlocked.

11. Tone Arm Lock Nut
This Aluminum nut is used to secure the head shell and 
cartridge assembly to the tone arm tube. See Cartridge 
Setup for more details.

Bottom Parts

12. Adjustable Rubber Dampening Feet
When all of the feet of the turntable are completely 
tightened, the top flat surface of the turntable will be at 
85mm. Unscrewing these feet raises the turntable up to 
compensate for unleveled surfaces.

13. Carrying Handles
These handles provide a secure grip so that the turntable 
may be comfortably transported.

14. RCA Output Jacks
These stereo output jacks allow the turntable to be 
connected to a compatible device with a PHONO level input.

15. Ground Screw
This Ground Screw is used to run a ground line between the 
turntable and the device it is connected to.

16. Voltage Selector Switch
This two-position switch toggles the internal voltage 
transformer between 110V and 240V. The turntable should 
be shipped with the proper voltage setting for your region. 
Check this switch setting before connecting the IEC power 
cord to prevent damage to the turntable.

17. IEC Power Terminal
This IEC Power Terminal can be used with any IEC power 
cable, but it is recommended that the supplied IEC power 
cable be used.

7

8

9

11

12

13

10

9

x4

x4

17

16

14

15

Summary of Contents for TT-1650

Page 1: ...TT 1650 Operating Instructions 1 TT 1650 Turntable 1 Aluminum Platter 1 IEC Power Cable 1 RCA Cord w Ground Wire 1 Slipmat INSIDE THE BOX 1 Headshell w Cartrdige 1 Counter Weight...

Page 2: ...replace your obsolete outlet Do not defeat the safety purpose of the grounding type plug POWER CORD PROTECTION Power supply cords should be routed so that they are not likely to be walked on or pinch...

Page 3: ...t operating and maintenance servicing instructions in the literature accompanying the appliance NOTICE The apparatus shall not be exposed to dripping or splashing and that no objects filled with liqui...

Page 4: ...er position the pitch is at 0 When moved away from the center and towards the tone arm decreases the pitch slows down the platter and moving the pitch slider away from the tone arm increase the pitch...

Page 5: ...to the tone arm tube See Cartridge Setup for more details Bottom Parts 12 Adjustable Rubber Dampening Feet When all of the feet of the turntable are completely tightened the top flat surface of the tu...

Page 6: ...to prevent damage to the turntables and to reduce unwanted system noise There are many variations of these setups Find the best setup that works for your mixing style by experimenting with different t...

Page 7: ...are aligned parallel with the front of the turntable 3 Install the platter onto the center spindle and motor assembly making sure that the Numark logo and the two holes are aligned parallel with the...

Page 8: ...the ground screw against the ground clip so that the cable exits towards the IEC Power Terminal 3 Next connect the Red Right Angle RCA Plug to the Red RCA jack with the R indication 4 Then connect th...

Page 9: ...erweight in its new position further away from tone arm pivot point grasp the scale ring of the counter weight and rotate it until 0 is in the vertical position 5 Finally rotate the counterweight and...

Page 10: ...t both screws are aligned with the optimum position mark on the Head shell Numark HS 1 Head shell and Numark Cartridges only Moving the both screws to a mark away from the optimum position indicated o...

Page 11: ...Cue Lever then position the tone arm over the desired groove of the record and finally lower the Cue Lever to slowly drop the tone arm onto the record 4 Always secure the tone arm using the Arm Clip w...

Page 12: ...de of the packing Failure to do so will result in merchandise return d include purchaser s sales receipt or comparable proof of sale showing the date of purchase the serial number of the product and t...

Page 13: ...transit and therefore jeopardize the customer s warranty e Numark will not accept COD shipments and no call tags will be issued for merchandise return f Numark will not return repaired merchandise to...

Page 14: ...r Aluminum Diecast Speed 33 333 and 45 RPM Wow Flutter 0 25 WRM S N ratio 50dB Pitch Range 10 Tonearm Section Type Universal S Shaped Aluminum Height Range Fixed Cue System Lift Lever Arm Rest and and...

Page 15: ...s frequently connected and disconnected it may have become damaged and needs to be replaced The output sound is very distorted The Cartridge is not properly wired NOTE Static electricity and or other...

Page 16: ...Copyright Numark Industries LLC 2002 TT 1600 TT 1650 Manual English rev B...

Reviews: