


1
This Quickstart Guide explains how to quickly setup and begin using the NuVJ software and
controller. If you just cannot wait to begin using NuVJ, please take a few minutes to go through this
Quickstart and get familiar with some of the basic controls. However, we highly recommend reading
the Reference Manual in its entirety in order to fully understand and enjoy NuVJ. The Reference
Manual explains many features which may not be immediately obvious and which are not covered in
this Quickstart Guide, but which are necessary if you want to get the most out of NuVJ. Happy VJing!
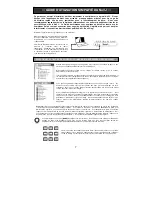
First, install the NuVJ software on your computer
by inserting the included CD-ROM and running
the NuVJ installation file.
Then, connect the NuVJ controller to your
computer’s USB port, using the included USB
cable (as shown here). The controller will be
powered through the USB connection.
Lastly, launch the NuVJ application. Please make sure that you always connect the controller before launching the application.
Otherwise, it will not function. If you disconnect and reconnect the controller while the NuVJ software is running, you will have
to restart the application.
Use the browser on the left side of the software to find video clips, images, or photos that you
would like to use in your performance.
Drag and drop a few visuals onto some of the cells on each deck (there are 9 cells available
for each deck).
You may also drag and drop files directly from your Explorer/Finder, as long as the file
formats are compatible with the NuVJ. (Please refer to the Reference Manual for
compatibility and performance discussion)
You can also drag and drop a variety of different ‘sources’ onto each cell. Sources are video
files, except they do not reside in a physical file on your computer. Instead, sources are
algorithm-driven visuals which you can use in very much the same ways that you can use
video clips and images.
You will also notice the “Live Inputs” category in the “Sources” menu. This is where any
additional inputs (such as webcams and other video source inputs) will be listed. NuVJ
allows you to use these inputs as part of your performance, just as you would a video clip or
image. If you would like to use one of the “Live Inputs” in your performance, please drag it to
an available cell.
Please note: If you have installed Logitech Quickcam drivers, your computer will not be able to properly recognize many
MIDI devices, including the NuVJ. To use the controller, you will need to uninstall the Logitech Quickcam driver. The
controller will then be able to function properly. To uninstall the driver, you need to right-click on My Computer, then
Properties -> Hardware -> Device Manager. This allows you to see all the devices installed on your machine. Find the
Logitech Quickcam device, right-click it and select “Uninstall”. This will uninstall the device and its driver.
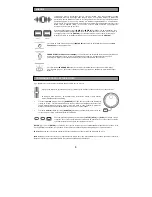
You will also notice a
[BANK]
knob on each side of the controller. This knob can be used to switch to a different
bank of pads, which means that you have access to over 144 video cells that you can use in your performance. As
you turn the
[BANK]
knob to the left or the right, you will step through different banks of video cells for the deck.
Once you have dragged a few clips onto the cells, you can trigger each clip or image
by pressing its corresponding
pad
on the controller. The clip or image that is currently
playing on the deck will be visible in the deck preview window.
::: NuVJ QUICKSTART :::
LOADING AND TRIGGERING VIDEO CLIPS, IMAGES AND LIVE VIDEO INPUTS
Summary of Contents for NuVJ
Page 17: ...www numark com...