QUICK START OWNERS MANUAL
(ENGLISH)
1.
Make sure all items listed on the front of this guide are included in the box.
2.
READ SAFETY INSTRUCTION BOOKLET BEFORE USING THE PRODUCT
3.
Place unit in an appropriate position for operation.
4.
Plug your unit into AC power.
5.
Go to
http://www.numark.com
for product registration.
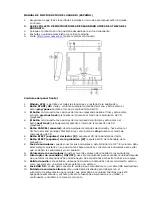
Front Panel Controls
1.
LCD module
- allows you to see all functions and copying status.
2.
START/OK button
– initiates and confirms any menu command and acts as the
[play/pause] button during CD play mode.
3.
<< button
– pages backwards through the menu options and acts as the
[previous track] button during CD playback mode.
4.
>> button
– pages forwards through the menu options and acts as the [next
track] button during CD playback mode.
5.
CANCEL button
– aborts any selected command and returns the CD Twin back
to the main menu. Also, acts as the [stop] button during CD playback mode.
6.
Reader EJECT button [R]-
ejects the CD in the Reader drive.
7.
Writer EJECT button [W]-
ejects the CD in the Writer drive.
8.
Headphone Jack
- Your headphones can be connected to this 1/8” terminal.
The volume should always be set at its lowest setting while connecting and
disconnecting headphones to prevent damage to headphones and/or your
hearing
.
9.
Headphone Volume
- Adjusts the volume level of the headphone output.
10.
Power ON/OFF Switch
– Use this switch to turn on the unit after all devices
are already connected to prevent damage to your equipment.
11.
Audio Output -
This output is for connecting an external monitoring device such
as an amplified speaker system or a home stereo.
12.
USB 2.0 Jack
– Used for connecting the unit to your computer with the supplied
USB cable.
13.
AC input -
This unit is designed to work with the power supply assembly that
comes with the unit. While the power is switched off, plug the power supply into
the unit first, then plug it into the outlet.
Summary of Contents for CD2CD
Page 17: ......


