MAN149 Rev Date 4/3/2014
ST-C6USBH(E)-HDBT
328 FOOT HDMI USB KVM Extender over
HDBaseT
Installation and Operation Manual
XTENDEX
®
Series
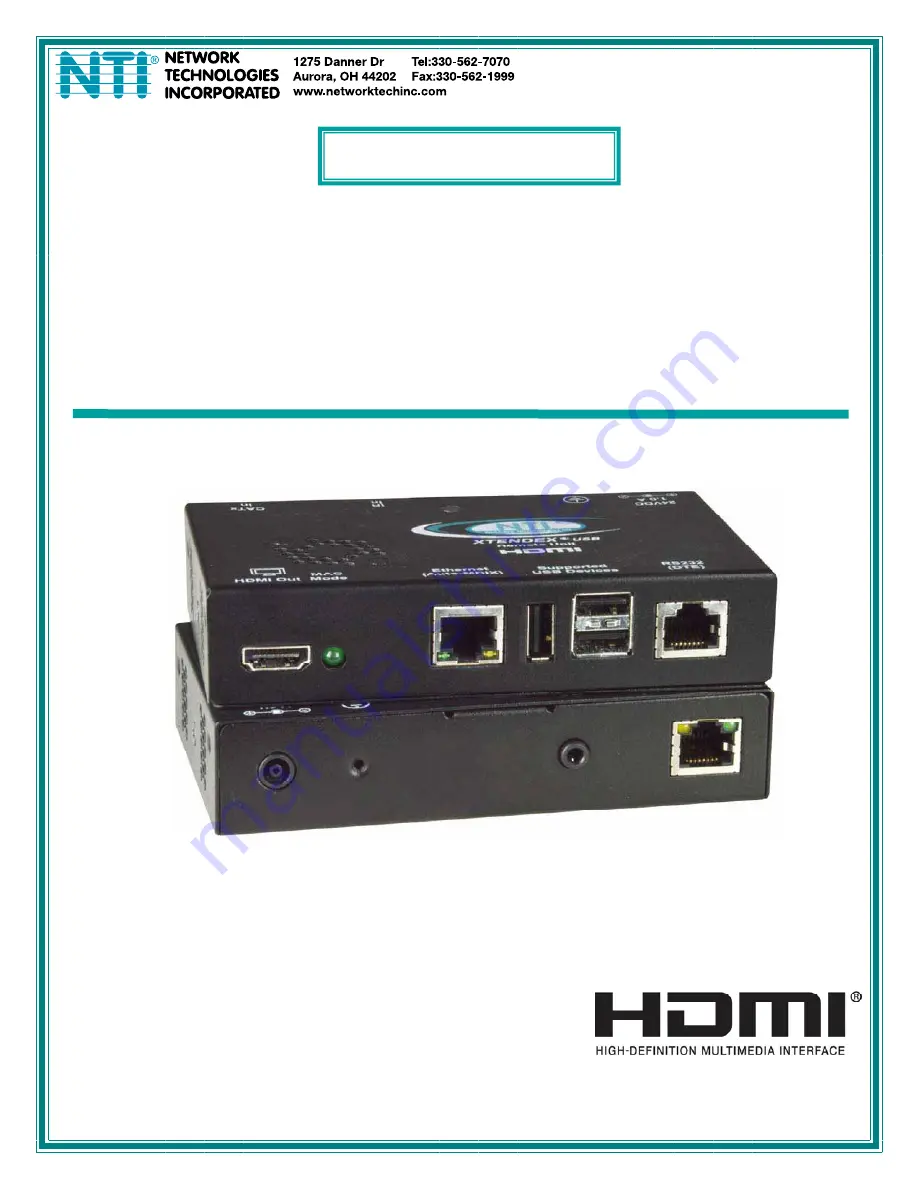
ST-C6USBHE-HDBT Remote and Local Unit
Page 1: ...MAN149 Rev Date 4 3 2014 ST C6USBH E HDBT 328 FOOT HDMI USB KVM Extender over HDBaseT Installation and Operation Manual XTENDEX Series ST C6USBHE HDBT Remote and Local Unit ...
Page 2: ...ation only and is subject to change without notice Network Technologies Inc reserves the right to make changes in the product design without reservation and without notification to its users Note CATx connection cable used between NTI XTENDEX Series Local and Remote or any XTENDEX Series products should not be run underground outdoors or between buildings WARNING Outdoor or underground runs of CAT...
Page 3: ...12 Upgrade the Local Controller Firmware 12 Upgrade the Remote Controller Firmware 13 Technical Specifications 15 Interconnection Cable Wiring Method 15 Troubleshooting 17 Warranty Information 17 TABLE OF FIGURES Figure 1 Connect the XTENDEX Local Unit to the computer 5 Figure 2 Connect the extended components to the Remote Unit 6 Figure 3 Connect CATx cable 7 Figure 4 Connect the AC adapter to ei...
Page 4: ...1200 Only one power supply is necessary to power both the local and remote units HDMI features supported o x v Color sYCC601 color Adobe RGB Color and Adobe YCC601 color o Dolby TrueHD DTS HD Master Audio Dolby Digital and DTS o Bandwidth up to 154 MHz 3 76Gbps o Support for CEC consumer electronic control compatible devices o Lip Sync HDCP compliant Supports the DDC2B protocol Full Infrared Remot...
Page 5: ...anual Additional materials may be required but are not supplied CAT5e solid UTP 6 6a solid UTP CAT7 solid STP CATx twisted pair cables terminated with RJ45 connectors wired straight thru pin 1 to pin 1 etc see page 15 for proper EIA TIA 568 B wiring method HDMI male male cable to connect a HDMI source or display Order NTI HD xx MM where xx 3 6 9 14 20 30 50 and 100 foot cable DVI D male to HDMI A ...
Page 6: ... HDMI cable between the Local Unit and the CPU 6 Ethernet RJ45 connector for connecting cable to either the LAN or an extended Ethernet connected device model with 100BaseT support only 7 USB to CPU USB Type B for connecting USB device cable from CPU 8 RS232 DCE RJ45 connector for connecting serial cable from CPU 9 IR In 3 5mm Stereo Jack for connecting the IR Receiver 10 HDMI Out HDMI female vide...
Page 7: ...ical interference that might reduce the quality of the video signal i e AC motors welding equipment fluorescent lighting etc All cables should be installed in such a way that they do not cause stress on their connections to the equipment Extended lengths of cable hanging from a connection may interfere with the quality of that connection Secure cables as needed to minimize this Properly shut down ...
Page 8: ... connect the DB9F to RJ45 adapter to the CPU and a CATx patch cable between the adapter and the RS232 port on the Local Unit Figure 1 Connect the XTENDEX Local Unit to the computer 100BaseT Support Option If the 100BaseT support option is present ST C6USBHE HDBT only the Ethernet Port can be used to extend a Local or Wide Area Network LAN WAN connection The Local or Remote unit can be used to conn...
Page 9: ...led HDMI Out on the Remote Unit 3 Connect the keyboard mouse and any other supported device to the USB Type A connectors on the Remote Unit Other supported devices include a touchscreen monitor CAC card reader or interactive whiteboard 4 If the monitor has serial touchscreen support connect the DB9M to RJ45 adapter supplied to the monitor and a CATx patch cable between the adapter and the RS232 po...
Page 10: ...or into the power outlet 2 Connect an AC adapter power connector to the 24VDC port on either the Remote Unit or the Local Unit Plug the AC adapter into a power outlet The green LED on the RJ45 connector of both the Remote and Local Units should illuminate indicating that a proper power connection has been made to them See Figure 4 The yellow LED will illuminate indicating communication between the...
Page 11: ...R OUT port on the Local unit Position the end of the receiver such that the signal from the remote control can easily reach the IR sensor Position the end of the emitter such that the extended signal can be sent to the signal source Figure 5 Connect IR Emitter and Receiver 3 5MM Mono Plug IR Emitter 3 5MM Stereo Plug IR Receiver IR RCVR 3 IR EMTR 3 Note The IR Emitter and Receiver work within a fr...
Page 12: ... Mode should be OFF the default setting To do this 1 Enter Command Mode Simultaneously press the left and right Shift keys on the keyboard The keyboard LEDs will illuminate 2 If a MAC CPU is connected press the M key The keyboard LEDs will momentarily flash and the MAC LED on the Remote Unit will illuminate to indicate MAC Mode is ON See Figure 6 3 To reconnect the XTENDEX to a SUN or Windows CPU ...
Page 13: ...upgraded with a binary file named c6usbvhe rcsx x bin The XTENDEX firmware has a bootloader which can be used for firmware upgrades The bootloader resides in a protected area of Flash memory so that if the upgrade fails for any reason the bootloader will still be available to be used to re program the entire unit Upgrades are made to the Local Controller Local Port Controller or Remote Controller ...
Page 14: ...ch cable to the FIRMWARE UPGRADE port on the Local Unit attach the supplied DB9F to RJ45 adapter to the patch cable and connect the DB9 adapter to an available COM port on the PC Figure 7 Connect PC for firmware upgrade 2 Power ON the computer only Open the terminal console and apply the following settings to the terminal console for the port connected to the XTENDEX Baud rate 57600 Data bits 8 Pa...
Page 15: ...s h H Display list of commands x X Exit Bootloader u U Upgrade Local controller firmware p P Upgrade Local port controller firmware r R Upgrade Remote controller firmware s S Read Checksum of the Local port controller firmware To proceed to upgrade the Local controller press u from Terminal window The following message should appear on the screen Erasing flash memory Memory successfully erased Sen...
Page 16: ...rade the Remote Controller Firmware The Remote controller firmware comes as a file in binary format and has the extension bin i e filename bin To upgrade the Remote controller to this file follow this procedure 1 With the power supply still connected to the Local Unit unplug the CAT6 cable between the Local and Remote Unit 2 Press and hold the Tab key on the keyboard while in the HyperTerminal win...
Page 17: ...e Menu Bar of the HyperTerminal window 2 click the item Send File 3 in the dialog box which pops up on the screen browse for the file to be sent and select it 4 select Xmodem from the Protocol drop down menu 5 press Send button The transmission will start shortly Wait until the transmission is finished There will be some pauses during transmission since the processor writes blocks of 4KB When the ...
Page 18: ...AT5e solid UTP CAT6 6a Solid UTP CAT7 Solid STP EIA TIA 568 B wiring with male RJ45 connectors CATx Cable Range 328 ft maximum Operating Temperature 0 50º C Operating Humidity Range 5 to 90 non condensing RH Remote Unit Power 100V to 240VAC at 50 or 60Hz 24VDC 2 5A via AC Adapter Enclosure type Electro galvanized steel black powder coated Size In WxDxH 6 06x3 05x1 08 Compliance Certifications CE R...
Page 19: ...TANCE feet Solid UTP 24 300 Stranded UTP 24 200 Solid STP 24 250 CAT5e Stranded STP 24 250 Solid UTP 23 328 Stranded UTP 24 200 Solid STP 23 328 CAT6 Stranded STP 24 150 CAT6a Solid UTP 23 328 Solid STP 23 328 CAT7 Stranded STP 26 300 Note Results may vary with cable quality Recommended Use Solid 23AWG Cat6 or better cable for best results ...
Page 20: ...io source Make sure Traffic LED on local and remote is illuminated Make sure they are snapped in properly and completely and reboot Switch to shorter cable or lower resolution maximum length is 328 feet Video Picture is noisy All Video Cables are not firmly seated CATx cable is too long HDMI DVI cable is too long The CATx cable is not properly connected CATx cable is poor quality for the length of...