iii
TABLE OF FIGURES
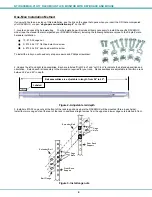
Figure 1- Mount RACKMUX to a standard rack ................................................................................................................................. 3
Figure 2- Adjustable rail depth ........................................................................................................................................................... 4
Figure 3- Install cage nuts.................................................................................................................................................................. 4
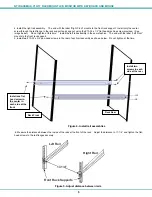
Figure 4- Install rail assemblies ......................................................................................................................................................... 5
Figure 5- Adjust distance between rails ............................................................................................................................................. 5
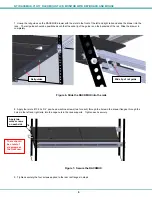
Figure 6- Slide the RACKMUX into the rails ...................................................................................................................................... 6
Figure 7- Secure the RACKMUX ....................................................................................................................................................... 6
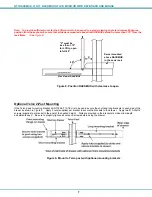
Figure 8- Position RACKMUX with clearance to open ....................................................................................................................... 7
Figure 9- Mount to Telco post with optional mounting brackets ......................................................................................................... 7
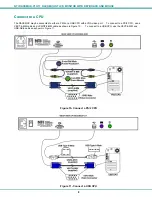
Figure 10- Connect a PS/2 CPU ........................................................................................................................................................ 8
Figure 11- Connect a USB CPU ........................................................................................................................................................ 8
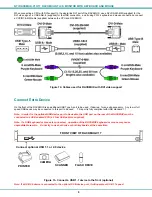
Figure 12- Cables used for RACKMUX with DVI video support......................................................................................................... 9
Figure 13- Connect a USB 1.1 device to the front (optional).............................................................................................................. 9
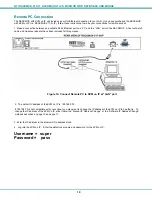
Figure 14- Connect Remote PC to KVM on IP at "LAN" port ........................................................................................................... 10
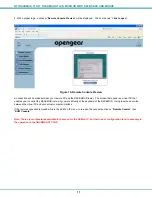
Figure 15- Remote Console Preview ............................................................................................................................................... 11
Figure 16- Login Screen for KVM on IP ........................................................................................................................................... 12
Figure 17- Network Configuration screen ........................................................................................................................................ 12
Figure 18- Connect the power cord ................................................................................................................................................. 14
Figure 19- DC Power Option Terminal Block ................................................................................................................................... 14
Figure 20- OSD Controls ................................................................................................................................................................. 15
Figure 21- US(English) Keyboard Layout ........................................................................................................................................ 21
Figure 22- Keyboard LED Indications .............................................................................................................................................. 21
Figure 23- Keys of the Number Pad ................................................................................................................................................ 23
Figure 24- Additional multi-function keys ......................................................................................................................................... 23
Figure 25- U.S. (English) keyboard with numeric keypad ................................................................................................................ 24
Figure 26- U.K. (English) keyboard with numeric keypad ................................................................................................................ 24
Figure 27- German keyboard with numeric keypad ......................................................................................................................... 25


