background image


                                  Nowy Styl 

-

 eUP 3 EN 

-

 DE 

-

 PL                                                    


20


EN


DE


Die Richtige Sitzhaltung


Falsches Sitzen kann zu gesundheit-
lichen Schäden an Gelenken, Seh-
nen und Muskeln führen. Um dies 
zu vermeiden, müssen Schreibtisch 
und Bürostuhl eingestellt werden. 


Unabhängig von den nachfolgen-
den Hinweisen ist eine unbequeme 
Sitzhaltung zu vermeiden. Sollten 
sie feststellen, dass der eine oder 
andere Hinweis zu einer für sie un-
bequemen Sitzhaltung führt, pas-
sen sie die Positionierung einfach 
ihren Bedürfnissen an.


Bürostuhl


• 

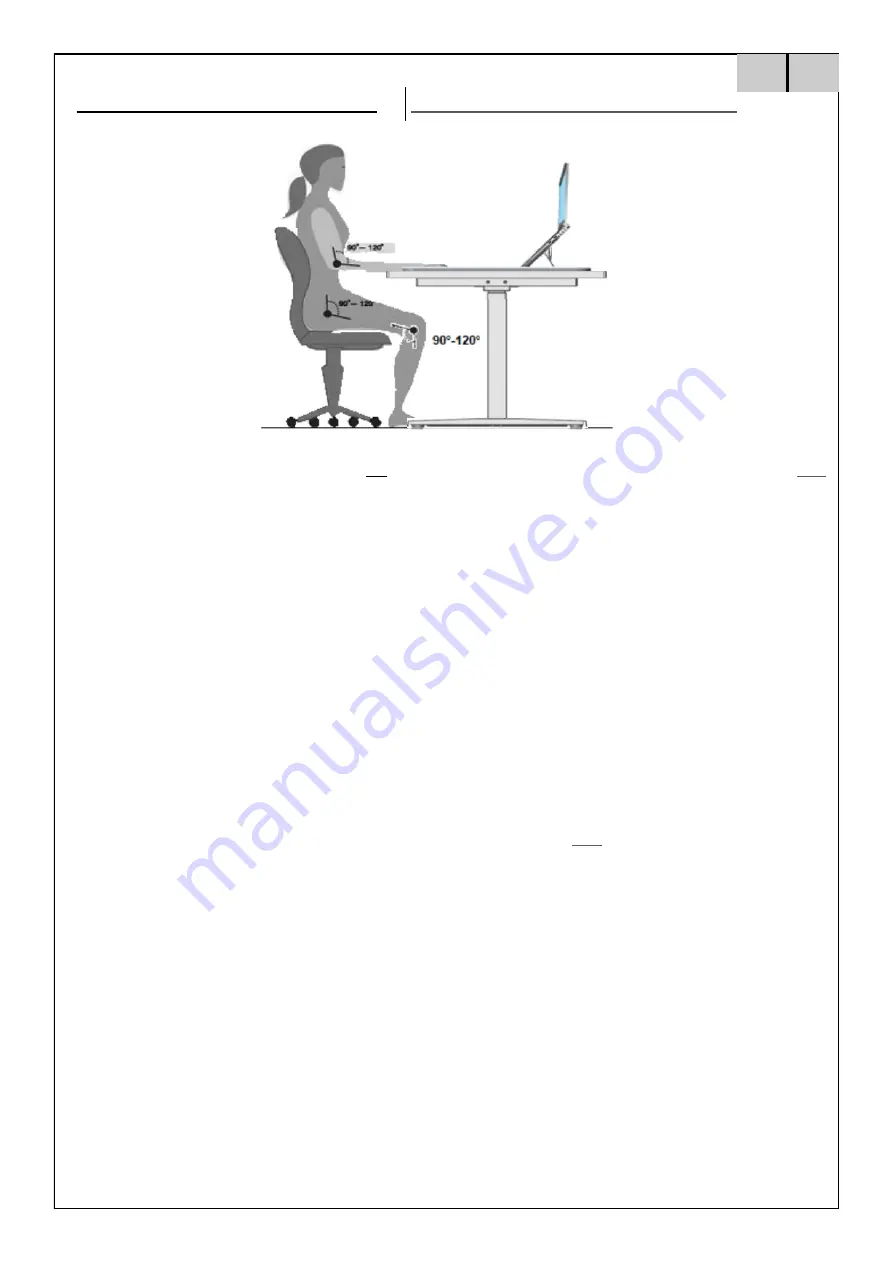
Stellen sie die Sitzhöhe so ein, dass ihre Knie jeweils einen 
Winkel von 90° bis 120° haben, wenn ihre Füße dabei flach 
auf dem Boden stehen.


• 

Eine optimale Sitzhaltung ergibt sich, wenn ihr Gesäß an der 
Rückenlehne anliegt. Stellen sie die Sitztiefe so ein, dass die 
Kante der Sitzfläche nicht gegen ihre Unterschenkel drückt.


• 

Sitzen sie aufrecht und lehnen sie sich dabei entspannt ge-
gen die Rückenlehne. Sofern möglich, stellen sie die Lordo-
senstütze des Stuhls auf Ihre Körpergröße ein. 


Die Rückenlehne sollte so eingestellt werden, dass ihr 


Oberkörper leicht nach vorne gedrückt wird, jedoch 


           flexibel ihren Bewegungen nachgeben kann.


• 

Wenn möglich, stellen sie die Armlehnen so ein, dass ihre 
Schultern entspannt sind, wenn die Unterarme aufliegen. 


Schreibtisch


• 

Passen sie die Schreibtischhöhe erst dann an, wenn sie die 
korrekte Sitzposition gefunden haben.


• 

Ihre Ellenbogen sollten einen Winkel von 90° 

-

 120° haben, 

wenn ihre Unterarme auf der Tischplatte liegen. Die Tisch-
kante darf dabei nicht gegen ihre Unterarme drücken.


Arbeitsgeräte auf der Tischplatte


• 

Einfallendes Licht auf ihren Monitor (Fenster oder Leucht-
mittel) sollte in einem Winkel von 90° auf die Bildschirm-
oberfläche fallen.


• 

Die Monitorhöhe ist so einzurichten, dass ihr Blick zur Bild-
schirmmitte leicht abwärts gerichtet ist.


• 

Halten sie ca. 60 

-

 70 cm Distanz zu ihrem Monitor


• 

Eine schonende Handgelenkhaltung erhalten sie, wenn die 
Tastatur möglichst flach aufliegt


• 

Beachten Sie die Hinweise in den Anleitungen ihrer weite-
ren (ergonomischen) Arbeitsgeräte.


Correct siting posture


Sitting incorrectly can lead 

to injuries at joints, bow-
strings and muscles. In 
order to prevent this it is 
necessary to adjust your 
office chair and desk. 
Apart from the following 
advise you should always 
prevent an uncomforta-
ble sitting posture. If you 
feel that the following 
advices leads you to an 
uncomfortable sitting 
posture simply adapt 
your needs.


Office Chair


• 

The sitting height has to be adjusted in way that your 
knee is angled by 90

-

120° when your foot is flat on the 

ground.


• 

Sitting properly requires that your lower back touches 
the back rest. If possible align the seating depth in order 
to avoid pressure from the seat pan to your lower leg 


• 

Sit upright but lean back in a relaxed position. If possible 
adjust the lumbar support of your chair to your height. 
Adjust the back rest in a way that pushes your upper 
body slightly forward but still offering enough flexibility 
to yield 


movement.


• 

If possible adjust the height of your armrests. Your 
shoulders should be in a relaxed position when your 
arms are touching the arm rest.  


Desk


• 

Adjust the table height after you have found your cor-
rect sitting posture


• 

Your elbows should be angled by 90

-

120° when your 

arms rest on the table top. The edge of the top should 
not press against your arms.


Equipment on the desk


• 

Incident light (day light or lamps) on your monitor 
should approach the surface of your screen by an angle 
of 90°.


• 

The height of your monitor should be adjusted in way 
that enables you to look slightly downward while focus-
ing the centre of your screen.


• 

Please keep a distance of 60

-

70 cm from your screen


• 

A careful posture for your wrists can be achieved by a 
flat narrowed keyboard.


• 

Please heed the advice in the manuals of your further 
(ergonomical) equipment.


Guide: Ergonomic sitting posture


Ratgeber: ergonomische Sitzhaltung


Summary of Contents for eUP 3

Page 1: ...umna trzysegmentowa NSG BASIC 02 EUP 3 EN DE PL2021 03 17 EN Operating and Assembly Manual Read this manual thoroughly and store in a safe place DE Betriebs und Montageanleitung Bitte sorgf ltig lesen...

Page 2: ...tact data 23 Recycling 23 RECYCLING 23 Decomissioning 23 Disassembly 23 DisposalEntsorgung 23 DECLARATION OF CONFORMITY 44 GENERAL 3 Importance of this manual 3 Proper use 3 Improper use 3 Laws direct...

Page 3: ...hen dem Ger t und Empf nger Verbinden Sie das Ger t mit einer Steckdose eines anderen Stromkreises an dem der Empf nger nicht angeschlossen ist Bitten Sie den Fachh ndler oder einen erfahrenen Ra dio...

Page 4: ...ied Do not drag or pull the HAT over the floor You need a Phillips screwdriver for mounting Assemble the workstation Table with the supplied Allen Key They are the only tools which ensure that the All...

Page 5: ...rst wieder nach erfolgter Reparatur in Betrieb Nehmen Sie das Tischgestell sofort au er Betrieb wenn ungew hnliche Vorkommnisse Ger usche Qualm Rauch usw am Tischgestell entstehen sollten Lassen Sie d...

Page 6: ...gsanleitung PDF ist ber unseren Kundendienst erh ltlich ACHTUNG Jegliche nicht ausdr cklich durch den Her steller erlaubte Ver nderungen oder Modifikationen f hren zum Erl schen der Garantie und das G...

Page 7: ...ools Werkzeuge Mounting Hardware Kit Beschlagbeutel 14 1x SW5 3 2 2x 2x 4 2x 5 2x 6 1x 7 4x 8 2x 2x 1 2x 12 9 6x 2x 10 1x 11 M10x25 M6x15 5x25 M6x15 3 5x16 3x20 5x20 You need a Phillips screwdriver PZ...

Page 8: ...PL 8 Feet assembly Montage der Kufen EN DE The long side of the foot is poiting in the same direction with the long side of top sup ports Der lange Schenkel der Kufe zeigt in Richtung des langen Platt...

Page 9: ...ssary to go thue the holes ATTENTION Only insert the plastic sleeves H after you adjusted the length Fix the components with the screws C Bitte beachten Sie bei der Tischbreite von 120 cm bevor Sie di...

Page 10: ...necessary to go thue the holes ATTENTION Only insert the plastic sleeves H after you adjusted the length Fix the components with the screws C Bitte beachten Sie bei einer Tischbreite von 120 cm bevor...

Page 11: ...table before the table top is mounted Note The center piece part 8 is not necessa ry with a table length of 120 cm Bitte beachten Sie dass die Schrauben noch nicht fest angezogen werden Schrauben A da...

Page 12: ...Nowy Styl eUP 3 EN DE PL 12 Table top assembly Montage der Tischplatte EN DE 6 9 D H 2 D...

Page 13: ...Nowy Styl eUP 3 EN DE PL 13 Control box assembly Montage der Steuereinheit EN DE 7 6 G 13 E...

Page 14: ...n Sie unbedingt dass ihr Tischgestell h henverstellbar ist Die Kabel der elektri schen Komponenten d rfen w hrend der H henverstellung nicht eingeschr nkt sein und m ssen der maximalen Verstellh he fo...

Page 15: ...ight in centimeters or inches if your system uses the imperial number system Touch and hold S directly followed by UP for about 6 seconds The first number starts blinking Release both buttons and pres...

Page 16: ...at the stop points are removed and the full stroke of the table can be used again Release the keys The setting is saved and the process is now complete Setting the sensitivity of the orientation senso...

Page 17: ...Zahlentaste nun fest gespeichert Anzeige im Display mit der Tischh he vergleichen Zun chst die Tischh he beliebig einstellen empfohlen wird die unterste Position Messen Sie die tats chliche Tischh he...

Page 18: ...ie Tasten los Einstellung ist gespeichert und der Vorgang ist jetzt abgeschlossen Einstellung der Empfindlichkeit des Lageerkennungssensor Der Lageerkennungssensor dient als verbesserter Kollisionssen...

Page 19: ...nge 120 cm x Width Breite 80 cm Length L nge 140 cm x Width Breite 80 cm Length L nge 160 cm x Width Breite 80 cm Length L nge 180 cm x Width Breite 90 cm Only 160 cm 180 cm tables meet the requireme...

Page 20: ...onitor Eine schonende Handgelenkhaltung erhalten sie wenn die Tastatur m glichst flach aufliegt Beachten Sie die Hinweise in den Anleitungen ihrer weite ren ergonomischen Arbeitsger te Correct siting...

Page 21: ...ast 36 mm s Input power Eingangsspannung 230 V 50 60 Hz 400 VA Duty cycle Nutzungszyklus 10 1 minute on 9 minutes off 10 1 Minuten an 9 Minuten aus Durability Lebensdauer 10 000 Cycles average use 10...

Page 22: ...Hub 65 cm Table Width Tischbreite 120 180 cm Feet Width Kufenbreite 73 8 cm Minimum Table Top Depth Mindesttiefe einer Tischplatte 80 cm Maximum Table Top Depth Maximaltiefe einer Tischplatte 90 cm Ma...

Page 23: ...Leave the immediate surroundings of the office table at once if it starts to move spontaneously Under no circum stances attempt to operate the office table Have the office table repaired by specialist...

Page 24: ...umweltgerecht Bitte nationale Vorschriften beachten Taking the office Table out of active duty Pull the power plug out of the electricity socket Taking the office Table apart In case of de assembling...

Page 25: ...u zakaz wprowadzania jakichkolwiek modyfikacji element w sto u Korzystanie niezgodnie z przeznaczeniem Nigdy nie nale y korzysta ze sto u do podnoszenia os b ani adunk w St mo na obci a wy cznie do os...

Page 26: ...przechowywa w pobli u miejsca korzystania ze sto u Wskaz wki dotycz ce monta u Monta lub prace przy stole mog wykonywa wy cznie osoby kt re uko czy y 16 rok ycia Monta y ci musz zapozna si z Instrukc...

Page 27: ...ze stwa np panel sterowania nie b d funkcjonowa y prawid owo Utrzymanie i konserwacja Nale y zadba o to by produkt zawsze znajdowa si w nienagannym stanie W razie potrzeby nale y zleca przeprowadzanie...

Page 28: ...ta owy 14 1x SW5 3 2 2x 2x 4 2x 5 2x 6 1x 7 4x 8 2x 2x 1 2x 12 9 6x 2x 10 1x 11 M10x25 M6x15 5x25 3 5x16 3x20 5x20 A12x B 8x C12x D22x E 2x F 10x G3x H 22x x I 4x J 10x 1x 13 Do wykonania monta u niez...

Page 29: ...Nowy Styl eUP 3 EN DE PL 29 Monta stopy PL 1 12 B 5 14 D u sza kraw d stopy ustawiona w tym samym kierunku co wspornik blatu...

Page 30: ...nich ceownik Przy szeroko ci blatu 120 cm otwory przelotowe w ceowniku musz znajdowa si w lini z oboma otworami ramy W przypadku blat w o szeroko ci 160 cm i wi kszych element z tworzywa H nie musi p...

Page 31: ...sun do nich ceownik Przy szeroko ci blatu 120 cm otwory przelotowe w ceowniku musz znajdowa si w lini z oboma otworami ramy W przypadku blat w o szeroko ci 160 cm i wi kszych element z tworzywa H nie...

Page 32: ...E PL 32 Monta ramy PL 5 1 4 8 A A Nie nale y dokr ca rub zbyt mocno ruby A by umo liwi dopasowanie ramy przed zamocowaniem blatu sto u Uwaga Element rodkowy cz nr 8 w przypadku sto w o szeroko ci 120...

Page 33: ...Nowy Styl eUP 3 EN DE PL 33 Monta blatu PL 6 9 D H 2 D...

Page 34: ...Nowy Styl eUP 3 EN DE PL 34 Monta sterownika PL 7 6 G 13 E...

Page 35: ...regulacj wysoko ci Okablowanie komponent w elektrycznych podczas regulowania wysoko ci nie mo e by niczym ograniczone i musi porusza si swobodnie a do osi gni cia maksymalnej wysoko ci sto u Nale y za...

Page 36: ...nij przycisk S Wy wietlacz zacznie miga w wczas w ci gu 6 sekund nale y wcisn przyciski 1 2 lub 3 a dana pozycja zostanie zapisana pod wybranym numerem Por wnanie danych z wy wietlacza z wysoko ci rz...

Page 37: ...cone Odblokowanie zatrzymania w wymaganym najni szym po o eniu Wci nij i przytrzymaj przycisk S nast pnie dodatkowo wci nij i przytrzymaj przycisk 2 przez ok 6 sekund dop ki na wy wietlaczu nie pojawi...

Page 38: ...L Urz dzenie steruj ce Blat D ugo 120 cm x Szeroko 80 cm D ugo 140 cm x Szeroko 80 cm D ugo 160 cm x Szeroko 80 cm D ugo 180 cm x Szeroko 90 cm Tylko sto y o szeroko ci 160 cm 180 cm spe niaj wymogi d...

Page 39: ...owanej swobodnie opieraj c si o oparcie O ile to mo liwe nale y dostosowa podparcie l d wi do wzrostu u ytkownika Oparcie nale y ustawi w spos b zapewniaj cy lekkie nachylenie tu owia ku przodowi przy...

Page 40: ...ci enia 38 mm s Pr dko przy obci eniu 80 kg 36 mm s Napi cie wej ciowe 230 V 50 60 Hz 400 VA Cykl u ytkowania 10 1 minuta w czenie 9 minut wy czenie Okres u ytkowania 10 000 cykl w Poziom ha asu 42 dB...

Page 41: ...atu 62 cm Maks wysoko blatu 127 cm Skok 65 cm Szeroko blatu 120 180 cm Szeroko stopy 73 8 cm Min g boko blatu 80 cm Maks g boko blatu 90 cm Maks dopuszczalne obci enie blatu 80 0 kg og lny zakres tole...

Page 42: ...mierci dziecka Nie nale y przekracza maksymalnego dopuszczalnego czasu w czenia sto u wynosz cego 1 minut Nale y upewni si e wok sto u znajduje si wystarczaj co du o miejsca by unikn kolizji Dotyczy...

Page 43: ...y zdemontowa st nale y post powa zgodnie z instrukcj lecz w odwrotnej kolejno ci Utylizacja Podczas demonta u sto u nale y segregowa poszczeg lne materia y i podda je utylizacji zgodnie z przepisami o...

Page 44: ...Nowy Styl eUP 3 EN DE PL 44...

Reviews: