


N1100 Controller
NOVUS AUTOMATION
10/11
CALIBRATION OF THE INPUT
All inputs are factory calibrated and recalibration should only be done
by qualified personnel. If you are not familiar with these procedures
do not attempt to calibrate this instrument.
The calibration steps are:
a) Configure the type of input to be calibrated.
b) Configure the lower and upper limits of indication for the
maximum span of the selected input type.
c) At the input terminals inject a signal corresponding to a known
indication value a little above the lower display limit.
d) Access the parameter “
inLC
”. With the keys
and
, adjust
the display reading such as to match the applied signal. Then
press the
P
key.
e) Inject a signal that corresponds to a value a little lower than the
upper limit of indication.
f) Access the parameter “
inkC
”. With the keys
and
, adjust
the display reading such as to match the applied signal. Then
press the
P
key.
Note: When checking the controller calibration with a Pt100
simulator, pay attention to the simulator minimum excitation current
requirement, which may not be compatible with the 0.170 mA
excitation current provided by the controller.
REMOTE SETPOINT CALIBRATION
All inputs are factory calibrated and recalibration should only be done
by qualified personnel. If you are unfamiliar with these procedures do
not attempt to calibrate this instrument.
If the recalibration or the remote Setpoint is required, proceed as
follows.
a) Configure the remote Setpoint type to be calibrated.
b) Program the low and high limits of the remote Setpoint to the
minimum and maximum values respectively.
c) Apply to the remote Setpoint input a known signal that is slightly
above the low limit of that input.
d) At the parameter “
rsL(
” use the
and
keys to show in
the display the corresponding value of the applied signal. Then
press the
P
key.
e) Apply to the remote Setpoint input a known signal that is slightly
below the high limit of that input.
f) At the parameter “
rsk(
” use the
and
keys to show in the
display the corresponding value of the applied signal. Then press
the
P
key.
ANALOG OUTPUT CALIBRATION
•
Configure I/O 5 for the current output to be calibrated, be it control
or retransmission.
•
In the screen “
Ctrl
”, program manual mode (
man
).
•
Connect a current meter at the analog output.
•
Enter the calibration cycle with the correct password.
•
Select the screen “
ovLC
”. Press the
and
keys for the
controller to recognize the calibration process of the current
output.
•
Read the current indicated on the current meter and adjust the
parameter “
ovLC
” to indicate this current value (use the
and
keys)
•
Select the screen “
ovxC
”. Press the
and
keys for the
controller to recognize the calibration process of the current
output.
•
Read the current indicated on the current meter and adjust the
parameter “
ovxC
” to indicate this current value
•
Press the key in order to confirm the calibration procedure and
return to the operating level.
SERIAL COMMUNICATION
The controller can be supplied with an asynchronous RS-485 digital
communication interface for master-slave connection to a host
computer (master).
The controller works as a slave only and all commands are started by
the computer which sends a request to the slave address. The
addressed unit sends back the requested reply.
Broadcast commands (addressed to all indicator units in a multi drop
network) are accepted but no reply is sent back in this case.
CHARACTERISTICS
•
Signals compatible with RS-485 standard. MODBUS (RTU)
Protocol. Two wire connection between 1 master and up to 31
(addressing up to 247 possible) instruments in bus topology. The
communication signals are electrically insulated from the rest of
the device;
•
Maximum connection distance: 1000 meters.
•
Time of disconnection for the controller: Maximum 2 ms after last
byte.
•
Selectable speed; 8 data bits; 1 stop bit; selectable parity (no
parity, pair or odd);
•
Time at the beginning of response transmission: maximum 100
ms after receiving the command.
•
There is no electrical isolation between serial communication
(RS485) and channel I/O5
The RS-485 signals are:
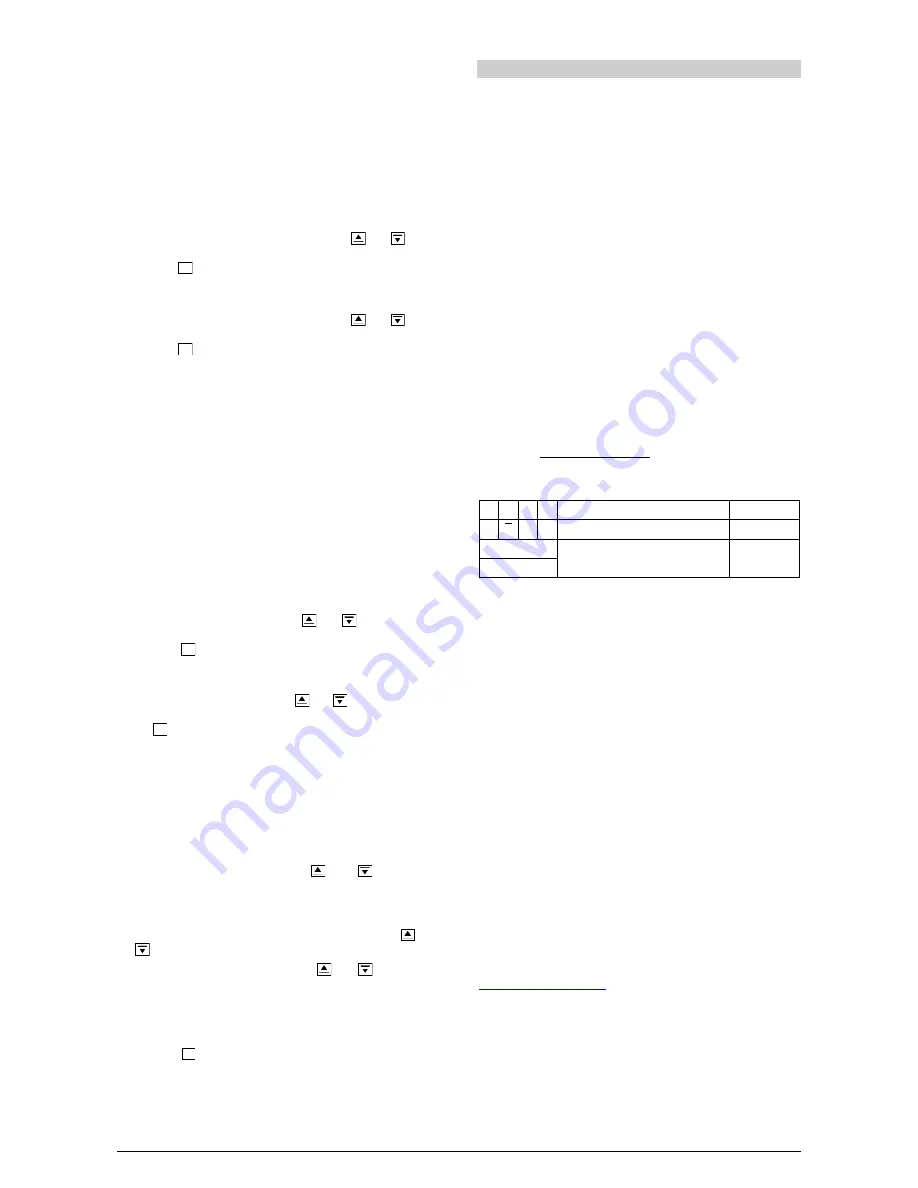
D1 D D + B Bi-directional data line.
Terminal 16
D0
D - A Bi-directional inverted data line.
Terminal 17
C
Optional connection that improves the
performance of the communication.
Terminal 18
GND
CONFIGURATION OF PARAMETERS FOR SERIAL
COMMUNICATION
Three parameters must be configured for using the serial type:
bavd
: Communication speed.
prty
: Parity of the communication.
addr
: Communication address for the controller.
REDUCED REGISTERS TABLE FOR SERIAL
COMMUNICATION
COMMUNICATION PROTOCOL
The MOSBUS RTU slave is implemented. All configurable parameters
can be accessed for reading or writing through the communication port.
Broadcast commands are supported as well (address 0).
The available Modbus commands are:
03 -
Read Holding Register
06 -
Preset Single Register
05 -
Force Single Coil
16 -
Preset Multiple Register
HOLDING REGISTERS TABLE
Follows a description of the usual communication registers. For full
documentation download the Registers Table for Serial
Communication in the N1100 section of our web site –
www.novusautomation.com
.
P
D:


