background image

07/02 Rev. 2.16-00

USER MANUAL

Setup, page 4

AP 3.4

Loading the Media

AP 3.4 printers can be operated in three diffe-
rent options: standard, peel-off, or with a cutter.

Standard mode

 allows you to collect each 

label freely.

m

See paragraph 

Standard Mode

 on 

page 4.

In 

peel-off mode

, the backing material is 

being peeled away from the label as it is 
printed. After the former label is removed, 
the next one will be printed.

m

See paragraph 

Peel Off Mode

 on page 6.

In 

cutter mode

, the printer automatically 

cuts the label after it is printed.

m

See paragraph 

Cutter Mode

 on page 7.

Standard Mode

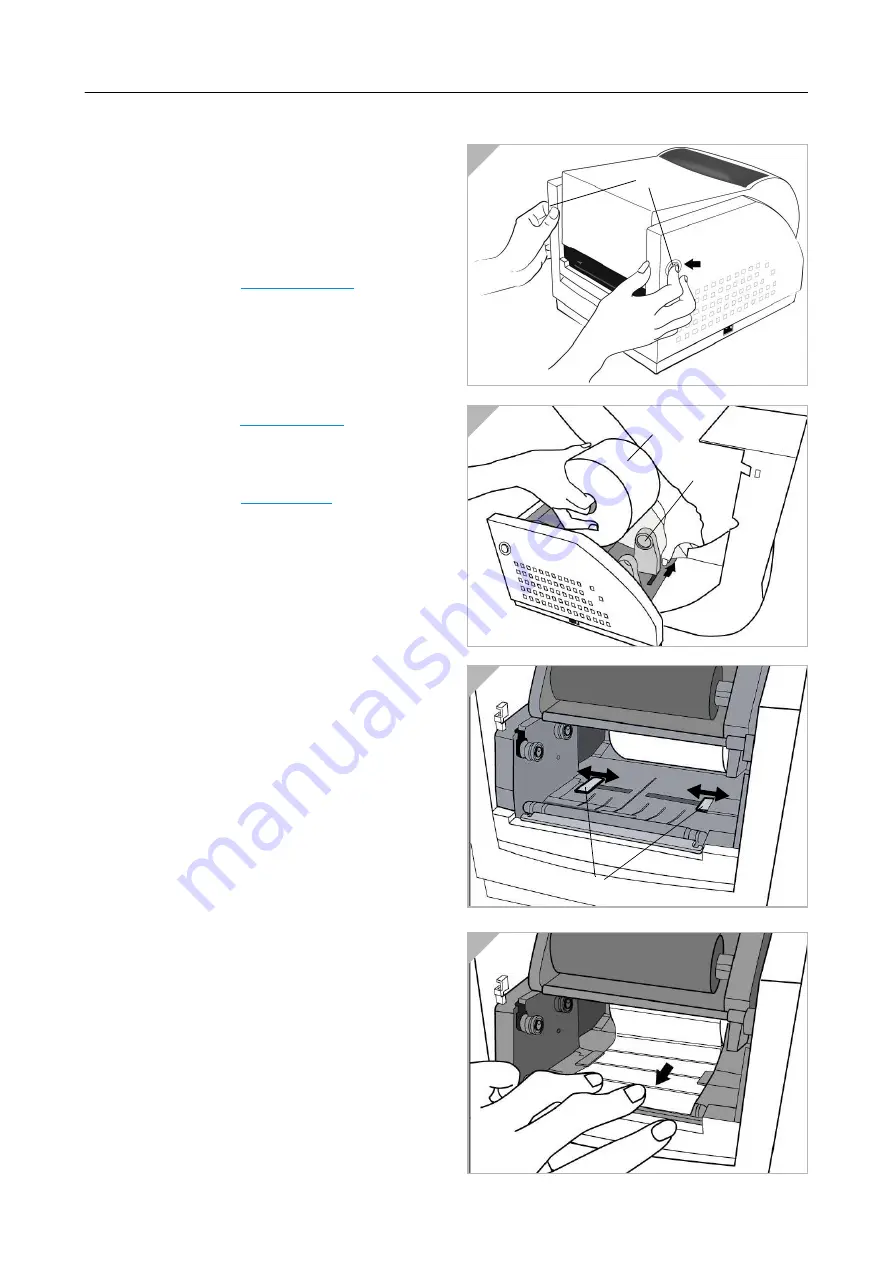
 1. Press the push-buttons (1) on both sides 

to swing the top cover toward the rear 
and expose the media compartment 
(Fig. 1).

 2. Push media holder (2) to adjust the 

space allowed a media roll (3) to fit in 
(Fig. 2).

 3. Load the media roll onto the media hol-

der.

 4. Unlatch the print head module.

 5. Hold the print head module upright with 

one hand to allow the media pass under 
it. Lead the media through the media gui-
des (4) with the other hand. The media 
guides can be adjusted centrality to well 
fit with different label width (Fig. 3).

2

Á

Â

3

Ã

4

1

À

Summary of Contents for AP 3.4

Page 1: ...07 02 Rev 2 16 00 USER MANUAL Seite Page 1 AP 3 4 Setup Loading the Ribbon 2 Loading the Media 4 Standard Mode 4 Peel Off Mode 6 Cutter Mode 7 Performing Calibration 8 Index 9...

Page 2: ...rd the rear Fig 1 2 Unlatch the print head module by pushing the two green release levers 2 on the sides toward the rear Fig 2 3 This allows print head module to rotate upward automatically and expose...

Page 3: ...nd then insert the bare core into the pick up holder To do so first snap in the right side then the left side Fig 1 8 Turn the wheel 1 of the print head module to ensure the ribbon is tightly wound Fi...

Page 4: ...In cutter mode the printer automatically cuts the label after it is printed m See paragraph Cutter Mode on page 7 Standard Mode 1 Press the push buttons 1 on both sides to swing the top cover toward...

Page 5: ...d the media over the platen roller Fig 1 7 Turn back the print head module and then press it down firmly on both sides till you hear a snap Fig 2 8 Close the top cover and turn on the prin ter or pres...

Page 6: ...approximate 6 long labels from the backing paper Fig 1 3 Trim the edge of label backing paper with scissors or knife Fig 2 4 Push down peeler switch 1 to ease the access packing paper 5 Lead the back...

Page 7: ...is ready Cutter Mode m For installing the cutter please refer to the Service Manual topic section Ser vice 1 Follow the common procedure of Loa ding the Media as described in Stan dard Mode 2 Mount c...

Page 8: ...2 Turn on the power 3 MEDIA indicators will blink at this point release Pause button 4 The printer will feed the labels for 12 inches 5 MEDIA indicators stop blinking and remain illuminated This proce...

Page 9: ...07 02 Rev 2 16 00 USER MANUAL Setup page 9 AP 3 4 Index B Backing paper 6 C Calibration 8 Cutter Mode 7 M Media loading 4 P Peel Off Mode 6 R Ribbon core adapter 2 Ribbon loading 2 S Standard Mode 4...

Reviews: