background image

• 

Faders: Pickup is on for faders, but off for the Mod Wheel.

• 

Mod Wheel: Pickup is on for the Mod Wheel but off for faders.

When pickup is on for faders/Mod Wheel, values will not be sent from that con-trol until the physical position of the 

control matches (or passes) the previous value. This behaviour prevents sudden jumps in the value after switching 

be-tween Parts, for example. The default value for these controls will be at the lowest position (i.e. fader all the way 

down).

Please note that the SL MkIII’s fader pickup behaviour does not apply when us-ing InControl. The controller will there-

fore adopt the pickup behaviour of HUI or your DAW.

Global Settings, Page 2: Analogue Settings 

Press the down arrow to the left of the screens to reveal more Global options, as described in the following sections.

E. 

Clock Out PPQN

When the Transport is running, ‘clock pulses’ send for each quarter note via the analogue clock out. How many pulses 

are sent is determined by this analogue clock setting in PPQN (Pulse Per Quarter Note). PPQN can be set to 1, 2 (de-

fault), 4, 8 or 24.

F. 

CV Mod 1 Range and CV Mod 2 Range

These two settings allow you to specify the output voltage of each mod port. Available ranges are ‘-5 to 5V’ or ‘0 to 

5V’. Any CC messages directed to the mod port will be mapped to one of these ranges.

G. 

CV Mod 1 CC and CV Mod 2 CC

You can give each Mod port a specifi c CC number, which you can set individually for each port using the rotary knobs 

above ‘Mod 1 CC’ and ‘Mod 2 CC’. When a message sends with this CC number using the surface, Sequencer auto-

mation, or from external MIDI to a part that routes to a CV port, this will control the CV Mod output.

H. 

CV Calibration

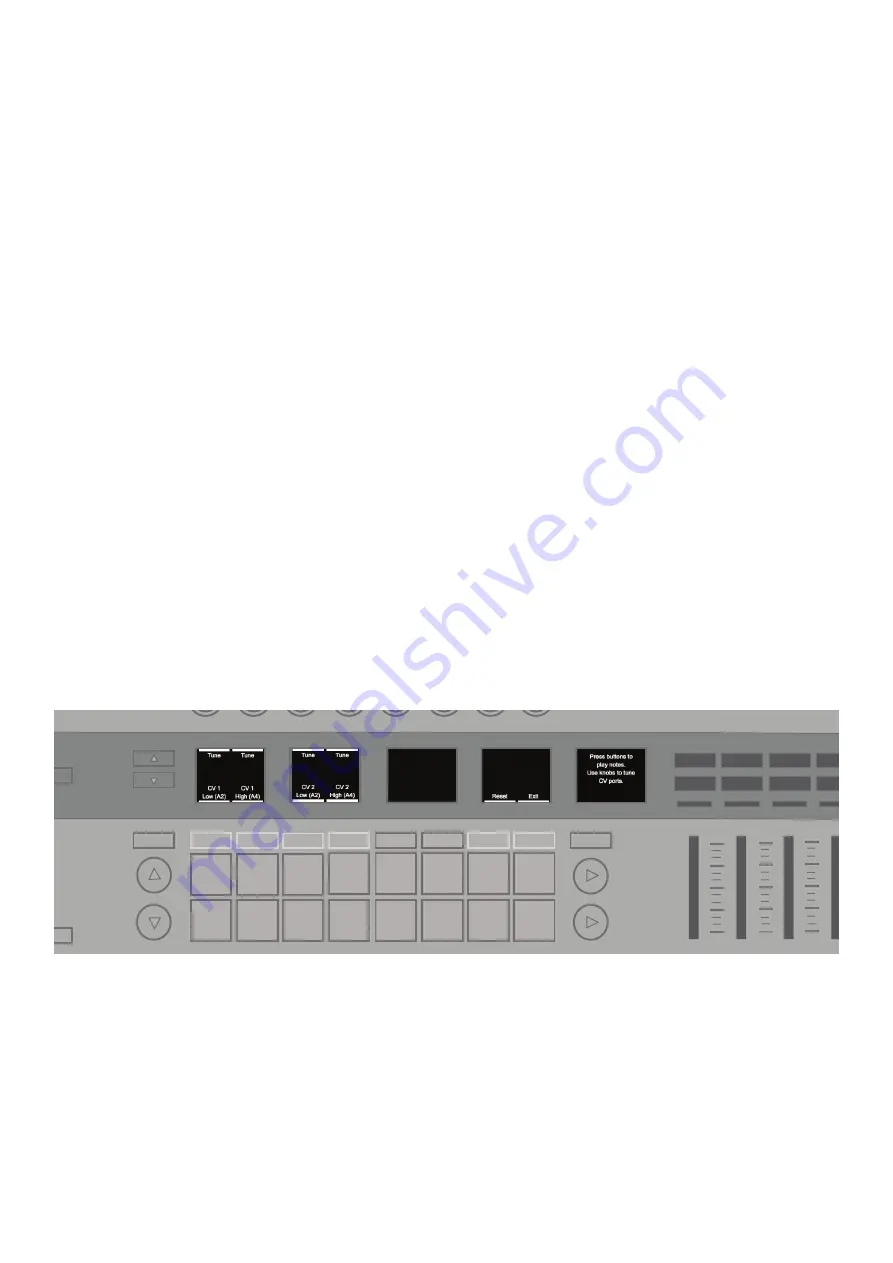
The CV Pitch output ports may need calibrating in order to precisely represent the pitch range. Press the soft button 

under ‘Calibrate’ to enter calibration mode.

1. 

To calibrate a CV Pitch port, fi rst press the soft buttons under ‘CV 1 Low’ or ‘CV 2 Low’. Doing so will set the 

voltage of the port to approximately 220 Hz (A2). You will need to connect the port to a sound source to either tune by 

ear or use a tuner. Otherwise, you can connect the port directly to an oscilloscope or measuring device to verify the 

tuning. 

2. 

2. 

Use the Tune knob directly above to increase or decrease the volt-age and fi ne tune the output until it 

matches 220 Hz exactly. 

3. 

Next, press the soft buttons under the ‘CV 1 High’ or ‘CV 2 High’ and do the same for 880 Hz (A4). 

Tempo


INCONTROL

Global

Shift

Zones

Sequencer

Latch

Arp

Scales

Sessions

Patterns

Steps                       

Save

Duplicate

Clear

Grid

Options

Pitch

Modulation

Octave

Transpose

Track

_

+

Templates

Expand

Summary of Contents for SL MkIII

Page 1: ......

Page 2: ...A Notes B Mod 7 Keyboard Setting A Octave B Transpose 8 Tempo Swing View A Set Tempo B Display Clock Source C Swing D Swing Sync Rate E Tap Tempo 9 Transport A Start Stop Continue B Song Position 10 Z...

Page 3: ...steps to ensure that the information given here is both correct and complete In no event can Novation accept any liability or responsibility for any loss or damage to the owner of the equipment any th...

Page 4: ...ee DIN sockets 5 pin for MIDI In Out Out2 Thru 5 Two 1 4 TS or TRS jacks with silver metal rings for Pedal 1 Sustain and Pedal 2 Expression and one 1 4 jack for Pedal 3 Footswitch 6 Seven 3 5mm TS jac...

Page 5: ...pad aka Step white along the way Steps that have MIDI notes assigned will light brightly As the play head reaches one of these bright Steps it will play any notes assigned to them To assign a note s...

Page 6: ...or above i e both 25 and 89 became 90 or above Alternatively if you had turned the knob to the left those same velocities would have snapped to 88 or lower Note that after all the notes on a Step hav...

Page 7: ...pro gresses to the end Step Backwards Conversely Backwards means playback begins at the end position and step progresses to the start Step You could think of this as reverse Ping Pong During the firs...

Page 8: ...the mode to try something new try copying Patterns between Tracks For ex ample you could copy your drum Pattern to your bass track and vice versa You never know what happy accidents might occur D Aut...

Page 9: ...ord button Transport Then select a Step by pressing a pad to enter Step Edit mode This action will audition the Step Move a control to the desired value to assign this value to the Step and deactivate...

Page 10: ...to dozens of pieces of external kit or software You can set these configurations with Templates through the fol low ing process A Select Template To change the Template for a Part Press Shift and Ses...

Page 11: ...s setting E Edit Part Colour The colour for a part can be changed by selecting a Part and pressing one of the eight coloured pads 4 Arp The SL MkIII s Arp Arpeggiator gives you the ability to program...

Page 12: ...eld or latched will be played in a downwards direction at the Arp Sync Rate one after another then the pattern repeated Up Down 1 Notes held or latched will be played in an upwards direction then down...

Page 13: ...eld notes will be played as a chord at the pitch then 1 octave and then 2 octaves before the pattern repeats There will be no duplicated notes when changing this setting I Arp Velocity Arp note Veloci...

Page 14: ...hese settings save when the device is turned off via the power switch If the power cable is removed however these settings will not be saved Press the Up Down arrows next to the screen to navigate thr...

Page 15: ...k trans mission Off When set to On the SL MkIII is sending clock tempo Devices or software cor rectly configured to receive the SL MkIII s MIDI clock should now operate in sync MIDI clock messages sen...

Page 16: ...ings allow you to specify the output voltage of each mod port Available ranges are 5 to 5V or 0 to 5V Any CC messages directed to the mod port will be mapped to one of these ranges G CV Mod 1 CC and C...

Page 17: ...the instructions for installa tion N Standby Animation When left unattended for 5 minutes the SL MkIII enters Standby Animation sometimes referred to as Vegas Mode This standby animation stops with a...

Page 18: ...e tempo using the above rotary control If the clock signal stops or is lost then the SL MkIII will revert to its internal tempo and you can again use the rotary knob to adjust tempo The clock source c...

Page 19: ...ion and send a MIDI Con tinue message 4 Pressing Play while the Sequencer is running will send a MIDI Stop mes sage followed by a MIDI Start mes sage Pressing Play will restart the se quencer from the...

Page 20: ...nge is shown on the LEDs overriding the LEDs of Zone 2 where there is an overlap ii Entering Zones View Zone s View is where you can customise your Zones according to your needs To enter Zones View pr...

Page 21: ...set values are 0 and both Follow settings are On Turn the knobs above the Follow settings to select between On and Off When on the Zone s behaviour is influ enced by the Octave and Transpose but tons...

Page 22: ...ton once so that the Save button is flashing You will notice that you can now use the two left most soft buttons below the screen to scroll through different session col ours Once you have found your...

Page 23: ...t learning the fundamentals of chords and scales It also serves as an excellent refresher for intermediate players whose knowledge of harmony has become rusty Hold Shift then press the Scale button to...

Page 24: ...elow the screen toggles Scale functionality on off per Part Therefore you can choose which Parts will be af fected by Scale mode and its settings and which will not A common occurrence for this option...

Page 25: ...ne using Com ponents please see 2 Templates for Components web address When content arrives at the SL MkIII the device enters Content Transfer Mode In this mode it stops the transport and disables UI...

Page 26: ...es Yes Yes N A Yes Arm Track Yes Yes Yes Yes N A Yes Transport Controls Rewind Yes Yes No Yes Yes Yes Fast Forward Yes Yes No Yes Yes Yes Stop Yes Yes Yes Yes Yes Yes Play Yes Yes Yes Yes Yes Yes Reco...

Page 27: ...the screens to access send groups A through E As of publication only Pro Tools displays the send names below the displayed rotaries Transport Control The Transport s buttons can control the equivalen...

Page 28: ...wn below the Focusrite A E Novation SL MkIII SL MkIII InControl port MUST NOT say N A If this is the case the user might solve this by right clicking the device and choosing Forget device Navigate to...

Page 29: ...k does not arm it but does allow you to view or modify its devices See the section 8x2 Soft Buttons to learn about track arming Since the red selection ring is just a visual aid you can quickly move b...

Page 30: ...d it is naturally hard to differentiate between clip slots available for record ing and al ready recorded clips since both cases render pads red In such sit uations we recommend looking at your comput...

Page 31: ...laying Device Chains and Device Selection Upon entering the Options View the upper part of the screens will show the de vice chain on the currently selected track These devices may be Ableton in strum...

Page 32: ...t s most recent actions Pressing Click toggles Live s metronome on or off Holding Shift will also display a Capture button if you recently played but did not record MIDI notes Press this last soft but...

Page 33: ...ete the SL MkIII will appear in the list If Use with Reason is checked and Novation SL MkIII SL MkIII From DIN 1 is enabled you should be ready to start controlling Reason with the SL MkIII ii Overvie...

Page 34: ...Loop On Off Option button This toggle s Reason s metronome On Off It will light white when active and orange when off Up Down buttons The up down buttons directly left of the pads change presets when...

Page 35: ...he names of other contributors to this software may be used to endorse or promote products de rived from this software or part thereof without specific written permission 4 This software or any part t...

Reviews: