


SMART2 Operation
SMART2 Installation and Operation Manual 1
35
1. Click the
Stop Recording
button.
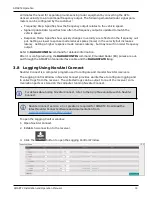
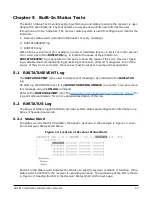
3.8.5 Change the Log File Settings
When logging to a file on the NovAtel Connect computer, the file used is determined by the log
file settings. To change the log file settings:
1. Click the
button in the Logging Control Window.
The
Settings
dialog box appears.
2. Modify the log file settings.
File Path
The path of the directory in which the log files are stored.
Enter the path directly in the text box or click the
Browse
button and use the
dialog box to select the directory.
File Name
The file name used for the log file.
You can enter a name or allow NovAtel Connect to generate a name.
To enter a file name, clear the
Auto
check box and enter the name in the
text box.
The next logging session will save the logs using the entered name. For
subsequent logging sessions, you will be prompted whether you want to
replace the existing file or add the new session to the existing log file.
To allow NovAtel Connect to generate a unique name for each logging
session, ensure the
Auto
check box is selected. NovAtel Connect will
generate a new file for each logging session. The file is named with the
product serial number (PSN) and the time when the logging session started.
Hold Type
Enable or disable Hold on the logs started using the Logging Control Window.
When the Hold Type is set to
No
, the logs started using the Logging Control
Window can be unlogged when an
UNLOGALL
command is sent.
When the Hold Type is set to
Yes
, the logs started using the Logging Control
Window can not be unlogged when an
UNLOGALL
command is sent.
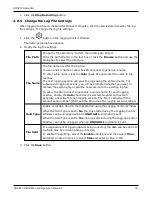
File Split
If a large amount of logging data is being collected, the data can be split into
multiple files by collection time or file size.
To enable file splitting, select the
Enable
check box and then select
Time
and enter a value in hours or select
Size
and enter a value in MB.
3. Click the
Save
button.