Manual, F/T Sensor, Axia90
Document #9620-05-B-Axia90-03
Pinnacle Park • 1031 Goodworth Drive • Apex, NC 27539 • Tel:+1 919.772.0115 • Fax:+1 919.772.8259 •
B-4
Glossary
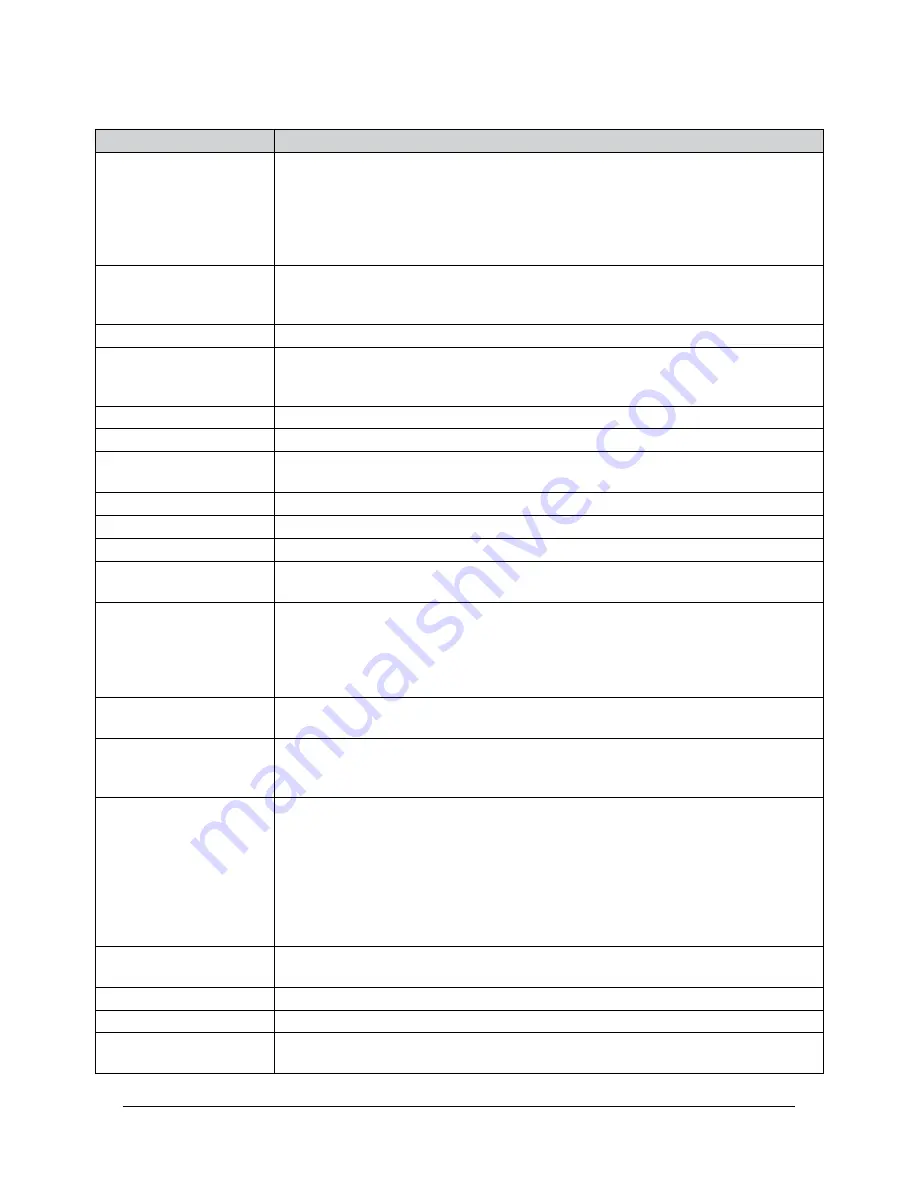
Term
Definition
Bias
Biasing is useful for eliminating the effects of gravity (tool weight) or other acting
forces. When the bias function is used, the software collects data for the forces
and torques that are currently acting on the sensor and use these readings as a
reference for future readings. Future readings will have this reference subtracted
from them before they are transmitted. Bias may also be referred to as “zero out”
or “tare”the sensor.
Calibration
Defines a specific measurement or sensing range for a given sensor. Calibration
is also the process of measuring a transducer’s raw response to loads and
creating data used in converting the response to forces and torques.
Complex Loading
Any load that is not purely in one axis.
Communication Interface
Versions
The software standard that the customer device uses to apply features to the
sensor and for the sensor to report data, for example: EtherCAT, RS422, and
Ethernet.
Coordinate Frame
See Sensing Reference Frame Origin.
Data Rate
How fast data can be output over a network.
Force
A force is a push or pull action on an object caused by an interaction with
another object. Force = mass x acceleration.
FS
Full-Scale, refers to the limits of a given calibration or sensing range.
F/T
Force/Torque.
F
xy
The resultant force vector comprised of components F
x
and F
y
.
Hysteresis
A source of measurement error caused by the residual effects of previously
applied loads.
Interface Plate
A separate plate that attaches the sensor to another surface. Interface plates are
often used if the bolt pattern on the sensor doesn’t match the bolt pattern on the
robot arm or customer tooling. The interface plate has two bolt patterns, one on
either side of the plate. One side is for the sensor. The other side is for the robot
arm or customer tooling.
IP67
Ingress protection rating “67” designates protection against dust and submersion
under 1 m of fresh water.
Master Device
A customer supplied device such as a personal computer, robot, or
programmable logic controller (PLC) that is compatible a specific communication
interface.
Measurement
Uncertainty
Commonly referred to as “accuracy”, “measurement uncertainty” is the worst-
case error between the measured value and the true load. The measurement
uncertainty is specified as a percentage of the full-scale measurement range for
a given sensor model and calibration size. This value takes into account multiple
sources of error. The sensor’s calibration certificate lists the measurement
uncertainty percentage. For more information, refer to
Section 2.2: Measurement
Uncertainty
in the Frequently Asked Questions (FAQ) document located at:
https://www.ati-ia.com/library/documents/FT_FAQ.pdf
.
Mechanical Coupling
When an external object such as customer tooling or utilities contacts a sensor’s
surface between the sensor’s mounting side and tool side.
Mounting Interface Plate
An interface plate that attaches the sensor to a fixed surface like a robot arm.
N/A
Not Applicable
Overload
The condition where more load is applied to the transducer than it can measure.
This will result in saturation.


