OnTime Clock
Installation and User Guide
Firmware Version 1
All claims based on information publicly available at time of printing. All other product or service names mentioned
in this document may be trademarks of the companies with which they are associated.
© 2015 Novanex, Inc. | All rights reserved | page 7
port, 12 port, 24 port, or 48 port configurations. The
OnTime Store
offers a single port
PoE injector for sale to support demonstration systems.
Note that Midspan Power
Injectors can also be configured for battery backup.
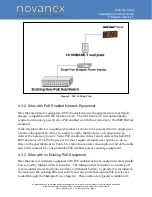
The OnTime Clocks require connection to a PoE enabled LAN. PoE power is usually
injected into the LAN using either PoE enabled Ethernet switches or Mid Span power
injectors. Consult with your IT Group to make sure that the required PoE equipment is
in place.
4.4. Surface Mounting the Analog Clock
The following is a recommended procedure for surface mounting the analog clock:
1.
Determine the clock mounting location.
2.
Mark the Mounting Point location.
Note that the Mounting Point is located 2½
”
(6.35 cm) below the top of the clock rim.
3.
Refer to Figure 2 to install the junction box for the data cable (if required)
centered 2 ½
”
(5 cm) to the right of the Mounting Point.
Figure 2: Analog Clock Mounting Template
4.
Insert a flat-head fastener suitable for the wall surface at the marked point and
tighten.
5.
Withdraw the fastener until there is a ¼
”
(or a little more than ½ cm) gap
between the mounting surface and the back of the fastener head.
6.
Insert the data cable into the jack located at the back of the OnTime Clock.


