background image

Section 1 - 6

www.notifierknowledge.com

997-670-000-2

Panel User Interface

Operating Manual

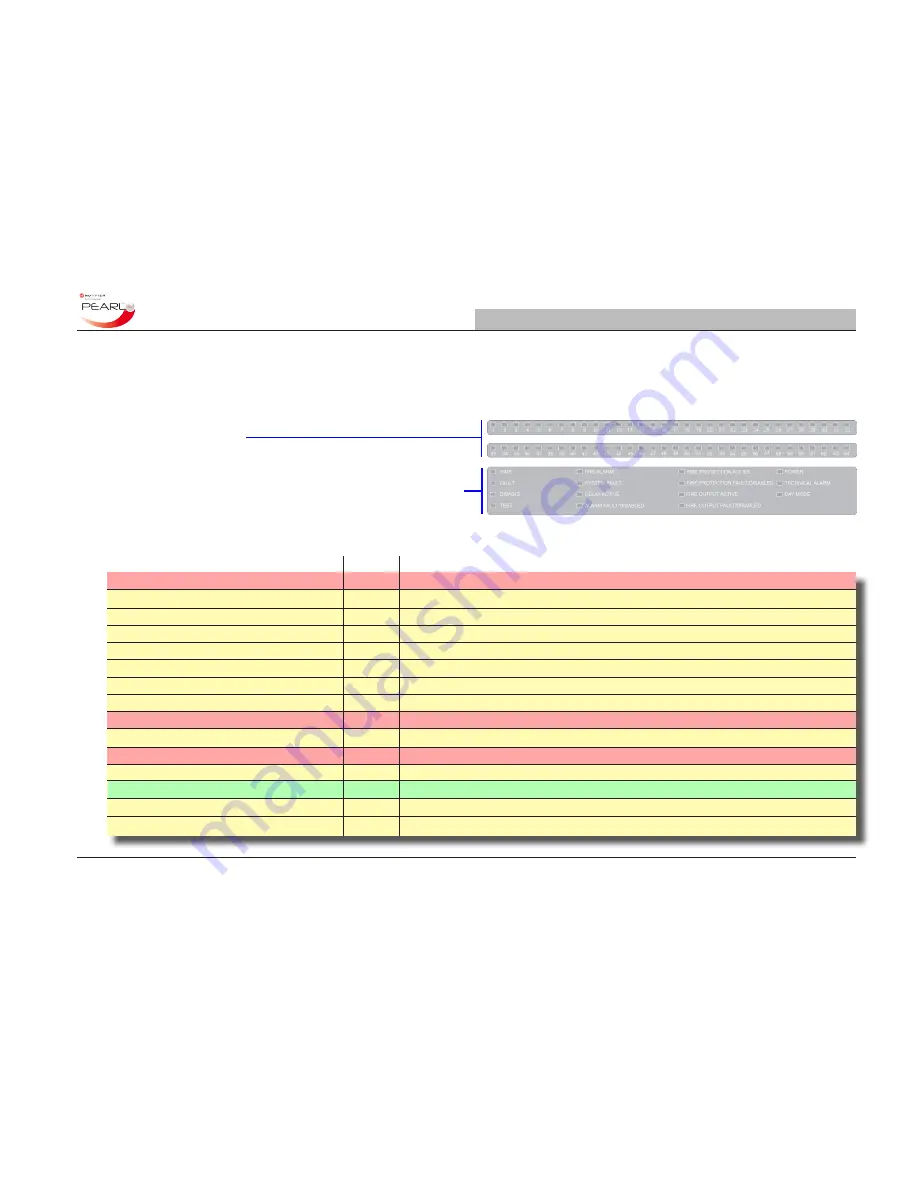
1.2.3 LED Status Indicators

In addition to details of detected events being displayed on the LCD, 

a number of LED status indicators are provided in the lower area 

of the panel fascia.
The upper two banks of LEDs are zone fire LEDs (zones 1 to 64) 

and may not be fitted.
The lower bank of LEDs contains all the required system status 

indicators to support the primary indicator, i.e. the LCD. With most 

panel- or loop-related events these LEDs are able to provide a quick 

indication of the possible cause of the panel status change.

The following status indicators are provided:
 

LED Name 

Colour  Description

  FIRE 

Red 

A fire condition exists.

  FAULT 

Yellow 

A fault condition exists.

  DISABLE 

Yellow 

One or more devices are disabled.

  TEST 

Yellow 

A test condition has been entered,

  PRE-ALARM 

Yellow 

A pre-alarm condition exists.

  SYSTEM FAULT 

Yellow 

The system has failed.

  DELAY ACTIVE 

Yellow 

Programmed delay(s) are in effect.

  ALARM FAULT/DISABLED 

Yellow 

A fire output, if configured, is disabled or has a fault.

  FIRE PROTECTION ACTIVE 

Red 

An output to the fire protection system, if configured, is active.

  FIRE PROTECTION FAULT/DISABLED  Yellow 

An output to the fire protection system, if configured, is disabled or has a fault.

  FIRE OUTPUT ACTIVE 

Red 

The fire relay (and fire output if configured) is active.

  FIRE OUTPUT FAULT/DISABLED 

Yellow 

The fire relay is disabled or the Fire output (if configured) is disabled or has a fault.

  POWER 

Green 

System power (mains or battery) is available.

  TECHNICAL ALARM 

Yellow   Technical Alarm device activated.

  DAY MODE 

Yellow 

The DAY MODE has been entered.

Summary of Contents for Fire Alarm Control Panel

Page 1: ...997 670 000 2 Pearl Fire Alarm Control Panel Operating Manual...

Page 2: ...1 Status Normal 3 1 3 2 Panel Controls and Menus 3 1 4 Enabling User Access Level 2 4 1 4 1 Passcode Entry 4 1 4 2 Keyswitch Entry 4 1 5 Navigating the Panel Menus 5 1 5 1 Disable Enable Menu 5 2 5 1...

Page 3: ...Contents ii 997 670 000 2 Contents www notifierknowledge com Operating Manual 5 5 Commissioning Menus 5 19...

Page 4: ...ontrol panel hereafter referred to as the panel is provided with all required indicators to allow the user to review the system status and with appropriate user keyholder access perform approved syste...

Page 5: ...E PROTECTIONACTIVE FIRE PROTECTION FAULT DISABLED FIRE OUTPUT ACTIVE FIRE OUTPUT FAULT DISABLED POWER TECHNICAL ALARM DAY MODE See Section 1 2 3 LED Status Indicators Internal Buzzer This audible devi...

Page 6: ...ed event In the event that more than one event has been detected some of the control keys keyholder access only can be used to scroll down the list of all current events to review those hidden from vi...

Page 7: ...s illuminate Fault LED indications for individual zones are not provided Note The LCD backlight is turned off and pushbutton backlights are dimmed with the loss of the primary power i e mains supply...

Page 8: ...y can be selected for example the EXTEND DELAY function during the first stage of an active two stage delay period 2 Menu Navigation option Selection Functions Keys With the panel at user access Level...

Page 9: ...ULT Yellow A fault condition exists DISABLE Yellow One or more devices are disabled TEST Yellow A test condition has been entered PRE ALARM Yellow A pre alarm condition exists SYSTEM FAULT Yellow The...

Page 10: ...n was configured during system commissioning Use the information provided by the LCD and the LEDs to understand quickly what action needs to be taken To assist this process the panel s LCD indicates t...

Page 11: ...of sounders etc the detection of a fire may indicate a zone fire condition but without the FIRE LED being lit This indicates that a fire condition has been detected but the panel is waiting for anothe...

Page 12: ...on that needs to be taken To assist this process the panel s LCD indicates the nature of the fault if it is a faulty detection device the zone location and the device s responsible for raising the fau...

Page 13: ...n a clockwise direction or enter a valid user access Level 2 passcode and then press the RESET key The LCD will re display the Status Normal screen and all alarm or other event related indicators will...

Page 14: ...on logo is displayed POWER LED green This is lit continuously when the panel is powered No other front panel LEDs are lit and the internal buzzer is silent 3 2 Panel Controls and Menus No control func...

Page 15: ...e appropriate access passcode and press the key again to enter A correct passcode entry displays the main user level menu Main Menu Press the key to abandon an invalidated passcode entry attempt and r...

Page 16: ...ghlighted With the Main Menu all the listed options are available and the first is highlighted Working Example Set Change the Date Time With the Main Menu displayed on the LCD press the numeric key 3...

Page 17: ...anual Override if configured during commissioning 5 1 1 Zones and Devices Select option 1 Zones and Devices to disable enable a zone or select devices to disable individually Only configured zones are...

Page 18: ...zone output devices such as sounders cannot be disabled individually 2 Todisable enabletheentirezone defaultselection pressthe key Each press of the key toggles the state of the zone disabled or enabl...

Page 19: ...ic key 1 to select the Disable Enable option Press the 1 key on the numeric keypad to select Zones and Devices The list of all configured zones is displayed the first zone in the list is highlighted U...

Page 20: ...e enable disable state is changed With the fault relay output in a disabled state the DISABLE LED is lit The DISABLE tab is displayed with disabled fault relay output Press the key to bring the DISABL...

Page 21: ...enable disable state changes toggled Press the key at any time to exit 5 1 4 Delays to Outputs This option is only available when delays have been configured as part of one or more Cause Effect rules...

Page 22: ...e DAY MODE LED is lit However if it has been overridden using this menu option the DAY MODE LED extinguishes until the next configured day mode period occurs or the Time of Day program if still active...

Page 23: ...f the LCD see Section 5 2 5 LCD Test the internal buzzer see Section 5 2 6 Internal Buzzer 5 2 1 Zones To perform a zone walk test select option 1 Zones from the Test Menu press the 1 key on the alpha...

Page 24: ...zones to be tested To view the status of the devices in any other zones in test use the navigation buttons to move from one zone to another OR 5 2 1 2 To Cancel a Zone Walk Test A zone walk test can o...

Page 25: ...prompted for a node ID number even if the devices that require testing are connected to the current panel 2 Press the navigation buttons to highlight the first device in the list and then press the ke...

Page 26: ...the Fire LED and working down first and then across to the last LEDs on the right The POWER LED is not tested as this will already be lit continously under normal conditions 2 The SHOW MORE ZONES IN F...

Page 27: ...on button inverts the on or off state of the pixels This means that pixels previously not turned on are now turned on and the pixels that were turned on are now turned off This pixel state inversion h...

Page 28: ...2 6 Internal Buzzer Select option 6 Buzzer from the Test Menu to test the panel s internal buzzer Press the 6 key on the alphanumeric keypad or if highlighted press the key When selected the buzzer is...

Page 29: ...ock format As a number is entered the cursor moves one place to the right automatically However if an incorrect number was entered use the C key to clear the entry and enter it again When the time has...

Page 30: ...imum of 50 000 can be logged and each event is time and date stamped With the View Status Menu screen displayed press the key to select option 1 Historic Log If it is not highlighted press the 1 key o...

Page 31: ...option and press the key The user is then prompted through a number of steps to specifiy the loop number device type sensor or module and the loop address of the device If a device has been configure...

Page 32: ...and select the correct address Should the data of another device need to be displayed when for example it is located on a different loop or it is of a different type such as a module or sensor then Us...

Page 33: ...mory for later retrieval by the service engineer This menu option allows the alarm event total to be displayed on the LCD Using the numeric keypad press 3 to select option 3 Alarm Count Alternatively...

Page 34: ...owledge com 997 670 000 2 Navigating the Panel Menus Operating Manual 5 5 Commissioning Menus Access to the commissioning menus requires the entry of an access Level 3 passcode These functions are not...

Reviews: