background image

RE

G

U

L

A

R

M

AI

NT

E

NANCE

P

R

E

V

E

N

T

IV

E

M

A

IN

T

E

NANCE

Ho

t

S

u

rfa

c

e

Igni

to

r

X

-

C

hec

k

for

c

ont

inui

ty

.

-

C

hec

k

that

F

lam

e

S

ens

or

is

s

tr

a

ight

.

-

C

lean

s

ens

or

w

it

h

fine

s

teel

w

ool

.

-

R

em

ov

e

fr

o

m

the

uni

t

and

c

lean

w

it

h

c

o

m

p

re

s

s

e

d

ai

r

fr

o

m

out

s

ide

m

a

tt

ing.

N

O

TE

:

It

is

re

c

om

m

e

nde

d

to

re

p

la

c

e

th

e

bur

ne

r

ga

sk

e

t

eac

h

ti

m

e

a

bur

ner

is

re

m

o

ved.

D

rai

n

L

in

es

X

-

S

w

it

c

h

to

dr

ai

n

and

m

a

k

e

s

u

re

w

a

te

r

flo

w

s

fr

eel

y

.

-

A

dj

us

t

b

lo

w

dow

n

ti

m

e

w

hen

requi

red.

C

hec

k

that

s

c

al

e

has

not

ac

c

u

m

u

la

te

d

abov

e

2

".

-

D

ri

ll

out

tank

ni

ppl

es

w

hen

requi

re

d

to

ens

ur

e

n

ippl

es

ar

e

not

bl

oc

k

e

d

w

it

h

s

c

a

le

.

-

C

lean

tank

w

hen

requi

red.

-

C

lean

tank

.

Fl

oa

t

C

ha

m

b

e

r

X

X

X

-

E

n

s

u

re

float

s

m

ov

e

fr

eel

y

.

-

C

lean

s

c

a

le

fr

om

float

c

h

am

ber

and

hos

e

c

onnec

ti

ng

to

hi

t.

Fi

ll

Li

ne

s

X

X

X

-

In

s

pec

t

for

leak

s

.

D

rai

n

L

in

es

XX

X

-

Ins

pec

t

for

leak

s

a

t

the

dr

ai

n

pum

p,

fil

l

c

u

p

and

float

c

ham

ber

.

Ga

s

V

e

n

ti

n

g

XX

X

-

Ins

pec

t

for

le

ak

s

.

E

n

s

u

re

te

rm

inal

c

a

p

is

c

le

ar

and

any

c

o

ndens

at

io

n

p

roduc

ed

flow

s

to

c

ondens

at

e

tr

aps

.

F

lue

te

m

p

s

houl

d

b

e

bet

w

een

350-

400º

F

.

Di

re

c

t

V

e

n

t

X

X

-

Ins

pec

t

for

le

ak

s

.

E

n

s

u

re

in

ta

k

e

te

rm

inal

is

c

lear

.

H

/L

S

ta

c

k

S

e

ns

or

XX

X

-

V

is

ual

c

hec

k

that

s

ens

or

is

in

ta

c

t,

w

ir

ed

and

at

ta

c

hed

to

th

e

e

x

haus

t.

-

R

epl

ac

e

hot

s

u

rf

ac

e

igni

to

r

and

flam

e

s

ens

or

w

it

h

repl

ac

em

ent

k

it

.

M

AND

AT

O

R

Y

M

AI

NT

E

NANC

E

S

C

H

E

D

UL

E

W

H

A

T

N

EED

S

T

O

B

E

D

O

N

E?

F

lam

e

S

en

so

r

X

X

X

X

Ta

nk

EN

D

O

F

SE

A

S

O

N

MI

D

30

D

A

Y

S

a

fte

r

in

iti

a

l

st

a

rt-u

p

PA

R

T

S

X

G

a

s

B

ur

ne

r

- 29 -

Summary of Contents for GS Series

Page 1: ...GS Series Gas Steam Humidifier Installation User Maintenance Guide 1506222 D IMPORTANT Read and save this guide for future reference This guide to be left with equipment owner ...

Page 2: ...NGES Max Ambient Temperature 104ºF 40ºC Min Ambient Temperature 41ºF 5ºC Max Relative Humidity RH non condensing 95 RH Min Relative Humidity RH non condensing 5 RH WARNING Improper installation adjustment alteration service or maintenance can cause injury or property damage Refer to this manual For assistance or additional information consult a qualified installer service agency or the gas supplie...

Page 3: ... ADDITIONAL REQUIREMENTS WHEN VENTING THROUGH A SIDEWALL 11 ELECTRICAL 12 PRIMARY WIRING 13 LOW VOLTAGE CONTROL WIRING 14 CONTROL INSTALLATION 15 PLUMBING 15 FILL WATER SUPPLY LINE 15 DRAIN LINE 15 AUX DRAIN PORT 16 STEAM LINES AND CONDENSATE LINE 16 GS OUTDOOR INSTALLATION 16 MOUNTING 16 TYPICAL GSTC OUTDOOR INSTALLATION 17 ROOF CURB DIMENSIONS 18 GAS PIPING 19 EXHAUST VENTING 20 ELECTRICAL INSTA...

Page 4: ...MPONENTS REPLACEMENT 32 Hot Surface Igniter and Flame Sensor Replacement 32 Burner Removal and Installation 32 Removal and Installation of the Combustion Blower 33 Gas Valve Replacement 33 Air Switch Replacement 34 Float Chamber Replacement 34 Transformer Replacement 35 Fill Valve Replacement 35 Drain Pump Replacement 36 Fill Box Replacement 36 Removal of the Heat Exchanger 37 DIP SWITCH SETTINGS ...

Page 5: ... mounted inside the unit legs Stand cross bracing are shipped with the unit The GS Outdoor Series comes with all required venting to be installed on site Desired accessories ordered RECEIVING UNPACKING EQUIPMENT Check packing slip to ensure ALL material has been delivered All material shortages are to be reported to NORTEC within 48 hours from receipt of goods NORTEC assumes no responsibility for ...

Page 6: ... GAS MAX 420 000 315 0 05 MIN 45 000 25 0 05 PROPANE MAX 420 000 315 0 35 MIN 50 000 25 0 35 MODEL GS 400 SPECIFICATIONS FUEL BLOWER SPEED INPUT BTUH STEAM CAPACITY LBS HR MANIFOLD PRESS IN W C NATURAL GAS MAX 560 000 420 0 05 MIN 45 000 25 0 05 PROPANE MAX 560 000 420 0 35 MIN 50 000 25 0 35 MODEL GS 500 SPECIFICATIONS FUEL BLOWER SPEED INPUT BTUH STEAM CAPACITY LBS HR MANIFOLD PRESS IN W C NATUR...

Page 7: ...ine 3 4 min 30 80 psi Exhaust Outlet Optional Direct Vent Figure 1 Typical Installation Indoor HIGH ALTITUDE A derate in input exists for installations at higher altitudes For Canadian models an automatic 10 derate applies to installations from 2000 4500 feet For U S Models refer to the chart below for high altitude derate information FOR U S MODELS ONLY Altitude Derate Feet Meters 0 2000 0 610 0 ...

Page 8: ...r contaminants from entering the cabinets when activities such as drilling are taking place Ambient temperature location for humidifier 41ºF 104ºF 5ºC 40ºC Relative humidity location for humidifiers 5 rh 80 rh All GS humidifiers are rated for the clearance to shown in Figure 2 Location of the steam distributor should be minimum of 36 above the humidifier DO NOT locate humidifier any further than a...

Page 9: ...to the humidifier using a commercial soap solution made to detect leaks Bubbles indicate gas leakage Seal all leaks before placing the humidifier in operation WARNING Never use an open flame to check for gas leaks If a leak does exist a fire or explosion could occur resulting in damage injury or death The appliance must be isolated from the gas supply piping system by closing its individual manual...

Page 10: ...ified personnel All local regulations relating to the provision of air supply systems must be observed and adhered to The maximum pipe length for the air supply line and exhaust is equivalent to 70 21m The vent pipe diameter must be maintained over the overall length of the vent All air piping must be listed type for direct vent application with sealed joints and seams such as Z flex The air suppl...

Page 11: ...mpetent with these codes and the local requirements of the jurisdiction must carry out the installation Proper removal of combustion gases must be assured and building materials must be protected from degradation by flue gases Never mix venting types B to BH or visa versa Never use two different manufacturer s equipment for the same chimney All vent runs should be as direct as possible with no mor...

Page 12: ... installation of the vent Condensate tee required Steam Outlet Exhaust venting outlet Horizontal run 1 4 rise per ft 2 FT Min 3 Min Wall Hangers Straps Condensate Tee Condensate tee and trap must be installed Take the condensate to a floor drain or a condensate pump BH type vent using double wall vent with all joints being air and water tight Reference local and or national codes before installing...

Page 13: ...he appliance ensure that the trap is filled with water and that the drain terminates in accordance with local plumbing codes Never vent into a unlined masonry or concrete chimney Chimney or vent should extend at least 3 1 m above a roof and at least 2 6 m above any ridge within 10 3 m of the chimney Local codes apply Install venting so as to prevent accumulation of condensate and have a means for ...

Page 14: ...ion Standard venting hook ups require a female path It is highly recommended that a female to female adapter be assembled onto the humidifier to establish the proper venting sequence Consult with the venting manufacturer for proper hook up Vent connectors shall not be connected into any portion of a mechanical draft system operating under positive pressure Use only double wall aluminum inner wall ...

Page 15: ...vent pipe can occur A minimum equivalent vent length of 7 feet must be connected to the humidifier Vent lengths must not exceed 100 30 m Each 90 elbow is equivalent to 10 and each 45 elbow equals 5 The vent run should be as direct as possible with no more than 6 elbows in the system Diret vent applications length of vent should not exceed 70 in equivalent length ADDITIONAL REQUIREMENTS WHEN VENTIN...

Page 16: ...trips are provided in the electrical compartment Internal sides are factory wired External sides are to be field wired Refer to the specific control wiring diagram supplied with each unit Field wiring from humidistat to humidifier and between devices should be shielded 18 AWG or heavier and kept as short as possible Controls are available from NORTEC as accessories and can be ordered with the humi...

Page 17: ...ph 380V 3ph Stepdown Transformer 600V 208V byothers Stepdown Transformer 460V 208V byothers L1 L2 Neutral L2 L3 L3 600V 1phbetweenanytwohotleg 347V 1phbetweenhotandneutral Note 460V 3 Phase Supply 460V 1phbetweenanytwohotleg 277V 1phbetweenhotandneutral Note 380V 3 Phase Supply 380V 1phasebetweentwohotlegs 220V 1phasebetweenhotandneutral Note 208V 3 Phase Supply 208V 1phasebetweentwohotlegs 120V 1...

Page 18: ... no On Off Control is used then a field jumper must be connected across terminals 1 and 2 in order for the humidifier to operate 14 18 1516 17 13 COM COM COM COM N O N O N O N O N C Humidifier ON Humidifier ACTIVE Humidifier SERVICE Humidifier FAULT Low Voltage Terminal Strip 1 2 Wire all on off controls and safeties between these two terminals If not used jumper 1 2 for the unit to operate 4 Modu...

Page 19: ...plied with an adapter for the fill valve NPT Fill rate 10 l min all unit sizes Size of piping is a minimum copper recommend up to within 4 feet of unit Standard fill valves are sized for water pressure ranging from 30 to 80 psig ideally 55 to 60 psig For other pressures consult factory This pressure should be measured at the humidifier if the water pressure is suspect It is recommended to have a f...

Page 20: ...tribution system installation manual Steam Distributor Installation Manual Form XX 231 and SAM e Short Absorption Manifold Form XX 249 The GS series of Gas Steam humidifiers can develop steam pressures up to 12 w c to overcome duct and steam line pressures An enclosed trap on the drain line prevents steam from going to drain Duct pressures above 12 will cause steam to exits through the drain line ...

Page 21: ...t off Drain Lines Funnel With Air Gap Roof Curb By others Electrical Disconnect By others BH Vent By Nortec Insulated Steam Line By others Gas Line with Manual Shut off Electrical Disconnect By others Roof Curb By others Figure 13 GSTC Outdoor Typical Installation Rooftop Figure 14 GS Outdoor Typical Installation Rooftop ...

Page 22: ...NER SIDE BASE FRAME ELEMENT CURB 34 1 8 86 6cm A 3 3 4 9 5cm MAX 11 16 1 8cm 6 0 15 24cm 5 0 12 7cm A A Roof Curb by Others Pipe Chase Lifting Hooks SECTION A A 3 4 1 90cm Roof Curb Dimensions Model Dimension A Curb Height Shipping Weight Operating Weight GSTC Outdoor 100 8 63 27 91cm 15 38 1cm Min 400 lbs 181 kg 556 lbs 252 kg GSTC Outdoor 200 15 06 38 25cm 15 38 1cm Min 500 lbs 227 kg 744 lbs 33...

Page 23: ...local codes and the National Fuel Gas Code ANSI Z223 1 in the United States or CAN CGA B149 Installation Codes in Canada Refer to the indoor gas piping installation guidelines for gas line sizes pressures leak testing procedures and safety instructions Gas lines are to be routed to the outside connection on the right side near the back of the unit The installation of a sediment trap and a certifie...

Page 24: ...ed from Nortec ELECTRICAL INSTALLATION Power and control wiring is to be routed into the humidifier through the pipe chase in the base pan of the outdoor models located in the burner area Installation details for primary and low voltage control wiring are the same as for indoor units A field supplied NEMA rated weatherproof disconnect switch must be mounted external to the GS Outdoor unit to allow...

Page 25: ...ed the tank drains at a rate of 18 20 l min 7 8 gal min Internal drain water tempering will ensure a maximum of 140 F 60 C during normal operation AUXILIARY DRAIN Standard GS Outdoor units come with a capped NPT auxiliary drain connection at the bottom of the tank It is recommended to install a manual shut off valve on this connection and route to drain provide an air gap GS Outdoor units standard...

Page 26: ...as valve s remains open and combustion continues If a flame is not sensed the above sequence is repeated to a maximum of three times after which the ignition module will lock out The gas valve s maintains a constant ratio air to gas independent of blower speed or external conditions This air and fuel is thoroughly mixed in the blower s and then forced through the burner ports where ignition occurs...

Page 27: ...y to ensure that no dirt or dust has accumulated in the electronics compartment or the burner area A build up of dust on the electronics can cause overheating and early failure of the components If necessary clean the area around thehumidifier to prevent contaminants from being drawn into the combustion blowers FILLING THE SYSTEM Before the GS unit will initiate combustion it must be filled with w...

Page 28: ...nsure all external controls connected to the security loop are closed Verify that the building demand signal is connected to the humidifier Install and secure all cabinet service doors Switch the humidifier on At the completion of the float test the humidifier will begin the combustion sequence and each burner will ignite in sequence Depending on the system demand the combustion blowers will modul...

Page 29: ...essure Regulator dedicated for each gas unit EXHAUST GAS VENTING Comply with local regulations Proper venting materials used B or BH refer to gas codes Maximum vent length of 100 feet 70 feet for direct vent models Proper pipe diameter used Condensate tee installed STEAM LINES Slope up 2 per 12 Sloped back to drain Slope down per 12 Trapped 2 more than static duct pressure Traps Size _______ Insul...

Page 30: ...G Silica____ppm Chlorides _______ppm pH _______ NOTE Failure due to chloride corrosion is not covred under Nortec s standard warranty Consult factory for more information ELECTRICAL INSTALLATION Comply with local regulations Proper supply voltage must match rating plate and breaker size Electrical disconnect switch close to humidifier Cables properly affixed Low voltage wiring control signal s wir...

Page 31: ... tank and float chamber If you are unaware of the hardness or silica content of your water supply there are many do it yourself kits which can be purchased or there are several companies that will perform the tests for a reasonable price You can even contact your municipality for your water condition or order the NORTEC water test kit Note Water quality conditions resulting in component failures a...

Page 32: ... keypad display menu structure at the end of the manual GSP MODELS Faults are indicated on GSP models with a fault code on the small display screen attached to the logic control board The display can be viewed by removing the front electrical door Check the display for the fault code before shutting off power to the unit Resetting the humidifier clears the fault This can be achieved by shutting of...

Page 33: ...Clean tank Float Chamber X X X Ensure floats move freely Clean scale from float chamber and hose connecting to hit Fill Lines X X X Inspect for leaks Drain Lines X X X Inspect for leaks at the drain pump fill cup and float chamber Gas Venting X X X Inspect for leaks Ensure terminal cap is clear and any condensation produced flows to condensate traps Flue temp should be between 350 400ºF Direct Ven...

Page 34: ...e the top cabinet panel using a Phillips screwdriver Remove the top clean out ports my removing the nuts Removal of the heat exchanger s is not necessary to clean the inside of the tank Scoop out loose scale with a small shovel such as those used for gardening Once loose scale is removed use a scraper such as a plastic windshield scraper to remove scale adhering to the tank or heat exchanger walls...

Page 35: ...or higher If meter reads below 0 on scale meter leads are reversed Disconnect power and reconnect meter leads for proper polarity NOTE Proper polarity of supply voltage to the unit is necessary for flame sensing to occur Oxidation on flame sensing rod can reduce measured current The oxidation can be cleaned from the sensing rod using steel wool or an emery cloth Igniter Check If the igniter is sus...

Page 36: ...silicon carbide igniter is breakable Handle with great care to avoid damage Burner Removal and Installation 1 Shut off electrical power and gas supply to the humidifier 2 Remove the right side service access door 3 Disconnect all wiring to the combustion blower gas valve air proving switch igniter and flame sensor note the connector assignment 4 Undo the union on the flexible gas hose and disconne...

Page 37: ...riented or gas flow through the valve will be impeded 9 Leak test the gas train before re commissioning the humidifier Gas Valve Replacement 1 Shut off electrical power and gas supply to the humidifier 2 Remove the right side service access door 3 Disconnect all wiring to the gas valve and air proving switch note the connector assignment 4 Undo the coupling on the flexible gas hose and disconnect ...

Page 38: ...n shut off electrical power and water supply to the humidifier 2 Remove the left front service access door 3 Remove the cable connection to the float board 4 Remove the hose clamps on the float chamber and remove all hoses note the correct hose assignment 5 Squeeze both sides of the mounting bracket to release it from the slots in the support bracket behind the float chamber 6 Reverse the above se...

Page 39: ...quired 4 Remove screws 2 holding transformer 5 Reverse above procedure to re install Fill Valve Replacement 1 Shut off electrical power and water supply to the humidifier 2 Remove the right side service access door 3 Remove all wiring connections to the fill valve 4 Remove the hose clamps on the fill valve outlets and remove hoses note the correct hose assignment 5 Remove the 2 screws securing the...

Page 40: ...oors 4 Remove wiring connections to the pump 5 Remove hoses attached to the pump 6 Reverse above procedure to re install NOTE To avoid water spillage some water will be left on the tank bottom after manual draining use shop vac to remove left over water Fill Box Replacement Leak test all water connections before re commissioning the humidifier 36 Figure 36 Drain Pump Assembly ...

Page 41: ...right top panels 8 8 Free all cable connections to the components combustion blower ignition module air pressure switch etc of the respective heat exchanger IMPORTANT Note the connector assignment 9 9 Undo the coupling of the respective flexible gas pipe and remove the flexible gas pipe 10 10 Dismount the burner with the air blower and the gas pressure regulating valve of the respective heat excha...

Page 42: ... 38 ...

Page 43: ...0 hour ON ANALOG CHANNEL 1 Input Range SW1 1 SW4 1 SW 4 2 0 10V input OFF OFF OFF 0 5V input OFF ON OFF 2 10V input OFF OFF ON 1 5V input OFF ON ON 0 20mA input ON OFF OFF 0 10mA input ON ON OFF 4 20mA input ON OFF ON 2 10mA input ON ON ON ANALOG CHANNEL 2 Input Range SW1 2 SW4 3 SW 4 4 0 10V input OFF OFF OFF 0 5V input OFF ON OFF 2 10V input OFF OFF ON 1 5V input OFF ON ON 0 20mA input ON OFF OF...

Page 44: ...5 3 5 ON OFF OFF 10 OFF ON OFF 15 ON ON OFF 20 OFF OFF ON 25 Factory set ON OFF ON 30 OFF ON ON 35 ON ON ON MAINTENANCE SHUTDOWN MAINTENANCE SHUTDOWN FUNCTION SW5 4 Unit will shutdown 72 hours after service time expired by gen erating an error OFF Unit will display warning but continues to operate Factory set ON FULL TANK BLOWDOWN FULL TANK BLOWDOWN FUNCTION SW5 8 Disabled OFF Enabled Factory set ...

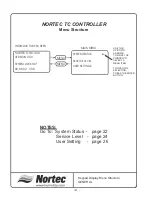
Page 45: ...ENU MENU USE THE UP DOWN ARROWS TO MOVE THE POINTER TO SELECT A MENU ITEM TO OPEN THE SELECTION PRESS THE ENTER BUTTON INTRODUCTORY SCREEN MAIN MENU Keypad Display Menu Structure GENERAL NORTEC TC CONTROLLER Menu Structure NOTES Go To System Status page 22 Service Level page 24 User Setting page 26 41 ...

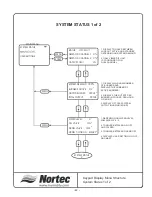
Page 46: ...IVE AND STANDBY DEPENDING ON SYSTEM DEMAND 2 ONLY VIEWED IF UNIT IS CONFIGURED FOR DUAL CHANNEL 1 DISPLAY WILL SHOW NUMBER OF BURNERS AND DISPLAYS THE NUMBER OF ACTIVE BURNERS 2 DISPLAYS THE OUTPUT PER BURNER IN POUNDS PER HOUR OR KG HR 3 DISPLAY OF TOTAL SYSTEM OUTPUT IN LBS HR KG HR 1 DEPENDING ON WATER LEVEL WILL DISPLAY 0 5 2 TOGGLES BETWEEN ON OFF AND PULSED 3 TOGGLES BETWEEN ON AND OFF 4 DIS...

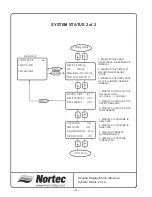
Page 47: ...O OPEN I CLOSED 1 DISPLAYS IF FEATURE IS SELECTED 2 DISPLAYS STATUS OF THE SAFETY SENSORS 2 DISPLAYS IF FEATURE IS SELECTED 3 DISPLAYS STATUS OF THE TANK SENSOR 3 DISPLAYS PRESENT BLOWDOWN RATE 4 DISPLAYS IF FEATURE IS SELECTED 3 DISPLAYS THE START DATE OF THE CURRENT SERVICE INTERVAL 2 DISPLAYS THE TIME LEFT BEFORE MAINTENANCE IS DUE LOOP BACK ENTER MENU MAIN MENU SYSTEM STATUS USER SETTINGS SERV...

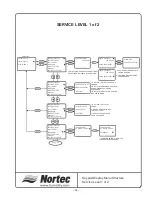
Page 48: ...ICE HISTORY FAULT HISTORY FAULT HISTORY FAULT HISTORY TANK DRAIN TANK DRAIN TANK DRAIN TANK PRE CLEAN TANK PRE CLEAN TANK PRE CLEAN SHORT CYCLE DELAY SHORT CYCLE DELAY SHORT CYCLE DELAY BURNERS BURNERS BURNERS 2 3 1 VERTICAL ARROW INDICATES ADDITIONAL SELECTIONS AVAILABLE BY SCROLLING 2 USE UP DOWN ARROWS TO CHANGE HOURS 3 PRESSING ENTER CLEARS THE REMINDER 1 1 1 2 2 3 3 1 DISPLAYS THE LAST 10 SER...

Page 49: ... 1 ENABLED BURNER 2 ENABLED BURNER 2 ENABLED BURNER 3 ENABLED BURNER 3 ENABLED BURNER 4 ENABLED BURNER 4 ENABLED BURNER 5 ENABLED BURNER 5 ENABLED BURNER 6 ENABLED BURNER 6 ENABLED SERVICE INTERVAL SERVICE HISTORY SERVICE HISTORY FAULT HISTORY FAULT HISTORY TANK DRAIN TANK DRAIN TANK PRE CLEAN TANK PRE CLEAN SHORT CYCLE DELAY SHORT CYCLE DELAY BURNERS BURNERS 1 VERTICAL ARROW INDICATES ADDITIONAL ...

Page 50: ...NAL SELECTIONS AVAILABLE BY SCROLLING SELECT LANGUAGE ENGLISH FRENCH GERMAN SELECT LANGUAGE ENGLISH FRENCH GERMAN DATE TIME UNITS LANGUAGE CONTROLS WATER MANAGEMENT CONTROL TYPE CAPACITY LIMIT CALIBRATE 1 SELECT UNITS LB HR KG HR CHANGE DATE MM DD YY CHANGE TIME XX XX 0335 0335 0335 PRESS ENTER TO SELECT UNITS PRESS ENTER TO SELECT LANGUAGE USER SETTINGS 2 Keypad Display Menu Structure User Settin...

Page 51: ...SERVICE LEVEL USER SETTINGS DATE TIME UNITS FTBD HOURS XXX FTBD HOUR XX BLOWDOWN RATE XX FLOAT CHECK HH MM FILL CORRCTN XX DRAIN CORRCTN XX DRAIN COOL SMART LANGUAGE CONTROLS WATER MANAGEMENT CONTROL TYPE CAPACITY LIMIT CALIBRATE 1 1 VERTICAL ARROW INDICATES ADDITIONAL SELECTIONS AVAILABLE BY SCROLLING USER SETTINGS PAGE 1 USER SETTINGS 3 0335 0335 0335 0335 0335 0335 0335 Keypad Display Menu Stru...

Page 52: ...S TO SET MAXIMUM CAPACITY PRESS ENTER TO CALIBRATE SIGNAL END ENTER MENU MAIN MENU SYSTEM STATUS SERVICE LEVEL USER SETTINGS CONTROL TYPE CONTROL INPUT TRANSDUCER INPUT CONTROL TYPE CONTROL INPUT TRANSDUCER INPUT DATE TIME UNITS LANGUAGE CONTROLS WATER MANAGEMENT CONTROL TYPE CAPACITY LIMIT CALIBRATE 1 1 VERTICAL ARROW INDICATES ADDITIONAL SELECTIONS AVAILABLE BY SCROLLING 0335 PRESS ENTER TO SELE...

Page 53: ...rious system parameters as the user scrolls through the lists For further details see specific section below Service Level password protected This section is specific to all service related activity For further details see specific section below User Settings password protected This section allows the user to set parameters specific to their requirements For further details see specific section be...

Page 54: ...number of active burners and the number of available burners Output Burner This field will display the actual output of steam generated by each burner kg hr or lbs hr Total output This field will display the total system steam output kg hr or lbs hr SCREEN 3 Water level This field displays the present water level detected by the float system Fill valve This field displays status of fill valve on o...

Page 55: ...he GSTC One for tank over temperature and one for stack over temperature Both sensors are wired in series Tank sensor This field displays the status of the tank sensor input If it is open the display will indicate 0 if it is closed the display will indicate 1 Closed indicates that the tank temperature is above 160ºF 70ºC This input is used for the keep warm feature and for activating the fill valv...

Page 56: ...UE XXX HOURS This field displays the time remaining until the next service interval To reset the MAINTENANCE due time enter the user code and select CLEAR REMINDER Service history In this area the customer can view the history of service maintenance performed on the humidifier SERVICE HISTORY X Y The service history stores the last 10 service periods X service occurrence where 1 is the most recent...

Page 57: ...the fault occurred Tank Drain The tank drain feature when activated will activate the drain valve for a fixed period of time depending on unit size To drain the tank press enter when CONTINUE is selected During the tank drain cycle the display will indicate the tank is draining and the amount of time remaining on the cycle To interrupt the cycle the unit must be switched off then on Must enter ser...

Page 58: ...0335 the individual burner can be highlighted Once ENTER is pressed the burner can be enabled or disabled Short Cycle Delay The short cycle delay feature can be used to reduce the amount of ON OFF cycles during operation The feature will cause a delay between cycles by forcing the system to wait a pre set period seconds before responding to a demand signal The delay can be set from 1 to 1000 secon...

Page 59: ...ection then enter the user code 0335 Press enter Use the UP DOWN arrows to select the month Pressing enter saves the setting and indexes the display to number of the month Use the UP DOWN arrows to adjust the number Pressing enter saves the setting and indexes the display to year Use the UP DOWN arrows to adjust the year Pressing enter saves the setting and returns the user to the previous menu Un...

Page 60: ... time Run time is measured in steam hours weighted run time hours and can be adjusted from 0 hours feature off to 400 hours in 25 hour increments Once the FTBD time has expired the controller will wait until the FTBD hour to initiate the cycle This prevents random drains at times when they would be inconvenient SELECT LANGUAGE ENGLISH FRENCH GERMAN SELECT LANGUAGE ENGLISH FRENCH GERMAN DATE TIME U...

Page 61: ... report any problems detected To set the time of day highlight the selection then enter the user code 0335 Press enter Use the UP DOWN arrows to adjust the hours 24 hour format Pressing enter saves the setting and indexes the display to minutes Use the UP DOWN arrows to adjust the minutes Pressing enter saves the setting and returns the user to the previous menu BLOWDOWN RATE CHANGE VALUE XX STEAM...

Page 62: ...odes permit Some process waters are very expensive so the customer may choose to temper the drain water through other means SMART The humidifier has a tank sensor that communicates the water temperature to the controller If the water is hot during drain cycles the fill valve will be activated This is the most water smart of the settings Control Input This section is used for configuring the contro...

Page 63: ...00 To adjust the maximum capacity highlight the selection then enter the user code 0335 Press enter Use the UP DOWN arrows to adjust the output between 25 and 100 Calibrate This selection is used to fine tune the operating range of the controller Some modulation signals are not precisely as stated e g a 0 10 controller could actually modulate over a 0 11 volt range This selection should only be us...

Page 64: ...tinuity between the switch with the wires off if so replace switch Ensure that there is not a strong positive pressure in the room holding the switch closed Consult factory FAULT BLOWER X RPM HIGH BHF X If the blower RPM is above the RPM tolerance for more than 10 seconds this fault is generated and the humidifier stops Check wiring to lead blower and ensure a good connection Check lead blower for...

Page 65: ...crease logically 1 2 3 4 5 If the water level increases and jumps a step 1 2 4 5 this fault will be generated The same holds for water level decreasing Float board defective Contact agent for replacement float board FAULT KEEP WARM TIME OUT TOO LONG TO HEAT KWF During a keep warn cycle if the tank temperature sensor does not open within a certain time window this fault is generated Ensure that the...

Page 66: ...X RPM LOW BLW X If a blower RPM is below the RPM tolerance limit this warning is generated If it is below the RPM tolerance limit for more than 10 seconds a fault will be generated SEE FAULT LIST WARNING MAINTENANCE TIME HAS ELAPSED HMW In the user menu the user sets the maintenance time Once this time expires this warning is displayed The maintenance time is measured in weighted operational hours...

Page 67: ... 63 ...

Page 68: ...8423 1 1 Dual 2528424 1 1 2 2 3 111 Stack High Limit Switch 1506745 1 1 1 1 1 1 112 Exhaust Manifold Gasket Single 1505973 1 Dual 1505942 1 2 2 3 3 113 Exhaust Manifold GS 100 1505875 1 GS 200 1505861 1 GS 300 400 1505843 1 1 GS 500 600 1505828 1 1 114 Flexible Gas Hose with fittings 1505960 1 2 3 4 5 6 115 Auxillary Drain Plug 1507043 1 1 1 1 1 1 116 Auxillary Drain Termination 1506925 1 1 1 1 1 ...

Page 69: ...9 Combustion Blower 110 120V Models 2524360 1 2 3 4 5 6 208 240V Models 1502289 1 2 3 4 5 6 130 Air Proving Switch 1504175 1 2 3 4 5 6 131 Gas Valve Assembly Natural Gas 1507713 1 2 3 4 5 6 Propane 1507714 1 2 3 4 5 6 132 Elbow Assembly for Air Intake 1504204 1 2 3 4 5 6 133 Burner Blower Gasket 1708208 1 2 3 4 5 6 Not Shown Bracket Fan Board Mount 1505899 1 1 2 2 3 3 Not Shown Fan Board 1505689 1...

Page 70: ... 66 ...

Page 71: ... 1 1 1 1 1 1 206 I O Board 1504760 1 1 1 1 1 1 207 Primary Transformer 110 120 V Models 1504859 1 1 1 1 1 1 208 240V Models 15067619 1 1 1 1 1 1 Fuse for Primary transformer 6 25 AMP 1505020 1 1 1 1 1 1 208 Ignition Control Module 110 120V Models 2525914 1 2 3 4 5 6 208 240V Models 1505987 1 2 3 4 5 6 209 Relay Mount Socket 1703250 1 1 1 1 1 1 210 Blower Relay 1453020 1 1 1 1 1 1 Not Shown Slotted...

Page 72: ... 68 16 19 20 21 22 23 24 25 26 27 28 29 30 31 32 34 33 35 36 37 38 39 40 41 43 44 2 11 7 42 6 8 9 12 13 14 1 15 3 18 17 4 10 5 GS Series Outdoor Cabinetry Exploded View ...

Page 73: ...s Door Tank 1507800 1 1 1 1 1 1 15 Left Panel Mini 1508096 1 Single 1508095 1 Double 1507861 1 1 Triple 1507804 1 1 16 Top Cap Assembly Mini 1508100 1 Single 1508099 1 Double 1507863 1 1 Triple 1507806 1 1 17 Display Bracket Holder 1506950 1 1 1 1 1 1 18 Female to Female Coupling 3 Dia 1508136 1 4 Dia 1508135 1 5 Dia 1507886 1 1 6 dia 1507880 1 1 19 Vent Pipe 24 Long 3 Dia 1508132 1 4 Dia 1508131 ...

Page 74: ...me Element 1506963 1 1 1 1 1 1 34 Rear Panel 1507785 1 1 1 1 1 1 35 Cross Member Mini 1506957 2 Single 1506979 2 Double 1506981 2 2 Triple 1506971 2 2 36 Mounting bracket float chamber 1508114 1 1 1 1 1 1 37 Front Frame 1506959 1 1 1 1 1 1 38 Right Panel Mini 1508087 1 Single 1508097 1 Double 1507862 1 1 Triple 1507803 1 1 39 Access Door Side 1507801 1 1507800 1 2 2 1507860 1 1 40 Base Assembly Mi...

Page 75: ...OR UNTILL SECURE 8 LOWER ENTIRE ASSEMBLY TO FLOOR AND ENSURE THAT IT IS STABLE 9 SHIMMING OF THE FLOOR BELLOW THE LEGS OF THE STANDS MAY BE NECESSARY TO ENSURE BALANCE OF THE HUMIDIIFER 10 THE STAND MAY BE PERMENANTLY FASTENED TO THE FLOOR VIA THE HOLES IN THE LEG SUPPORT PLATES GS100 GH2E40 14 85in 37 7 cm GS200 GH2E80 21 15in 53 7 cm GS300 GS400 36 7in 93 3 cm GH2E120 GH2E160 GS500 GS600 52 35in...

Page 76: ...ht In lbs kg 416 188 588 266 954 432 974 441 1340 607 1360616 Empty Weight In lbs kg 266 120 354 160 485 217 529 239 659 298 703 318 User level password Water consumption 25 bd Gallons litres 433 1639 866 3278 1300 4921 1733 6560 2166 8199 2600 9842 Tank Water Volume Gallons litres 18 71 29 111 58 221 55 210 84 320 81 309 Fill valve flow rates To tank Gallons litres To float chamber Gallons litres...

Page 77: ... by law No liability whatsoever shall be attached to THE COMPANY until said products have been paid for in full and then said liability shall be limited to the original purchase price for the product Any further warranty must be in writing signed by an officer of THE COMPANY THE COMPANY s limited warranty on accessories not of Walter Meier s manufacture such as controls humidistats pumps etc is li...

Page 78: ... Meier Climate USA Inc 826 Proctor Avenue Ogdensburg New York 13669 Walter Meier Climate Canada Ltd 2740 Fenton Road Ottawa Ontario K1T3T7 Tel 866 NORTEC 1 Fax 613 822 7964 northamerica climate waltermeier com www humidity com ...

Reviews: