background image

8

Using the provided hose clamp, secure the
flexible combustion air tubing from the burner to
the combustion air adapter.

CB-200A Cottage Base Installation
The CMF can be installed on a CB-200A cottage
base in certain applications, as described earlier
in these instructions   (See Table 1). Refer to the
Replacement Parts List for information on
ordering this base.  For installation, refer to the
instructions that are provided with the CB-200A
base kit.

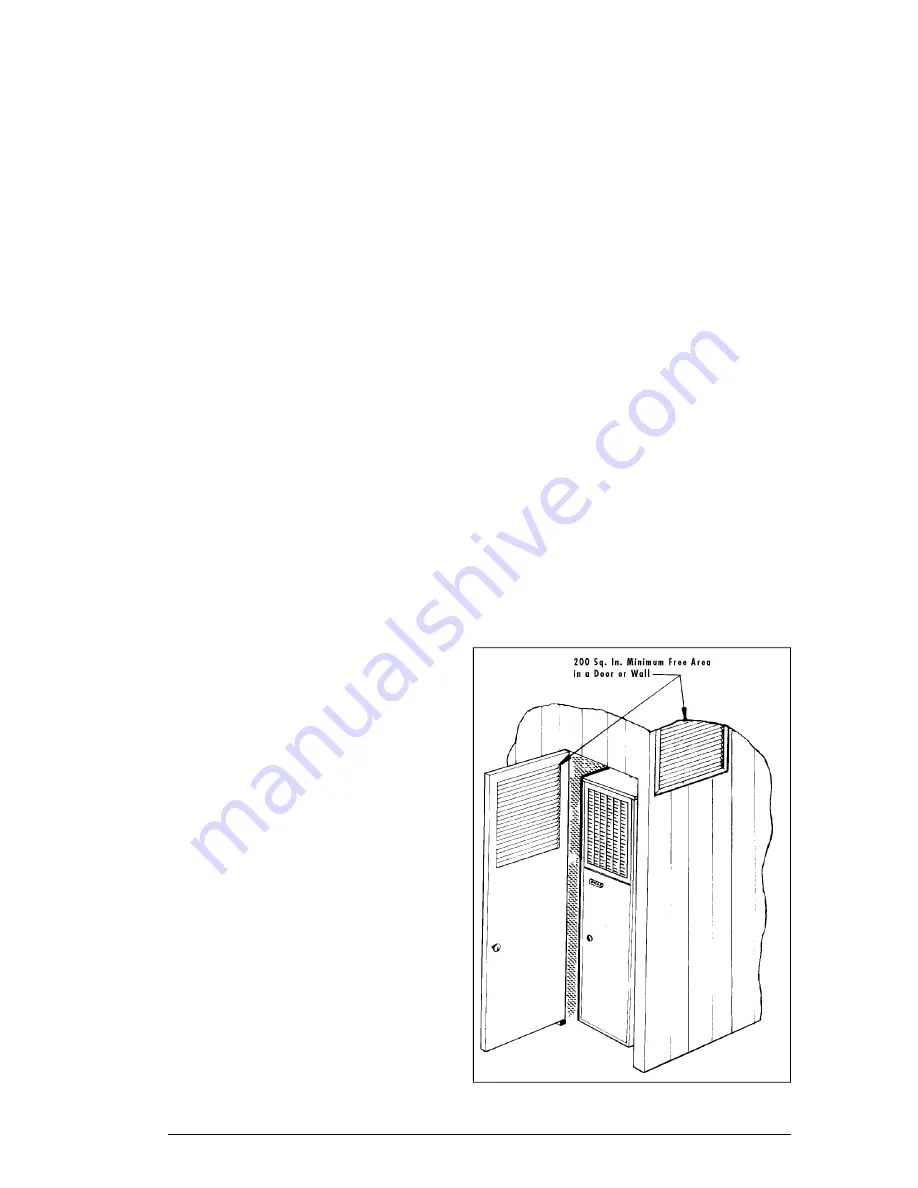
Closet Installation of the Furnace
Return air systems for a closet installation of the
furnace may consist of a grille or grilles in a
closet door or side wall that
communicates with the living area of the home.
(See Figure 6)  Return air openings should not
be located to draw air directly from a bathroom.
Grilles placed in a side wall require a 6" clear-
ance from the wall to the furnace so that the air
may enter the front grille of the furnace.  In
addition, all return air systems, including the
floor and ceiling systems, must meet the follow-
ing conditions:

A. The return-air opening into the closet,

regardless of its location, is to be a mini-
mum of 200 square inches.

B. If the return-air opening is located in the

floor of the closet (versus the vertical front
or side wall), the opening is to be provided
with means to prevent its inadvertent clo-
sure by a flat object placed over the open-
ing.

C. The cross-sectional area of the return

duct system (when located in the floor or
ceiling of the manufactured home) leading
into the closet is to be not less than 200
square inches.

D. The total free area of the openings in the

floor or the ceiling registers serving the
return air duct system is to be not less than
300 square inches.  At least one such
register is to be located where the likeli-
hood of its being covered by carpeting,
boxes, and other objects is minimized.

E. Materials located in the return duct system

shall have a flame spread classification of
200 or less.

F. Noncombustible pans having one inch

upturned flanges are located beneath
openings in a floor return duct system.

G. Hollow spaces used as ducts or plenums

for environmental air may contain mineral-
insulated metal sheathed cable, aluminum
sheathed cable, electrical metallic tubing,
rigid metal conduit, flexible metal conduit
not to exceed four (4) feet, or metal-clad
cables.  Wiring materials, fixtures, are to
be suitable for the expected ambient
temperatures to which they will be sub-
jected.

H. Gas piping cannot be located in the return

duct system.

 I. The negative pressure in the closet must

not be less than  minus 0.05 inches water
column with the closet door closed and the
fan operating at high speed.  A reading
below minus 0.05" indicates a dirty filter or
a restricted return air system.

Figure 6.  Closet Installation

Summary of Contents for CMF 100-PG

Page 1: ...ty direct vent furnaces used for manufactured housing rec reational vehicle and residential applications These furnaces are offered in either power gas designated by PG or power oil designated by PO models The power gas models are de signed for operation with either natural or pro pane LP gas The CMF series is convertible from power oil to power gas and vice versa Furthermore the firing rate of th...

Page 2: ...stallationofOil BurningEquipment ANSI NFPA70 National Electrical Code and NFPA 211 Chimneys Fireplaces Vents and Solid Fuel Burning Appliances The National Fuel Gas Code is available by writing American National Standards Institute Inc 1430 Broadway New York NY 10018 NFPA publications are available by writing National Fire Protection Association Batterymarch Park Quincy ME 02269 Combustion Air and...

Page 3: ...enting Requirements Manufactured Housing Installations For all manufactured housing applications the CMF furnace must be vented using the SRJ series roofjack The instructions for selecting the proper roofjack for your installation are detailed later in these instructions Venting Requirements Residential Installations WARNING This furnace is not to be connected to a chimney flue serving a separate ...

Page 4: ...in operation a Seal any unused openings in the venting system b Inspect the venting system for proper size and horizontal pitch as required in the ANSIZ223 1 NFPA54 NationalFuelGas Code and ANSI NFPA 31 Installation of Oil Burning Equipment and these instruc tions Determine that there is no blockage or restriction leakage corrosion or other deficiencies which could cause an unsafe condition c In s...

Page 5: ...e used Then mark the 2 1 4 x 7 1 4 opening for the combustion air duct Cut the opening for the feeder duct 14 1 8 x 14 1 8 in flooring cutting opening 1 larger all the waywillallowtheflangesontheundersideofthe base pan to fit in the opening If using the combustion air duct cut the opening for the duct about 1 8 larger than the marking on the floor Be sure to cut through all insulation and the bott...

Page 6: ...uct sys tem may be small and restrictive to proper air flow The MA 100 base provides approxi mately four 4 inches of additional plenum space before the discharge air enters the manu factured home duct system See Figures 4 and 5 Use the bottom panel of the base assembly to mark the 12 1 8 x 12 1 8 center opening for the feeder duct If using the combustion air duct select and knock out the combustio...

Page 7: ...ction Set the bottom base panel over the feeder duct Slit the corners of the feeder duct down to the top of the base While the top of the distribution duct is pulled up with one hand bend down each side of the feeder duct tightly to the base with the other hand Trim the metal to allow one inch flange over the top of the base and seal that flange with the metal tape Secure the top panel to the floo...

Page 8: ...t its inadvertent clo sure by a flat object placed over the open ing C The cross sectional area of the return duct system when located in the floor or ceiling of the manufactured home leading into the closet is to be not less than 200 square inches D The total free area of the openings in the floor or the ceiling registers serving the return air duct system is to be not less than 300 square inches...

Page 9: ...RJ Roof Jack Installation Refer to Figure 7 to determine SRJ roof jack and appropriate accessories required for your installation Furnace Base Package for O E M and replacement installations Model No MA 200 See Replacement Parts List for types of Base Packages offered Furnace Base Package for replacement installations Model No MA 100 See Replacement Parts List for types of Base Packages offered RA...

Page 10: ...ion at the top of the furnace Ease the roof jack assembly through the open ings The lower portion of the outer barrel must extend through the finished ceiling as indicated on the barrel Use sealant or caulking on the roof or adaptor to seal under the flashing of the roof jack assembly Extendtheventpipedowntoengagethelocking slot with the screw in the top of the furnace flue pipe Turn to lock and t...

Page 11: ...d all applicable local codes The materials used must be capable of withstanding exposure to temperatures of at least 700 F The CMF power gas units are fan assisted Installation of Ventilaire III or IV Air Quality Package Accessory The Ventilaire air quality packages are available to meet the ventilation requirements as outlined VENT PIPE 3 FEET MIN ROOF JACK ASSY ROOF CAP ASSY FLEX DUCT CEILING TR...

Page 12: ...off the main fuel supply if desired by the homeowner or required by local codes The proper gas supply line size can be determined using the gas piping chart shown in Table 3 Black pipe is the most practical for naturalgas becauseofthelargersizesrequired Copper tubing with an internal coating of tin is recommended for use with propane LP gas installations Compounds used on the threaded joints must ...

Page 13: ...sert the return line through the second opening in the duplex bushing If the bottom of the tank is lower than the pump intake the tube should be inserted three or four inches from the tank bottom If the bottom of the tank is higher than the pump intake the return line should extend not more than 8 inside the tank Hook Up Procedure See Figure 12 1 Use 3 8 O D copper tubing for the fuel line Cap the...

Page 14: ...VALVE IND L1 HSI HSIG L2 W PSI FSI GV PSO FSG C WHITE RED RED GREEN BLUE BLUE BLACK BLACK BLACK BLACK RED TERMINAL BOARD BUSHING LINE CORD BUSHING TO COMBUSTION MOTOR BURNER ELECTRICAL BOX BUSHING BUSHING OPTIONAL 24V COMMON FOR OPTIONAL ACCESSORY KITS C N L1 GROUND SCREW YELLOW CLOSED END CONNECTOR BLUE BLACK BLACK RED RED T T C W Figure 13 Wiring Diagram Model PGB DI Power Gas Burner Direct Igni...

Page 15: ...ccor dance with local codes or in the absence of local codes with ANSI NFPA 70 National Elec trical Code Use 14 2 Type NM cable with ground or conduit with single wires Secure the cable at the appliance using a code approved connector Line Voltage Connections Before connecting the power supply wiring become familiar with the wiring of this appliance by reviewing the wiring diagram shown in Figure ...

Page 16: ...the burner compartment 2 Connect R to one of the low voltage terminals on the burner 3 ConnectWtotheotherlowvoltageterminal on the burner FAN AND LIMIT CONTROLS Constant Blower Operation The button protruding through the cover of the fan and limit control provides either automatic operation of the blower through the thermostat or constant blower operation Pull the button out for automatic operatio...

Page 17: ...cause some gas is heavier than air and will settle on the floor WHAT TO DO IF YOU SMELL GAS Do not try to light any appliance Do not touch any electric switch do not use the phone Leave the building immediately then call your gas supplier If you cannot reach the gas supplier call the fire department C Use only your hand to push in and move the gas control lever Never use tools If the lever will no...

Page 18: ...essure of 3 5 in WC and a meter dial size of 1 cubic foot There times are based on LP gas at an average of 2 500 BTU per cubic foot a burner manifold pressure of 3 5 in WC and a meter dial size of 1 cubic foot Table 4 Natural and LP Gas Orifices 1 Shut off all other gas fired appliances except for any pilots 2 Startthefurnaceinheatingmodeandallow it to run for at least three minutes 3 Measure the ...

Page 19: ...the pressure gauge or U tube manometer from the gas valve and replace thetapplug Ensurethatthetapplugistight and not cross threaded Gas Burner Controls The gas valve lever can be set to ON or OFF as shown in Figure 16 When in the ON position gas flow through the gas valve is allowed when the valve is energized electrically When in the OFF position gas flow is completely shut off Combustion Blower ...

Page 20: ...erating Instructions as outlined previously in this manual to put the furnace into operation Adjusting the Burner The air shutter is factory pre set for installation in a given furnace as shown in Table 5 You should not need to adjust the air shutter setting of the gas gun burner except when converting thefiringrateofthefurnace Foryourinstallation check to ensure that the air shutter setting is co...

Page 21: ...er wire on the primary control Oil Burner Shutdown Procedure Set the room thermostat to OFF or its lowest setting Flame Adjustment 1 Turn the thermostat to a setting below room temperature to start the furnace 2 Allow the furnace to operate for about ten 10 minutes 3 Adjust the air shutter setting until 11 CO2 with a number zero smoke or less is achieved Furthermore the draft over the fire must be...

Page 22: ...er detected The control will attempt to re ignite the gas twice before locking out Once in lock out the control can be reset by interrupting the 24 volt power This can be easily accomplished by setting the thermostat below room temperature for at least forty five 45 seconds and then returning it to the desired setting If adjusting the thermostat does not reset the ignitioncontrol turnoffthepowerto...

Page 23: ...t switch in open mode d Check for clean air filter and proper airflow e Loose wire connections f Check for tripped manual reset aux iliary limit 3 120 volts is available to burner Test lamp does not light Remove junction box cover on burner check for a Loose wires b Defective transformer c Defective motor B Burner motor does not run no main flame 1 Defective centrifugal switch a Check the operatio...

Page 24: ...ts thermal load 5 Check thermostat anticipator 0 9 amps H Burner does not shut off Note Burner willstopwhenthedoorswitchisopen With the door open secure the door switch in the closed position by depressing the switch The means for securing the door switch must be removed once this testing has been completed 1 Disconnect the thermostat wires from TT connections on the burner junction box If the bur...

Page 25: ...u become familiar with the R7184 oil primary control For further service information please refer to Honeywell R7184 Installation Instruc tions 69 1233 and Beckett Technician s Quick Reference Guide RWB 61351 A Burner does not start with a call for heat 1 Check the electrical supply to the furnace 2 Be sure the furnace door switch is in the on position 3 Check for line voltage at the oil primary c...

Page 26: ...f not in restricted mode replace R7184 d If indicator light stays off while the flame is on check cad cell sighting for view of flame e If burner locks out check cad cell resistance f If burner keeps running system is Okay g If indicator light is off check cad cell assembly after disconnecting line voltage power C Burner will not start and indicator light is flashing at 2 second on 2 second off Ho...

Page 27: ......

Page 28: ...A Replaces7080620 Specificationsandillustrationssubject tochange withoutnoticeandwithoutincurringobligations PrintedinU S A 8 01 INSTALLER Please leave these installation instructions with the homeowner EFFICIENCY RATING CERTIFIED ama ...

Reviews: