background image

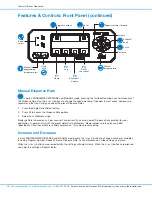
Home (F1)

In both PROGRAMMED DISPENSE and MANUAL mode, pressing the F1 button activates the “Retract to Home” 
screen. This step is required to remove the syringe barrel and / or when you want to prepare the unit for storage or 
shipping.
•  Choose Yes by pressing the F3 button. This will fully retract the plunger. 
•  Choose No by pressing the F4 button. This will return you to the Home screen. 

Jog (F2)

In PROGRAMMED DISPENSE mode, pressing the F2 button activates the Jog screen. Jog allows you to make 
small adjustments to the position of the plunger as it extends forward. Press and hold F2 until the “g” of Jog is 
highlighted. Use the FORWARD and BACK buttons to move the plunger slightly in either direction as needed.
In MANUAL mode, the F2 button is not active.

Features & Controls: Front Panel (continued)

Program number

Reset

Barrel 
select

Manual / 
programmed
dispense select

Cycle 

Start

Home

Jog

Shot count / 

Volume

Reset

shot count

Manual 
dispense rate

Decrease

Pullback / 
back

Increase

Deposit volume / forward

Pause

F1

F2

F3

F4

Ultimus IV Series Dispensers

14

www.nordsonefd.com   [email protected]

   +1-401-431-7000    Sales and service of Nordson EFD dispensing systems are available worldwide.

Summary of Contents for Ultimus IV Series

Page 1: ...Ultimus IV Series Dispensers Operating Manual Electronic pdf files of Nordson EFD manuals are also available at www nordsonefd com ...

Page 2: ...your authorized EFD distributor Detailed contact information is provided on the last page of this document The Nordson EFD Pledge Thank You You have just purchased the world s finest precision dispensing equipment I want you to know that all of us at Nordson EFD value your business and will do everything in our power to make you a satisfied customer If at any time you are not fully satisfied with ...

Page 3: ...F3 15 Reset Shot Count F4 15 Deposit Volume Forward 16 Pause 16 Pullback Back 17 Manual Dispense Rate 18 Increase and Decrease 18 Features Controls Back Panel 19 Attaching the Syringe Barrel 20 Attaching the Barrel Purging the Tip 20 Removing the Syringe Barrel 20 Program Function 21 How to Make a Bead 22 Modify Function 23 Operating Tips 24 Pre Load Adjustment 25 Syringe Barrel Filling 26 Input O...

Page 4: ... requirement for compressed air Programmable Pullback to eliminate oozing Menu driven touch pad 100 user defined memory cells for storing barrel size deposit volume dispense rate pause and pullback The Ultimus IV Dispensing System provides consistent results regardless of changes in fluid volume viscosity or temperature It is ideal for use with 2 part epoxies and other fluids with changing viscosi...

Page 5: ...n a slight electrical shock shut down all equipment immediately Do not restart the equipment until the problem has been identified and corrected MAXIMUM AIR PRESSURE Unless otherwise noted in the product manual the maximum air input pressure is 7 0 bar 100 psi Excessive air input pressure may damage the equipment Air input pressure is intended to be applied through an external air pressure regulat...

Page 6: ...kin can also cause toxic poisoning Any injury caused by high pressure liquid can be serious If you are injured or even suspect an injury Go to an emergency room immediately Tell the doctor that you suspect an injection injury Show the doctor the following note Tell the doctor what kind of material you were dispensing WARNING Medical Alert Airless Spray Wounds Note to Physician Injection in the ski...

Page 7: ... Keep clear of moving equipment Before adjusting or servicing moving equipment shut off the power supply and wait until the equipment comes to a complete stop Lock out power and secure the equipment to prevent unexpected movement Make sure spray areas and other work areas are adequately ventilated When using a syringe barrel always keep the dispensing end of the tip pointing towards the work and a...

Page 8: ...ng continuous trouble free use of this product Nordson EFD recommends the following simple preventive maintenance checks Periodically inspect tube to fitting connections for proper fit Secure as necessary Check tubing for cracks and contamination Replace tubing as necessary Check all wiring connections for looseness Tighten as necessary Clean If a front panel requires cleaning use a clean soft dam...

Page 9: ...tainer systems and barrel loaders with mild detergents only To prevent fluid waste use Nordson EFD SmoothFlow pistons Action in the Event of a Malfunction If a system or any equipment in a system malfunctions shut off the system immediately and perform the following steps 1 Disconnect and lock out system electrical power If using hydraulic and pneumatic shutoff valves close and relieve pressure 2 ...

Page 10: ...vals CE TUV RoHS WEEE China RoHS US Patent No 6 575 331 RoHS标准相关声明 标准相关声明 China RoHS Hazardous Material Declaration 产品名称 Part Name 有害物质及元素 Toxic or Hazardous Substances and Elements 铅 Lead Pb 汞 Mercury Hg 镉 Cadmium Cd 六价铬 Hexavalent Chromium Cr6 多溴联苯 Polybrominated Biphenyls PBB 多溴联苯醚 Polybrominated Diphenyl Ethers PBDE 外部接口 External Electrical Connectors X 0 0 0 0 0 O 表示该产品所含有的危险成分或有害物质含量依照EIP A ...

Page 11: ...ing The bore and stroke of the syringe barrel are used to calculate deposit volume For example the inside diameter of a 5cc syringe barrel measures 1 27 cm One step moves the plunger 0 00008 cm resulting in 0 0001 cc of fluid being displaced With a 3cc barrel it takes two steps to displace the same amount of fluid Flexible cable assembly The force of the stepper motor is transferred to the syringe...

Page 12: ...DISPENSE Mode In PROGRAMMED DISPENSE mode pressing the Cycle Start button once will return you to the Home screen Pressing it a second time will dispense a single deposit NOTE Pressing the Cycle Start button accidentally while already in a dispense cycle can abort your program Therefore we recommend that you use the foot pedal instead of Cycle Start to activate the dispense cycle Cycle Start in MA...

Page 13: ... not active Reset In PROGRAMMED DISPENSE mode press the Reset button to reset a range of variables depending on the screen selected Reset choices include syringe barrel volume level to 100 Dispense Volume to 0 cc Pause to 0 ms Pullback to 0 steps and Dispense Rate to the lowest minimum value possible depending on the selected syringe barrel size NOTE To reset Shot Count use the F4 button In MANUAL...

Page 14: ...ke small adjustments to the position of the plunger as it extends forward Press and hold F2 until the g of Jog is highlighted Use the FORWARD and BACK buttons to move the plunger slightly in either direction as needed In MANUAL mode the F2 button is not active Features Controls Front Panel continued Program number Reset Barrel select Manual programmed dispense select Cycle Start Home Jog Shot coun...

Page 15: ...ion page 23 Reset Shot Count F4 In both PROGRAMMED DISPENSE and MANUAL mode the F4 button is not active until you are in the screens noted below From the Shot Count screen F3 the F4 button allows you to reset the Shot Count to 0 From the Retract to Home screen F1 F4 allows you to select the No option From the Modify screen F4 allows you to adjust the syringe barrel specifications for stroke See Se...

Page 16: ...s as a settling period and allows the relief of back pressure between Forward and Pullback steps Pause is helpful when you are dispensing a large amount of material with a very small tip In most cases you will not need to use the Pause function In PROGRAMMED DISPENSE mode press the Pause button to insert an end of cycle pause Use the or buttons to set the Pause time In MANUAL mode the Pause button...

Page 17: ...ker fluids set the Pullback to 300 steps or more In general adjust Pullback in small increments of 50 steps at a time for best results Press the foot pedal to dispense and visually check the deposit Adjust Pullback again if necessary When setup is correct there should be no oozing or dripping The maximum number of Pullback steps is 20 000 The default setting for Pullback is 200 steps In MANUAL mod...

Page 18: ...give you better repeatability since they create less fluid compression This helps prevent oozing Increase and Decrease In both PROGRAMMED DISPENSE and MANUAL mode press the or button to change a number of variables including Program Number Deposit Volume Dispense Rate Pause milliseconds Pullback steps and more When the or buttons are pressed briefly the settings will adjust slowly When the or butt...

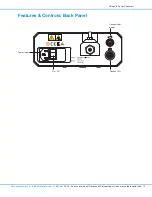
Page 19: ...On Off Connect I O Power Input Features Controls Back Panel Ultimus IV Series Dispensers 19 www nordsonefd com info nordsonefd com 1 401 431 7000 Sales and service of Nordson EFD dispensing systems are available worldwide ...

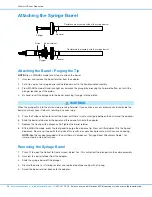
Page 20: ...hten the barrel retainer 8 Still in MANUAL mode press the foot pedal to purge the dispense tip Press until fluid almost fills the tip and dispenses Be sure not to overfill the tip since this results in excess back pressure which can cause oozing NOTE See the handout provided with your Ultimus IV dispenser Syringe Barrel Attachment Guide for simple step by step instructions Flexible cable assembly ...

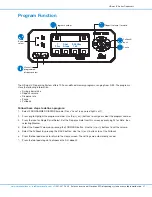
Page 21: ...pressing F3 for Rate then selecting Medium 4 Select the Deposit Volume by pressing the FORWARD button Use the or buttons to set the volume 5 Select the Pullback by pressing the BACK button Use the or buttons to set the Pullback 6 Press the foot pedal once to return to the Home screen The settings are automatically saved 7 Press the foot pedal again to dispense the first deposit Program Function Pr...

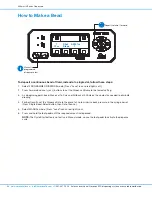
Page 22: ...f Lo to minimize back pressure in the syringe barrel Press Single Barrel Select button then Rate then Lo 5 Select MANUAL mode Press hand icon so red light is on 6 Press and hold the foot pedal until the required amount is dispensed NOTE The Cycle Start button is not active in Manual mode so use the foot pedal to activate the dispense cycle How to Make a Bead Manual programmed dispense select Depos...

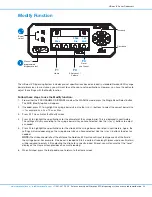
Page 23: ...uttons to adjust as needed 5 Press F4 to highlight the specifications for the stroke of the syringe barrel also listed in centimeters Again the settings will vary depending on the syringe barrel size you have selected Use the or buttons to adjust as needed NOTE The stroke should reflect the distance the Nordson EFD piston will travel to dispense all of the fluid in the syringe barrel For example i...

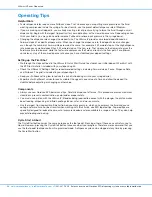
Page 24: ...nded settings including Forward steps Pause Dispense Rate and Pullback The grid is included in your dispensing kit Keep your Pullback setting low to reduce the risk of introducing air into your syringe barrel Experiment with different values for each variable Change only one value at a time and allow the deposit to stabilize before adjusting or changing another value Components Always use new Nord...

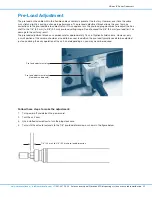
Page 25: ...ections to the pre load due to cable stretch If this happens turn the pre load plug clockwise to readjust the hex shaft to the 1 8 3 2 mm to 3 8 9 5 mm pre load setting range Do not exceed the 3 8 9 5 mm pre load limit as damage to the unit may result The pre load adjustment block can compensate for approximately 1 5 cc of hydraulic fluid volume However only a small portion of this volume should e...

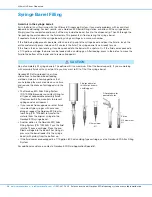
Page 26: ...t life you may want to fill to 1 2 of the syringe barrel CAUTION Nordson EFD offers productive air free alternatives to traditional barrel loading methods Here are a few suggestions that can help keep the work area clean save time and reduce the chance of entrapped air in the fluid The Nordson EFD Atlas Filling System P N 7022068 provides consistent filling for all types of nonpourable assembly fl...

Page 27: ...t dispense cycle This circuit is normally closed when a dispense cycle is not active Pins 3 and 4 of this circuit can be used to signal back to a host computer start another device in sequence or initiate other operations that need to be tied into the completion of the dispense cycle The circuit is an optically isolated transistor output designed to operate between 5 to 24 VDC 100 mA maximum Pin F...

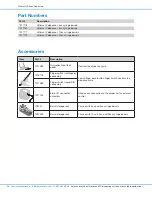
Page 28: ... switch rectangular connector Low voltage push button finger switch controls the dispense cycle 7017089 Finger switch round DIN connector 7017143 8 pin I O connector assembly Allows easy connection to the dispenser for external control 702241 Barrel storage rack For use with 3cc and 5cc syringe barrels 7022429 Barrel storage rack For use with 10cc 30cc and 55cc syringe barrels Ultimus IV Series Di...

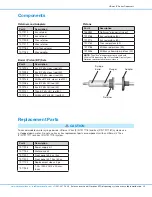
Page 29: ...3 5 10cc adapter 7017184 30cc adapter Barrel Piston BP Sets Part Description 7014103 3cc BP kits clear red 50 7012098 5cc BP kits clear red 40 7012116 10cc BP kits clear red 30 7012138 30 55cc BP kits clear red 20 7012086 3cc BP kits LB red 50 7012104 5cc BP kits LB red 40 7012127 10cc BP kits LB red 30 7012146 30 55cc BP kits LB red 20 Pistons Part Description 7360950 Optimum plunger all sizes 70...

Page 30: ... slower dispense rate The plunger has become disengaged from the piston To check unscrew the retainer from the adapter and turn the syringe barrel upside down If the syringe barrel falls off the plunger is disengaged See the handout Syringe Barrel Attachment Guide for step by step instructions on how to properly engage the plunger and piston Inconsistent shot size There is air in the syringe barre...

Page 31: ...Notes Ultimus IV Series Dispensers 31 www nordsonefd com info nordsonefd com 1 401 431 7000 Sales and service of Nordson EFD dispensing systems are available worldwide ...

Page 32: ...e of the equipment Before operation the user shall determine the suitability of this product for its intended use and the user assumes all risk and liability whatsoever in connection therewith Nordson EFD makes no warranty of merchantability or fitness for a particular purpose In no event shall Nordson EFD be liable for incidental or consequential damages This warranty is valid only when oil free ...

Reviews: